2026 Social Media Video Specs: Quick Reference Guide
You’re probably exporting a vertical clip, uploading it to one platform, then watching another one mangle the text, crop the face, or reject the file outright. The fix is simpler than most spec guides make it sound, social media video specs start with one master export, then platform-specific derivatives only where they’re needed.
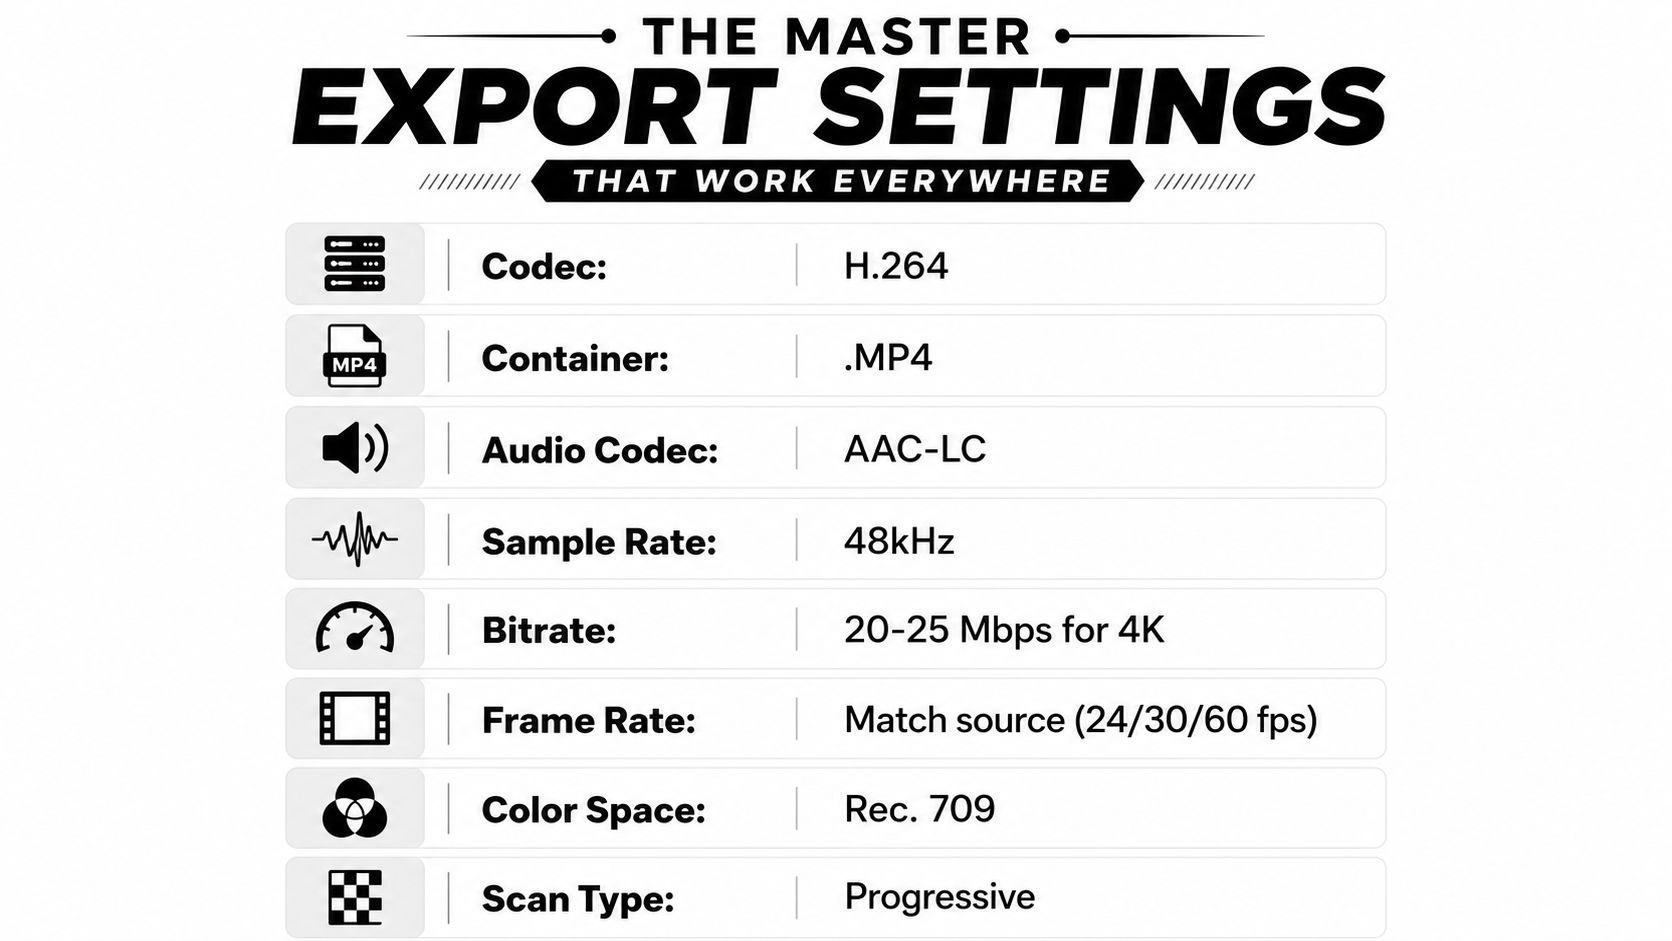
The safest default is MP4 with H.264 video, AAC-LC audio at 48 kHz, and a 24 to 30 fps export from a 1080p source. Build for vertical 9:16, 1080×1920 px first when the clip is meant for short-form feeds, because that’s the format designed to fill the phone screen and survive mobile-first viewing. That approach fits the repurposing workflow quso.ai users lean on every day, one source file, multiple platform-ready cuts, no extra round of editing.
Table of Contents
- The Master Export Settings That Work Everywhere
- Platform by Platform Video Specifications
- Safe Zones and UI Overlays You Must Avoid
- File Size Limits and Compression Strategies
- Repurposing Long Form Video Into Platform Ready Clips
- Common Export Mistakes and How to Fix Them
- Scheduling and Posting Notes for Each Platform
- Frequently Asked Questions About Video Specs
The Master Export Settings That Work Everywhere
Start with MP4, H.264, AAC-LC at 48 kHz, 24 to 30 fps, and 1080p as your master export baseline. That combination is the most reliable default for social platforms, and it keeps you out of the usual compatibility traps that eat time during upload and scheduling. For short-form work, I’d build the master as vertical 9:16 at 1080×1920 px, then create derivatives only when a placement needs a different crop.
Why one master file beats platform-by-platform exports
The practical win is consistency. If you export separately for every channel, you duplicate the same work, invite different compression artifacts, and make caption placement harder to manage across versions. One clean master gives you a source asset you can repurpose into Reels, Shorts, Stories, and feed placements without rebuilding the project each time.
Practical rule: export from the highest-quality practical source you have, then let the platform do less damage later.
That matters even more when you’re repurposing long-form footage. A webinar, podcast, or interview doesn’t need four separate edits just to fit four places. If the master is clean, the crop, caption treatment, and schedule-ready cut are much easier to handle downstream.
For a deeper pass on improving the file before it goes out, the technical breakdown in how to improve video quality is worth keeping open while you export. The goal isn’t to overcomplicate settings. It’s to land on one export preset that works, then move fast.
Platform by Platform Video Specifications
Different platforms accept different shapes, and that’s where uploads go wrong. The quickest way to stay sane is to compare them side by side, then choose the version that matches the placement instead of forcing a one-file-fits-all approach. Instagram Reels and Stories are built around vertical 9:16, with Reels supporting videos up to 90 seconds, Stories up to 60 seconds per frame, and Meta supporting uploads up to 4GB in practice for these placements. TikTok’s upload limit is cited at 500MB, which is why a file that sails through Instagram can still fail there unless it’s re-exported smaller.
Social Media Video Specs Quick Reference
| Platform | Aspect Ratio | Resolution | Max Duration | Max File Size |
|---|---|---|---|---|
| Instagram Reels | 9:16 | 1080×1920 | 90 seconds | 4GB |
| Instagram Stories | 9:16 | 1080×1920 | 60 seconds per frame | 4GB |
| Instagram Feed | 1:1 or 4:5 | 1080p baseline | Platform dependent | 4GB |
| TikTok | 9:16 | 1080×1920 | Platform dependent | 500MB |
| YouTube Shorts | 9:16 | 1080×1920 | Platform dependent | Platform dependent |
| YouTube standard | 16:9 | 1080p baseline | Platform dependent | Platform dependent |
| 1:1 or 16:9 | 1080p baseline | Platform dependent | Platform dependent | |
| X, Twitter | 1:1 or 16:9 | 1080p baseline | Platform dependent | Platform dependent |
| 9:16, 1:1, or 4:5 | 1080p baseline | Platform dependent | Platform dependent |
For frame rate context, frame rate explained simply is a useful refresher if you’re deciding whether a clip should stay at source cadence or be normalized during export. In practice, 24 to 60 fps sits in the common social-media range, but the safest everyday export baseline is still 24 to 30 fps for short-form repurposing.
Where each platform tends to trip people up
Instagram is usually forgiving on quality, but it’s unforgiving on layout. TikTok is stricter on file size, so a high-bitrate export that looks fine elsewhere can become the first rejected upload of the day. LinkedIn and X are less about immersive vertical viewing and more about making sure the video still reads cleanly in feed context, which is why square and 16:9 still matter there.
Operator note: pick the platform by placement first, then adjust aspect ratio second. File size comes third, because it’s often the hidden blocker.
If you’re using one source clip across all of them, the workflow is simple. Keep the master clean, then produce a vertical cut for short-form, a square or horizontal derivative for feed-heavy channels, and a compressed version for tighter upload limits. That’s the difference between a smooth publishing queue and a folder full of failed exports.
Safe Zones and UI Overlays You Must Avoid
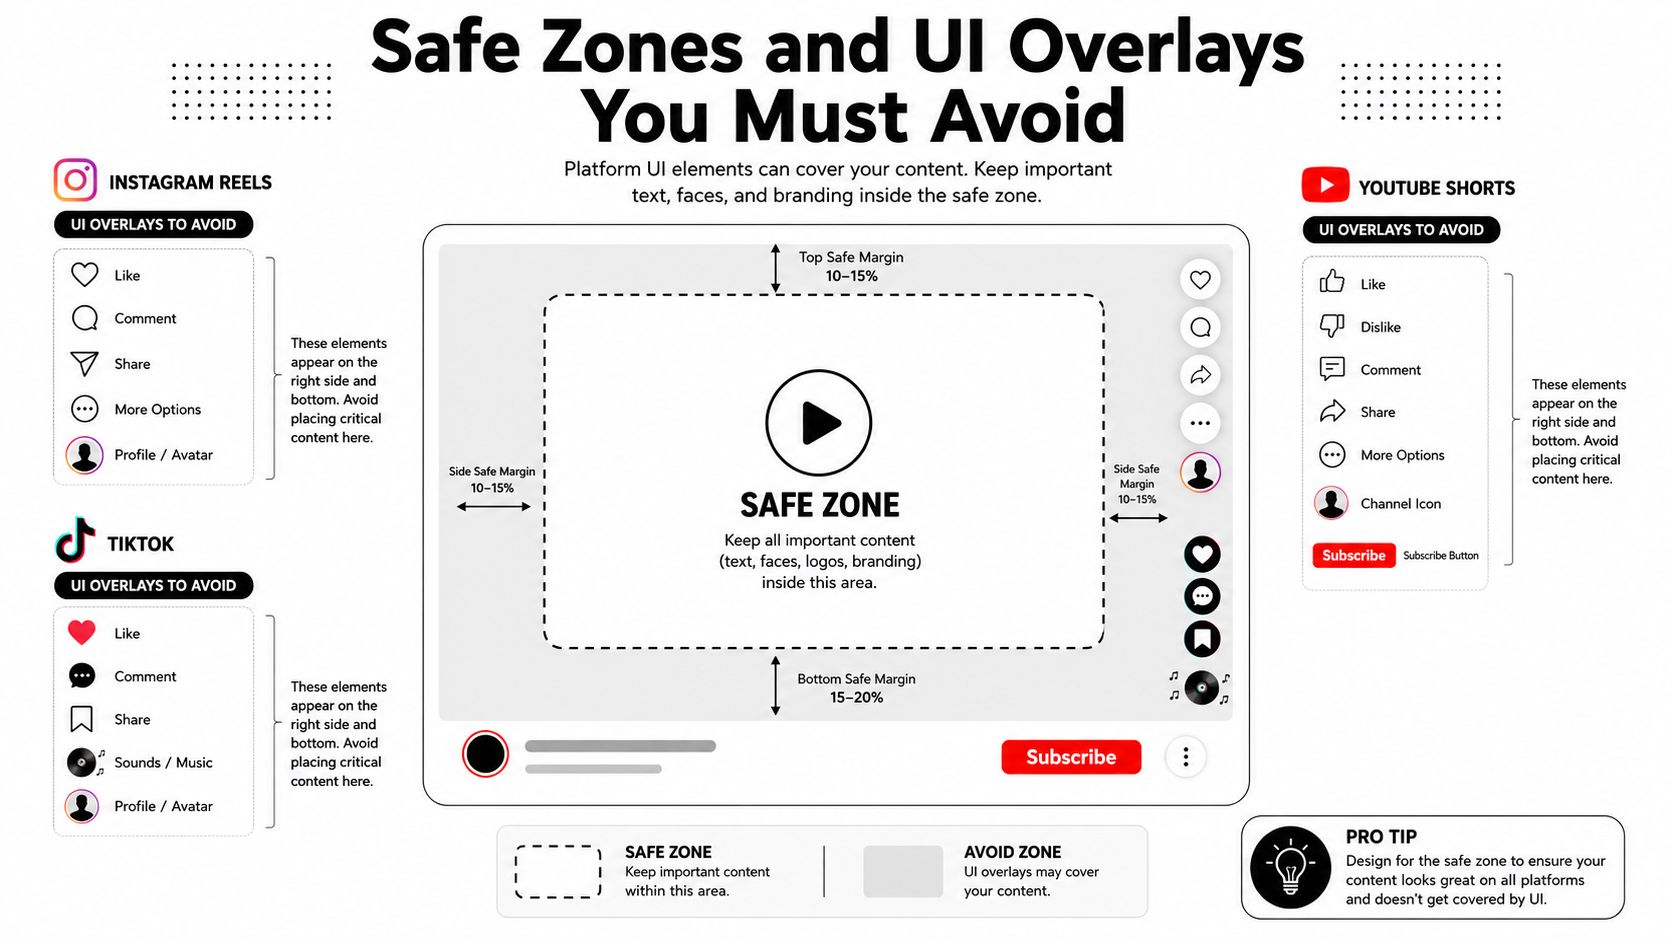
The most common short-form mistake isn’t bad resolution. It’s putting the important stuff exactly where the app UI sits on top of it. On Instagram Reels, the right side is crowded with engagement icons, the bottom gets caption and interface overlap, and the top gets crowded by profile and title elements. On TikTok, the right-side buttons, bottom caption area, and music bar can cover text, logos, and call-to-action lines. YouTube Shorts behaves similarly, with interface elements hugging the right edge and bottom of the frame.
Keep the core action inside the center window
For practical editing, treat the middle of the frame as the protected zone. A simple working rule is to keep key text, faces, and CTAs away from the outer edges, especially the right side and lower third. If you want a more conservative setup, leave roughly the outer margin clear and design captions inside the center band rather than letting them stretch to the edge.
That matters most when the clip is heavily captioned. Automated subtitles can look sharp in the edit and still become unreadable once the platform overlays kick in. Safe zone templates solve that by showing you where to park the text before you export, instead of discovering the overlap after scheduling.
How to use safe zones without slowing the edit
Use a template layer during the cut, not after the fact. Place your subtitles, logos, and CTA lines inside the central protected area, then preview the frame as if the platform UI were already there. That one habit prevents most of the crop-and-cover issues that make otherwise good clips feel sloppy.
Keep faces centered if you can, but don’t force the subject too low in the frame just to fill space. The cleaner the composition, the fewer surprises after upload. For repurposed clips, especially interview soundbites and demo segments, a simple crop strategy pays off fast.
File Size Limits and Compression Strategies
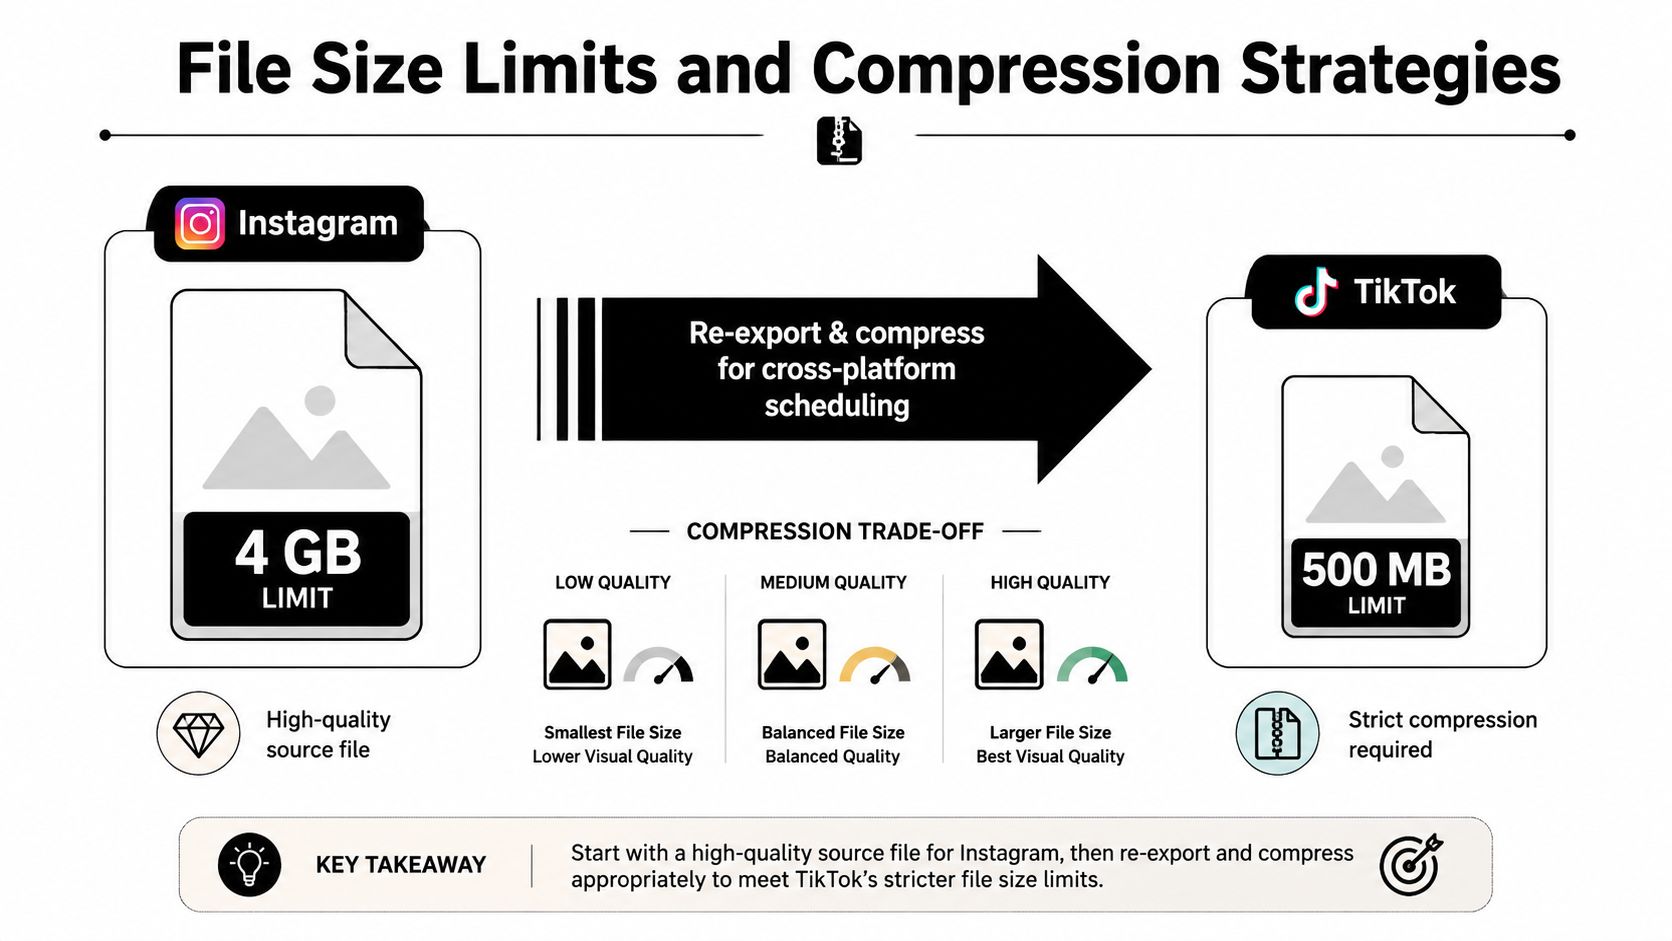
The file size gap across platforms is what breaks cross-posting. Instagram’s 4GB allowance gives you room for a high-quality source, while TikTok’s 500MB limit often forces a lower-bitrate export. That doesn’t mean quality has to fall apart, it means you need to compress with intent instead of blindly shrinking the file.
Compress for the platform that’s strictest
If the same clip has to live on both Instagram and TikTok, export to the stricter limit first. That usually means creating a smaller, cleaner derivative for TikTok, then using the same source asset to generate the Instagram version without re-editing the timeline. A single master file makes that practical, because you’re not reassembling the clip from scratch each time you change bitrate.
The easiest lever is bitrate. Lowering it reduces file size, but too much reduction makes text soft and skin tones muddy. If the video includes overlays, captions, or product screen recordings, that loss shows up fast. In those cases, it’s better to keep the image simple and let the compression do less damage.
Re-encode only when the file actually needs it
Not every export needs another pass. If the upload limit is already safe and the file looks sharp in preview, don’t chase a smaller number just because it sounds cleaner. Re-encoding only makes sense when you’re hitting a platform cap or when the export’s current bitrate is producing visible artifacts.
For upload-limit sanity checks, the notes in YouTube uploading limits are a useful reminder that platform constraints are not interchangeable. One platform’s acceptance doesn’t guarantee another’s. When the clip has to be scheduled everywhere, the strictest limit should shape the export.
Repurposing Long Form Video Into Platform Ready Clips
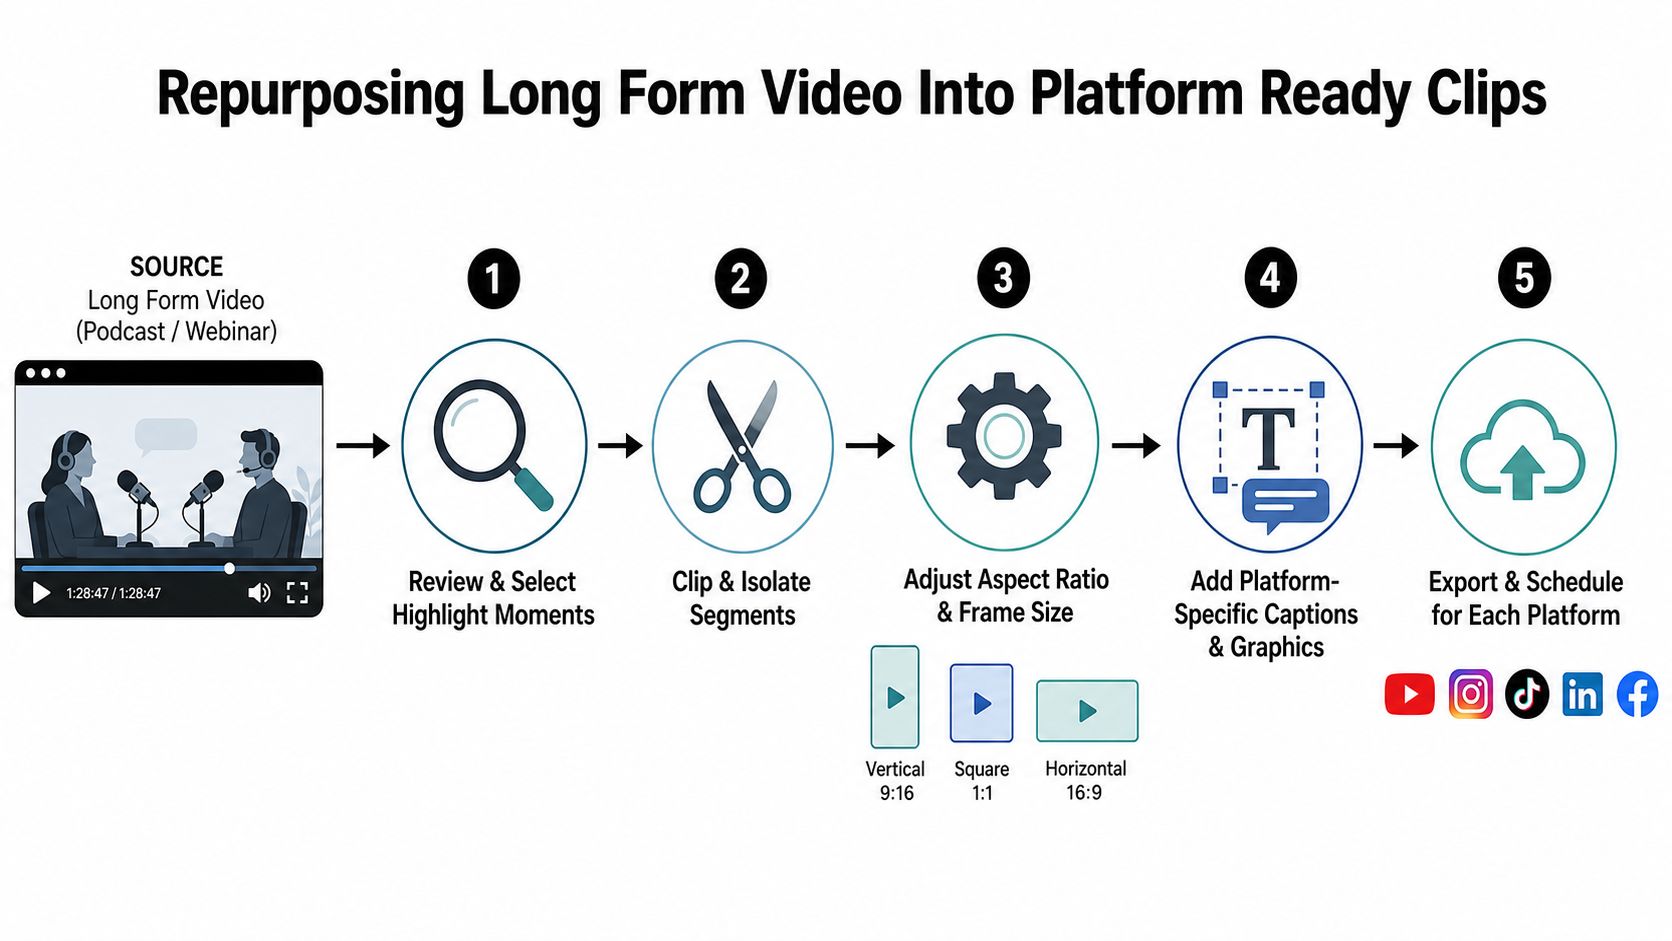
A single long recording can become several short clips if you treat it like a source asset, not a finished post. Start by selecting the strongest moments, the cleanest one-liners, the sharpest demo beats, or the clearest objections and answers. Then crop those moments into vertical 9:16, add captions inside the safe zone, and export platform-ready versions from the same core edit.
The workflow that saves the most time
- Review the full recording. Find the moments with a clear hook, a complete thought, or a strong visual demonstration.
- Clip the segment cleanly. Remove the lead-in and dead air so the short starts with momentum.
- Set the frame for the destination. Use 9:16 for Reels, Stories, TikTok, and Shorts, then reposition the subject so the important action stays centered.
- Add captions and graphics. Keep them inside the visible area so UI overlays don’t hide the message.
- Export and schedule. Create the platform-specific derivative, then queue it for publication without exporting each one manually.
That’s the point where a repurposing tool earns its place. quso.ai handles the long-to-short workflow by turning one upload into short-form clips with captions and scheduling, which is exactly the kind of system that keeps a weekly content pipeline from becoming a daily editing grind.
The cleanest repurposing system starts with one asset, one master crop, and one caption strategy.
For teams moving webinars, podcasts, or interviews into distribution, how to repurpose video content is the right companion piece to this workflow. The important shift is mental, not technical. Stop thinking in terms of single uploads, and start thinking in terms of reusable source footage.
Common Export Mistakes and How to Fix Them
Most failed uploads come from the same handful of mistakes. They’re easy to make because the file looks fine on your desktop, then falls apart after the platform processes it. If the video is cropped, blurry, or rejected, the symptom usually points straight to the cause.
The error, the cause, the fix
-
Wrong aspect ratio.
Symptom: black bars, cropped faces, or cut-off captions.
Cause: a horizontal edit was forced into a vertical slot, or vice versa.
Fix: rebuild the sequence in the correct target ratio before export. -
Unsupported codec.
Symptom: the file won’t upload or plays inconsistently.
Cause: the export used a less compatible codec instead of H.264.
Fix: re-export as MP4 with H.264. -
Audio mismatch.
Symptom: audio sounds thin, out of sync, or oddly processed after upload.
Cause: the file wasn’t exported in the standard social audio format.
Fix: switch to AAC-LC at 48 kHz. -
Frame rate mismatch.
Symptom: motion looks stuttery or unnaturally jerky.
Cause: the export rate doesn’t match the source or the platform-friendly range.
Fix: keep the export in the common 24 to 30 fps range unless the source demands otherwise. -
Too much downscaling.
Symptom: captions look soft and product details blur out.
Cause: the resolution was pushed too low for the amount of text on screen.
Fix: hold the export at 1080p when readability matters.
The pattern is simple. If the video fails, check the format first, then the crop, then the audio, then the bitrate. That order catches most of the headaches before you waste another round of scheduling.
Scheduling and Posting Notes for Each Platform
The export is only half the job. Once the file is queued, each platform still handles processing a little differently, and that affects timing, thumbnail choice, and how clean the post looks when it goes live. Instagram Reels may need a beat to finish processing, TikTok can hold a clip in review, LinkedIn tends to generate a thumbnail you may want to override, and X can behave differently with aspect ratio presentation depending on the feed context.
Check the post, not just the upload
Before publishing, confirm three things. The caption file is attached correctly if you’re using one, the thumbnail is intentional, and the description still reads well once the platform formats it. That matters because a technically correct upload can still look weak if the thumbnail crops the hook or the description gets buried.
Don’t trust the upload screen alone. Open the scheduled draft and verify the frame, the title treatment, and the first visible frame.
Scheduling tools help because they centralize the handoff. You can keep the same source asset, make platform-ready versions, and watch for the places where a file needs a different treatment before it goes live. That’s the key link between export settings and actual performance in the feed.
Frequently Asked Questions About Video Specs
Can I use the same video file for all platforms
Sometimes, but it’s usually a compromise. A vertical 9:16 file can work across short-form platforms, but feed-heavy placements and stricter file-size platforms often need a derivative.
What happens if my aspect ratio is slightly off
The platform usually corrects it for you, which often means cropping or adding space you didn’t want. Even a small mismatch can move text or faces into an unsafe area.
Do I need to re-encode videos that already uploaded successfully
Not always. If the file is accepted and looks clean, keep it. Re-encode only when you need a different file size, a different crop, or a more compatible format for another platform.
How do I check my video specs before uploading
Open the file properties in your system player or media inspector and confirm the container, codec, resolution, frame rate, and audio format. That takes less time than fixing a failed upload later.
What’s the difference between 1080p and 4K for social media
1080p is the practical baseline for most social placements. 4K gives you more source detail to work with during cropping and repurposing, but it doesn’t guarantee a better-looking final post after platform compression.
If you’re repurposing long video into short-form clips, keep one master export, crop for the platform, and let captions stay inside the safe zone from the start. If you want a faster way to turn webinars, podcasts, and interviews into schedule-ready social cuts, visit quso.ai and build your next batch from one source file instead of exporting each version by hand.