How to Create Reels on FB from Long Video in 2026
You’ve probably got the raw material already. A webinar recording, a podcast interview, a product demo, a customer testimonial. The question behind How to Create Reels on FB isn’t how to tap record. It’s how to turn that long video into a vertical Reel that’s clear, captioned, framed correctly, and ready to publish without getting buried by bad formatting.
Table of Contents
- How to Create Reels on FB
- What it actually takes to publish a Facebook Reel from a long video
- Prep your source footage before you touch the editor
- Upload and shape the Reel inside Facebook
- Frame, format, and respect the safe zones
- Add captions that survive muted playback
- Schedule and repurpose with quso.ai
- Pre-publish checklist and FAQ
How to Create Reels on FB
If you want the short answer, here it is: pick a strong spoken hook, crop the clip to vertical 9:16, trim it to a tight Reel length, add burned-in captions, keep text out of the UI-covered edges, then publish with the right audience and remix settings. That’s the workflow that ships.
Facebook Reels first launched in the U.S. on September 29, 2021, then expanded to more than 150 countries on February 22, 2022, which is why it now makes sense to build one repeatable short-form workflow instead of treating Facebook as a one-off experiment (Meta announcement). If you’re repurposing existing video, that matters.
Most creators get stuck because they treat Reels like an in-app recording feature. Operators treat them like a production pipeline. Source prep comes first. Then framing. Then captions. Then the distribution settings almost every tutorial skips.
For longer clips, 90 seconds is still a useful editing ceiling because Meta expanded Facebook Reels from 60 seconds to 90 seconds on March 3, 2023 (TechCrunch coverage). Even though Facebook’s current help docs now say Reels can be any length, that earlier shift gave creators a practical target for hook, context, and CTA.
If your source clip starts life on another platform, these YouTube-to-Facebook republishing tips are a useful companion.
Practical rule: Publishing is the easy part. Reach is usually won or lost before you hit upload.
What it actually takes to publish a Facebook Reel from a long video
The raw footage usually isn’t the problem. The problem is that long-form video was made to be watched differently. A webinar tolerates setup. A Facebook Reel doesn’t. You need a clip that lands its point early, survives muted playback, and still looks intentional after a vertical crop.
Start with the sentence that earns attention. For B2B clips, that’s often the moment a speaker names a mistake, pushes back on bad advice, or states an outcome plainly. Don’t lead with intro chatter, logo animation, or “thanks everyone for joining.” Those are the first cuts.
What to prepare before export
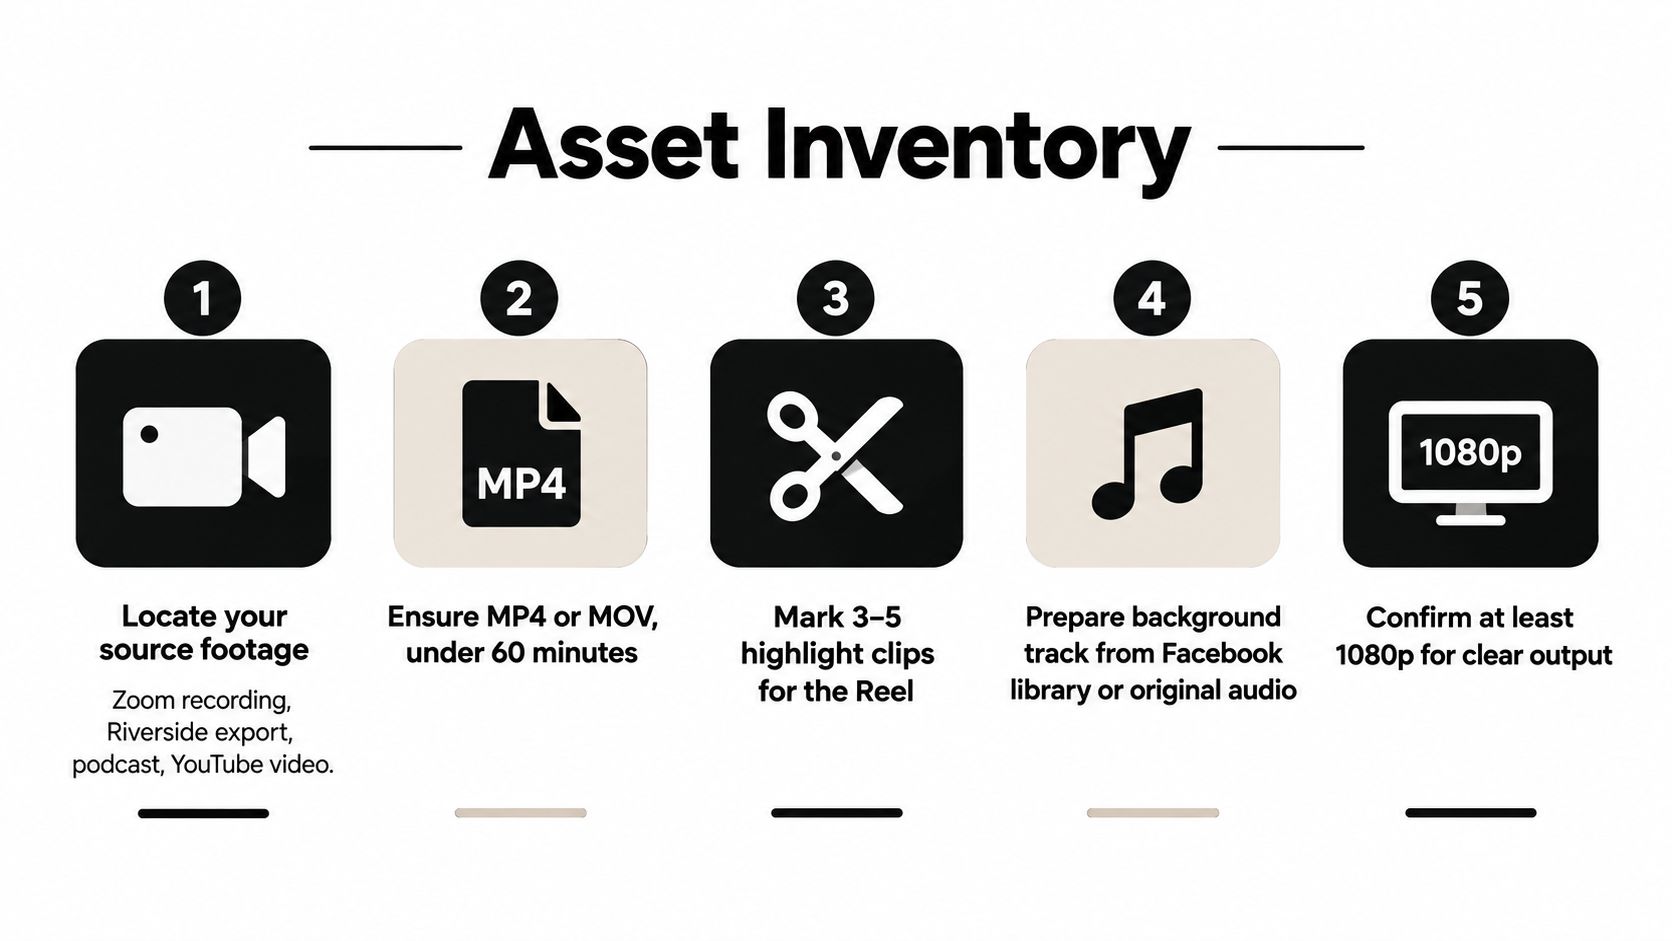
A clean Reel usually starts with a small working set, not your entire archive:
- Source file: Pull the original webinar, podcast video, Zoom recording, or VOD.
- Hook candidates: Mark a few moments where the speaker says something sharp enough to open the clip.
- Visual support: Note slides, gestures, product screens, or cuts to another speaker that can help hold attention after the opening line.
- Transcript or captions file: If you already have one, keep it nearby. It speeds up editing and review.
The point is to decide the clip before you enter Facebook’s editor. In-app tools are fine for finishing. They’re not where you should be hunting for a story.
What usually works from long-form content
Some source material adapts better than others:
| Source type | Usually works when | Usually fails when |
|---|---|---|
| Webinar | Speaker names a specific mistake or takeaway quickly | Clip depends on slides no one can read on mobile |
| Podcast video | Strong opinion or disagreement opens the segment | The payoff arrives too late |
| Product demo | One visible problem gets solved on screen | The clip needs too much explanation |
| Testimonial | Customer says the outcome in plain language | The answer is rambling and polite |
A Reel is not a summary of your long video. It’s a single moment with a job to do.
Prep your source footage before you touch the editor
Before you upload anything, check whether the footage can survive a vertical crop. That sounds obvious, but it’s where a lot of otherwise good clips die. If two speakers are far apart in a wide frame, or your screen share fills the whole scene, a 9:16 crop can turn a useful moment into a cramped mess.
Pick the hook by ear, not by thumbnail
The first sentence matters more than the first visual. A lot of editors still choose clips because the frame looks polished. On Facebook Reels, spoken payoff usually wins.
A few examples that tend to cut well:
- Webinar moment: “Creators don’t have a content problem. They have a packaging problem.”
- Podcast segment: “I disagree with the idea that more posting fixes weak messaging.”
- Customer interview: “We didn’t need more leads. We needed better follow-up.”
Those work because they create immediate tension. The viewer knows what the clip is about without waiting for context.
Check whether the visuals support vertical viewing
Look for moments with visual anchors. Hands moving. Slide changes. A second camera angle. A product screen with one obvious action. Those help the frame feel alive after you crop it.
If your source is mostly static talking head footage, that’s still usable. Just accept that your edit has to do more work through pace, captions, and cleaner trimming.
A simple prep pass usually includes:
- Marking chapter breaks: Good if you want several clips from one recording.
- Flagging dead air: Remove pauses, throat-clearing, and “let me back up” filler.
- Saving alternate openings: If the clip is promising, keep a few different first lines ready to test.
When you’re done, drop the source file, your hook options, and any existing transcript into one folder. That keeps the edit moving.
Upload and shape the Reel inside Facebook
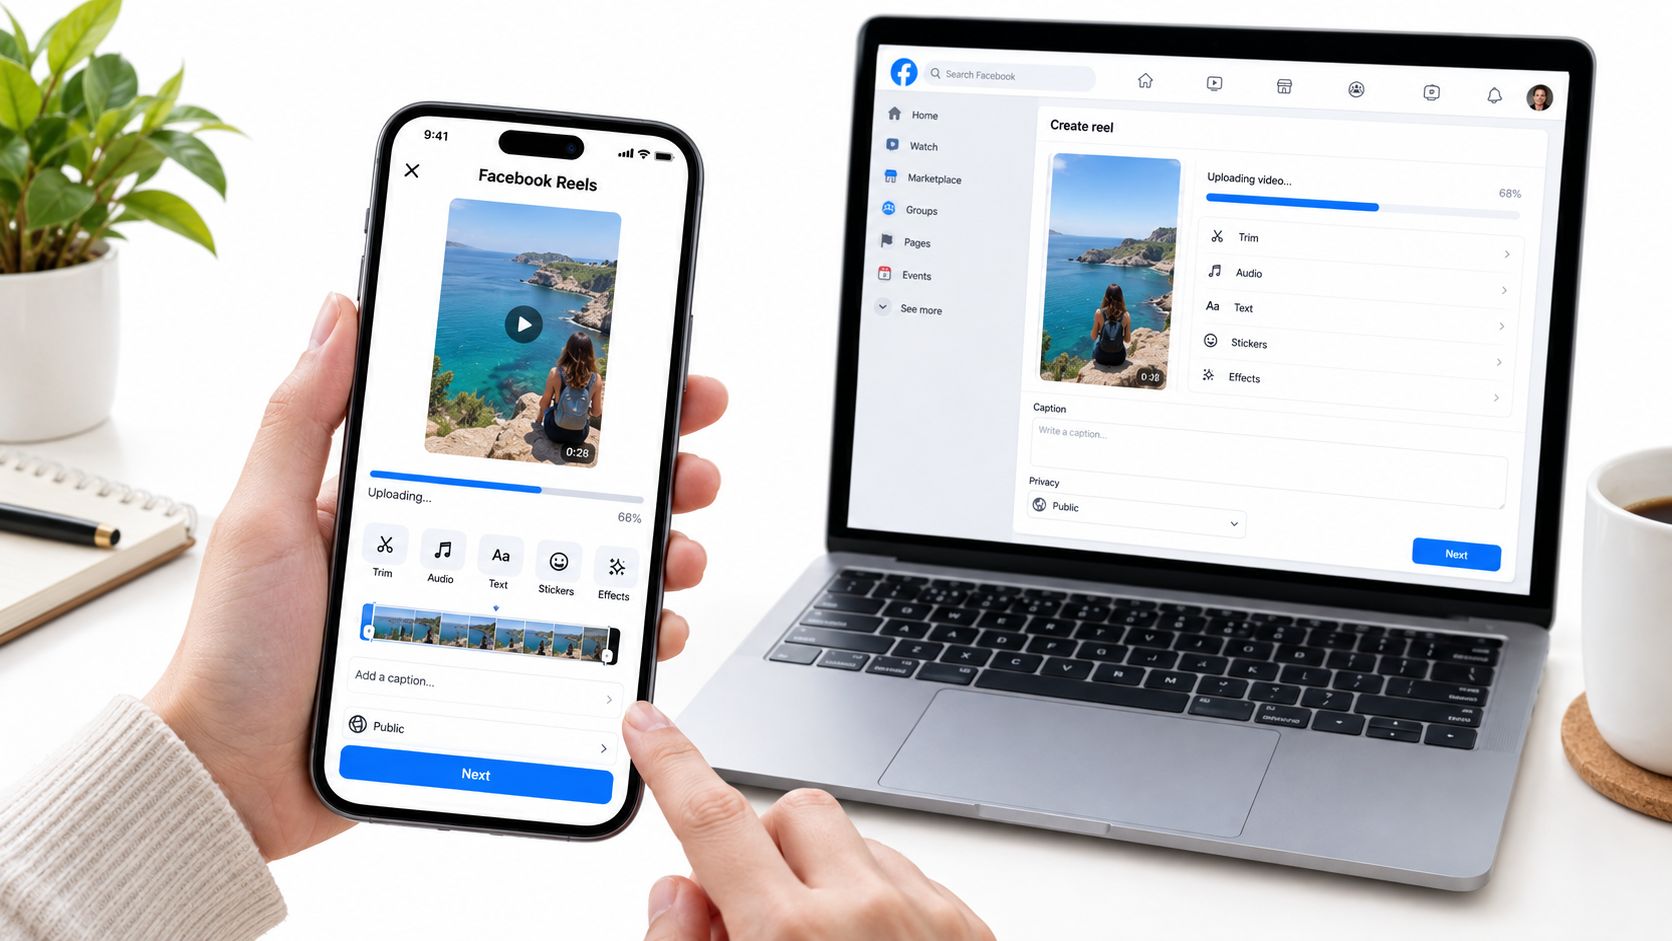
Once the clip is chosen, use Facebook’s Reel creation flow to upload the pre-trimmed video instead of recording from scratch. Facebook’s built-in creation tools also let you add text while creating a Reel and use a timer when recording video clips, which is helpful if you want to react on camera or layer in a quick face-to-camera intro (Facebook Reels help).
Reframe for vertical first
Facebook’s current Business Help Center says Reels can be any length or orientation, but it recommends 1080p resolution, 24–60 FPS, stereo audio, AAC LC codec, and 44.1kHz or 48kHz sample rate (Business Help Center specs). In practice, vertical still gives you the cleanest result for the full-screen feed.
If the source is wide, drag the frame so the speaker stays centered. If needed, pinch to zoom, but be careful. Aggressive zoom can make decent footage look soft fast.
A quick framing rule that holds up well:
- Keep the speaker’s eyes around the upper-middle area of the frame.
- Don’t pin text to the extreme top or bottom.
- Avoid trying to preserve the whole horizontal composition. Crop for clarity, not fairness.
Trim with less mercy than you think
Most long-form clips need a harder opening cut than expected. If the speaker takes too long to enter the point, trim right up to the useful phrase. You can leave a breath if it sounds unnatural without it, but don’t donate seconds to politeness.
Facebook’s trim controls are enough for final in and out points. Use speed adjustments lightly. If the original pacing is slow, tighter cuts usually work better than speeding a person up.
If you also manage Instagram and need account connections cleaned up before you publish cross-platform, this guide to linking Facebook to Instagram is worth bookmarking.
Here’s a quick product walkthrough if you want to see the Facebook Reel composer in action:
Clean up the audio
Voice should win. If the original recording has room hum, low-level hiss, or inconsistent levels, reduce the distraction before you add any music. Background tracks are fine when the source audio feels thin, but the voice still needs to sit in front.
If you’re publishing ad creatives, Meta’s Reels ad specs recommend 9:16, 1440 × 2560, support MP4/MOV/GIF, and allow a maximum file size of 4GB. Meta also says captions are optional but recommended (Meta Reels ad specs). For organic posting, lighter files are usually easier to work with.
Frame, format, and respect the safe zones
The technical setup that tends to be most reliable for organic Facebook Reels is vertical 9:16 at 1080 × 1920, exported as MP4 with H.264 video and AAC audio, with framing centered so the clip fills the screen cleanly (Hootsuite formatting guide). Even though Facebook accepts other orientations, full-screen vertical avoids the common problems: letterboxing, awkward crops, and weak visual presence.
The three zones that matter
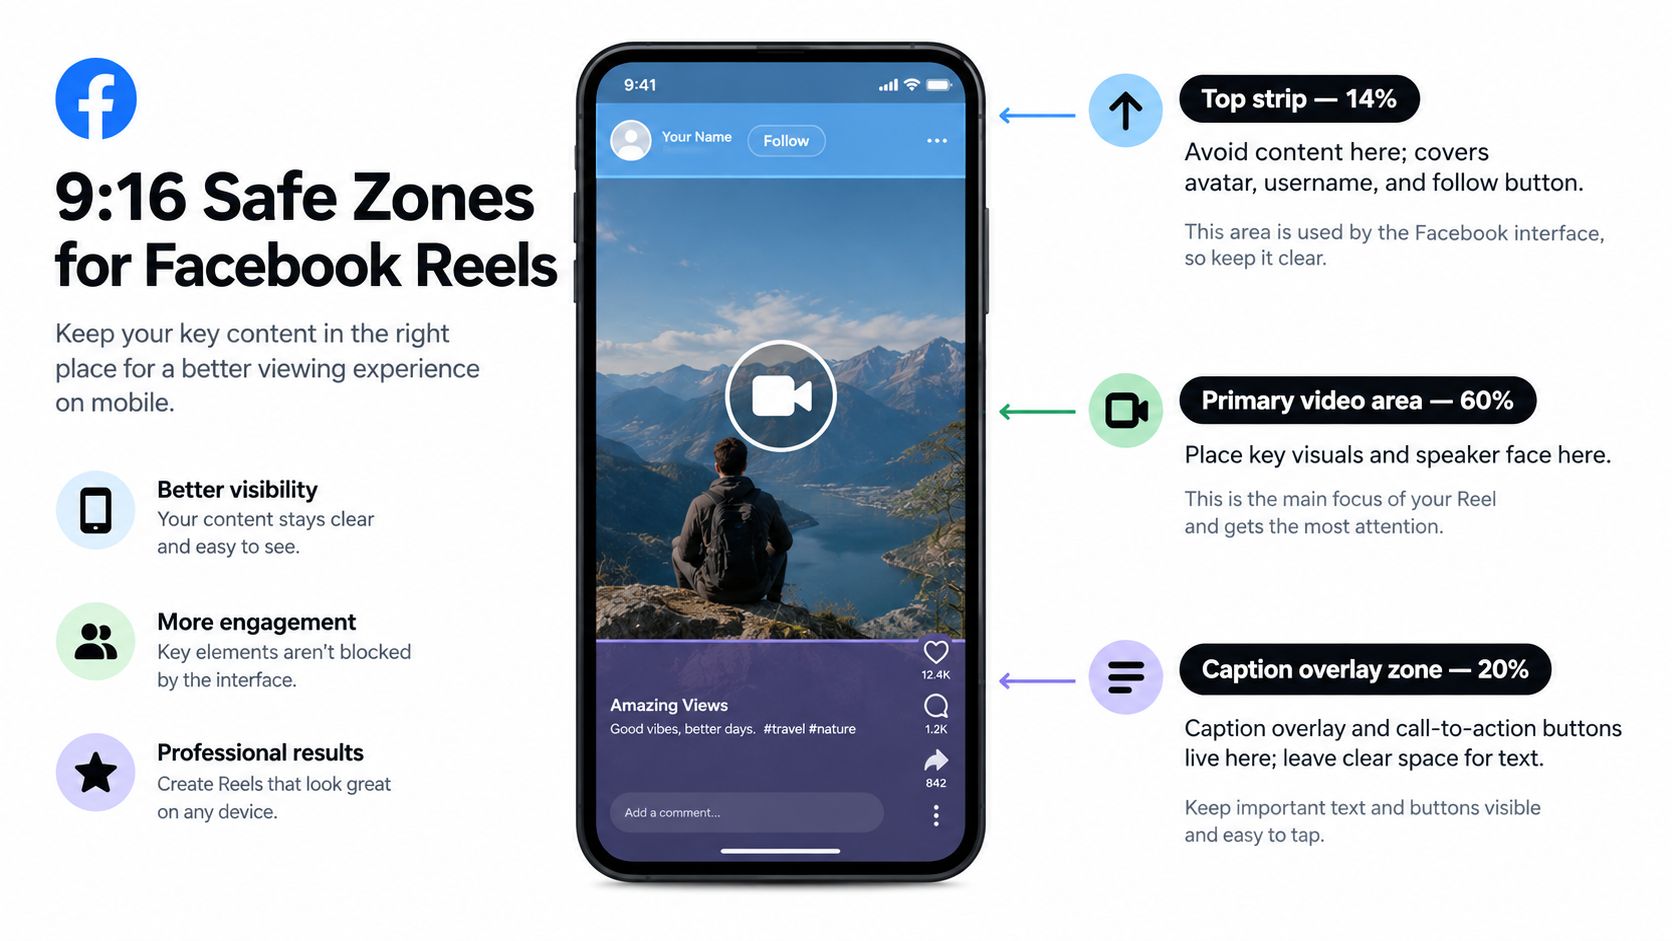
Think of the Reel frame as three working areas:
- Top strip: This area gets crowded by profile and interface elements. Don’t place headlines or logos here.
- Center band: The face, gesture, product action, or key visual should live here.
- Lower area above the action row: Best place for captions and short on-screen text, as long as you keep them lifted high enough to avoid buttons and overlays.
If you’ve ever had a good caption buried under UI, this is why.
What framing actually affects
Independent Facebook Reels analysis points to retention, not raw views, as the useful optimization lever, and notes that vertical Reels outperform square and horizontal formats on both reach and retention. The same guidance says early drop-offs in the first 0–3 seconds often signal a weak opening, and that watch time and retention curves are more predictive than simple view counts (Emplifi analysis).
That lines up with what operators see every week. If the face is too small, the text is too low, or the opening line is mushy, viewers leave before the point lands.
Keep logos, lower-thirds, and CTA text centered. The right edge can lose more usable space than people expect once interface elements show up.
Add captions that survive muted playback
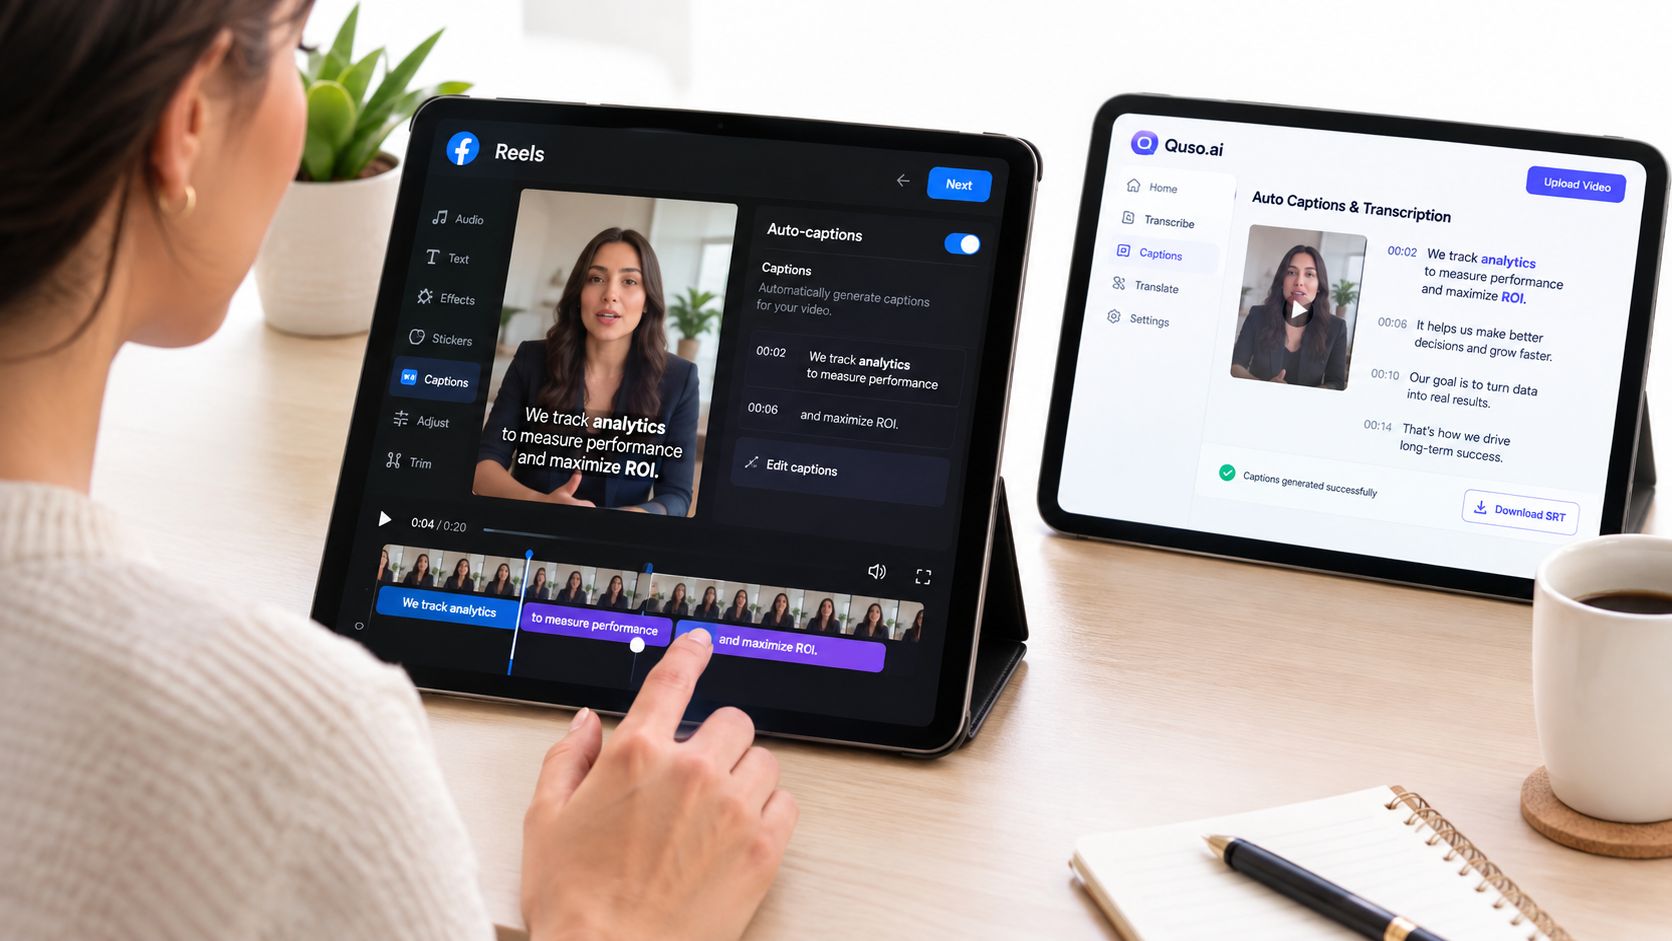
Captions aren’t decoration. On Facebook Reels, they carry comprehension, pace, and often the hook itself. Plenty of viewers start with sound off. If the clip only works when someone listens closely, you’ve made it harder than it needs to be.
Write captions for reading speed, not transcript purity
Good Reel captions are edited text, not untouched transcription. Clean up filler. Split long thoughts into readable beats. Keep each caption block short enough to scan instantly.
A practical formatting setup:
| Caption element | Working choice |
|---|---|
| Line count | Two lines max |
| Line length | Keep lines short enough to scan quickly |
| Case | Sentence case |
| Style | High contrast, usually white with dark shadow or solid background |
| Placement | Lower-middle of the safe area, not on the bottom edge |
If a speaker says, “We spent forty thousand dollars on this campaign and still missed the point,” the caption version might read:
We spent $40K on this campaign.
Still missed the point.
That lands faster on screen than voice alone. The viewer gets the argument immediately.
Built-in captions versus external captioning
Facebook gives you creation tools, but built-in captioning isn’t always where you want to finalize industry jargon, names, acronyms, or accented speech. If you’re cutting a lot of clips from long-form content, a dedicated social media subtitle maker is usually the cleaner route because you can generate, review, and place captions before the upload stage.
What matters more than the tool is the review pass. Fix timing if a key word appears late. If the hook relies on one phrase, that phrase needs to arrive exactly when it’s spoken, not a beat after.
Treat settings like distribution controls
Many tutorials stop once the clip looks finished. That’s the wrong place to stop.
Meta’s business help docs make it clear that when you publish a Facebook Reel, you choose who can see it, and if remixing is enabled on a public Reel, other people can reuse your audio or clips (Meta business help on audience and remix settings). That decision changes distribution and reuse. It isn’t admin clutter.
A few practical rules:
- Public-facing creator clip: Leaving remix on can help spread your audio or visual format.
- Client work or unreleased product footage: Turn remix off unless reuse is intentional.
- Network-limited post: If you keep visibility tighter, expect the clip to behave more like a closed distribution asset than a discovery asset.
There’s another platform change worth knowing. Meta’s Android help states that all video uploads were unified under the Reels format, which changes the practical workflow for anyone still thinking in separate “video post” and “Reel” paths (Meta Android help). Older tutorials are often outdated on this point.
Run copyright checks before publish
If you’re using licensed music, event footage, or repurposed clips, check rights before you post. Meta says creators can check for copyright violations before publishing in Meta Business Suite and both before and after posting in the Facebook mobile app (Meta help on copyright checks). That’s a useful final gate.
Operator habit: If a track looks questionable, swap it before publish. Don’t wait to see whether Facebook mutes it on some surfaces later.
Burned-in captions also do the accessibility work they should. They help deaf viewers, non-native speakers, and anyone scrolling in silence.
Schedule and repurpose with quso.ai
Publishing one Reel is manageable. Publishing a steady stream from a backlog of long videos is where teams often slow down. The fix is simple in theory and annoying in practice. Stop treating every Reel like a custom one-off.
A batch workflow works better. Pull one webinar, one podcast episode, or one interview. Identify several hook-led moments. Create multiple cutdowns. Queue them out so the content library turns into a publishing calendar.
If you want more angles on turning one asset into many, these strategic content reuse ideas are solid.
Why scheduling belongs in the same workflow
When clipping and scheduling live in separate tools, teams stall in handoffs. Files get exported, renamed badly, passed around, then forgotten. That’s usually where the content gap comes from.
One practical option is quso.ai, which is built for repurposing long video into short clips, adding captions, reframing for vertical formats, and scheduling social posts from the same workflow. If your input is a webinar recording, podcast video, YouTube link, or upload, that setup is much closer to how Reels get shipped than editing clips manually one at a time.
For a fuller walkthrough, the quso repurpose content guide covers the batch approach in more detail.
What good cadence actually looks like
The point of scheduling isn’t to be “always on.” It’s to remove friction.
- Batch the source review: Find several usable moments from one long video.
- Package each clip differently: Change the hook, crop, or caption emphasis rather than posting near-duplicates.
- Queue the output: Put clips into specific slots so the backlog turns into a runway instead of a folder.
If the source material is already recorded, repurposing is usually the fastest path to consistent Facebook Reels.
Pre-publish checklist and FAQ
Run this before every Reel goes live:
- Check the frame: Vertical 9:16 still gives the cleanest full-screen result. Make sure there’s no awkward horizontal letterboxing.
- Check the caption placement: Keep text clear of bottom overlays and edge collisions.
- Read the first line aloud: If the hook doesn’t name a pain point, conflict, or outcome quickly, cut again.
- Review the publish settings: Confirm audience, remix, and copyright checks match the intent of the post.
- Schedule if needed: If your viewers are elsewhere, queue it instead of posting live just because the file is ready.
FAQ
Can I upload a Reel to Facebook from my camera roll?
Yes. You can upload an existing video through Facebook’s Reel creation flow instead of recording inside the app.
Do Facebook Reels have to be vertical?
No. Facebook says Reels can be any length or orientation in its current Business Help Center specs, but vertical 9:16 is usually the right choice for full-screen viewing and cleaner presentation.
How long should a Facebook Reel be?
Facebook’s current help says there’s no minimum or maximum length requirement for Reels. In practice, many operators still cut tighter clips for easier consumption, and 90 seconds remains a useful upper editing target because Meta expanded the previous cap to that length in 2023.
Can people reuse my Facebook Reel?
Yes, if remixing is enabled on a public Reel, other people can reuse your audio or clips. Check that setting before publishing.
Can I add captions to a Facebook Reel?
Yes. You can add text in Facebook’s creation flow, and many creators also use external captioning tools to get cleaner subtitles, better placement, and easier editing before upload.
If your real problem isn’t recording a Reel but turning long videos into Facebook-ready clips consistently, quso.ai handles the parts that usually slow teams down: clipping, vertical reframing, burned-in captions, and scheduling. It’s a practical way to turn webinars, podcasts, and demos into a repeatable Reel pipeline instead of another half-finished content folder.