Social Media Marketing Workflow That Actually Scales

Your team has a full webinar, podcast, or customer interview ready to publish, but Monday still starts with the same scramble: someone hunts for the original file, someone else asks who approves the captions, and the scheduler has no platform-specific copy. A practical social media marketing workflow fixes that by turning one raw recording into a controlled pipeline with clear owners, review rules, and a queue the team can maintain.
The operating principle is simple: ship only what the team can review, publish, and learn from. More automation won’t help if intake is messy, approvals are vague, captions sit under platform controls, or clips age in the queue before anyone publishes them.
Table of Contents
- What a Social Media Marketing Workflow Actually Does
- Stage 1 Content Intake and Triage
- Stage 2 Repurposing Long Video Into Short Clips With Captions
- Stage 3 Approval Without Bottlenecks
- Stage 4 Scheduling and Publishing Across Platforms
- Stage 5 Measure, Iterate, and Avoid Common Failures
- FAQ on Building a Social Media Marketing Workflow
What a Social Media Marketing Workflow Actually Does
A social media marketing workflow moves content through five stages: intake, repurpose, approve, schedule and publish, then measure. The process starts by collecting raw footage and ideas in one intake queue, converting suitable material into platform-ready clips, routing each post through the right review threshold, scheduling approved assets, and feeding performance insights back into the next planning cycle. A unified workflow matters because the average social media manager now handles 5.2 platforms, compared with 3.8 in 2023, according to social media scheduling statistics from ScheduleWave.
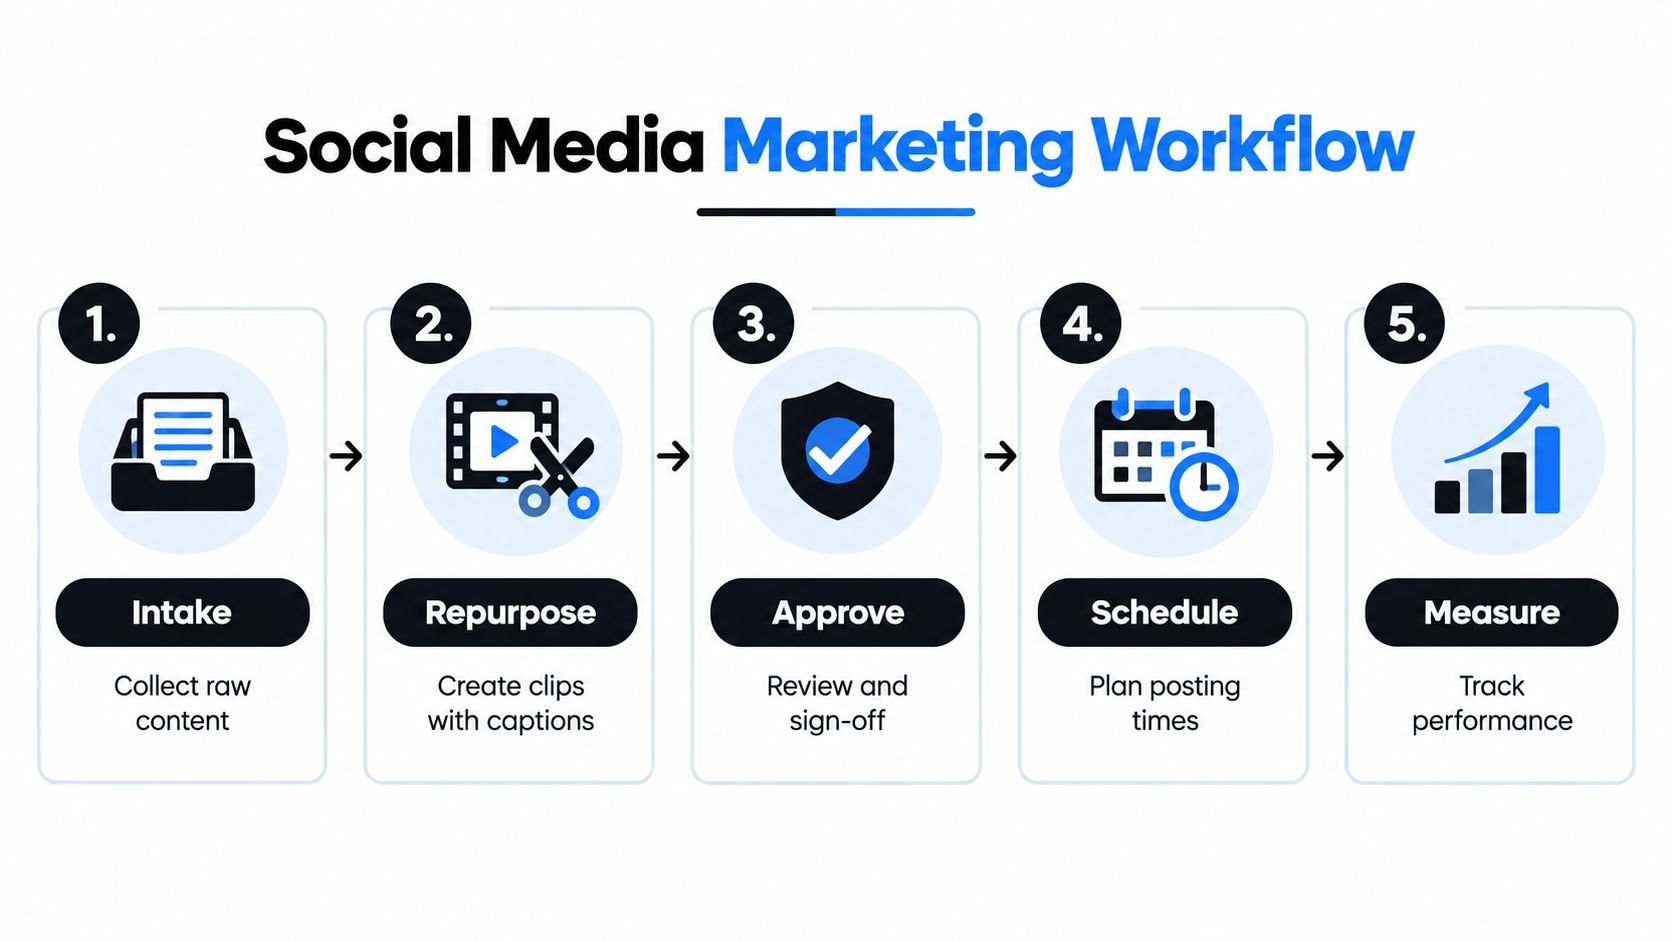
Start Monday with the queue, not a blank document. Every item should have a source asset, a proposed angle, a target audience, and an initial status such as New, Needs Triage, Ready for Repurposing, In Review, Approved, Scheduled, or Measured. That status label tells the next person what to do without another meeting or chat message.
The pipeline your team should see
Use one editorial view for raw recordings, clip candidates, approval work, scheduled posts, and reporting notes. A SMS marketing workflow engine offers a useful comparison here, because the same operational principle applies across channels: a trigger should create a visible next action, not another untracked request.
Keep the intake queue deliberately narrow. A recorded demo might produce a product education clip, a customer objection clip, and a founder perspective clip. It shouldn’t automatically become a dozen posts just because the tool can create them. The workflow earns its value when each output has a reason to exist, a destination, and an owner.
Stage 1 Content Intake and Triage
Intake is a filter, not a suggestion box. Before anyone edits, the submission needs five fields: source asset, intended goal, target platforms, owner, and deadline. Add the proposed content pillar and any relevant context, such as product version, campaign, speaker, or customer permission, so the editor isn’t forced to reconstruct the brief from a scattered conversation.
Run a short Monday triage meeting with a three-bucket board in quso.ai: Auto-approve, Flag, and Kill. The meeting shouldn’t become a creative workshop. Its job is to decide whether each item has enough value and operational clarity to enter production.
| Bucket | Criteria | Action | Owner |
|---|---|---|---|
| Auto-approve | Existing pillar content, scheduled recordings, clear goal, and usable source asset | Move directly to repurposing | Content operator |
| Flag | Off-brand topic, weak hook, missing caption file, unclear audience, or uncertain platform fit | Return for clarification or revise the brief | Content lead |
| Kill | Duplicate angle, no distribution path, no owner, or no meaningful audience problem | Archive and record the reason | Marketing manager |
A strong intake form prevents the most expensive kind of rework: editing an asset that never had a distribution decision. If the team can’t name the audience, destination, and owner, the item stays in Needs Triage.
For a deeper operating model, use this content creation workflow guide alongside the board. The handoff rule is strict: only items with an owner, deadline, and platform list move to Stage 2. That rule may feel restrictive, but it stops the repurposing queue from filling with attractive ideas nobody is accountable for shipping.
Stage 2 Repurposing Long Video Into Short Clips With Captions
Repurposing works best as a sequence of decisions, not a single “make clips” command. Start with hook-first scoring. Keep candidate segments where a strong claim, useful answer, or clear visual lands immediately. If the first three seconds contain setup with no tension or payoff, either cut deeper into the recording or reject the segment.

A repeatable clip pass
- Select the idea. Identify the one claim, objection, lesson, or moment the viewer should remember. Don’t combine unrelated points to preserve runtime.
- Trim for the destination. Treat platform length as a starting constraint, not a promise of performance. One study found an inverted U-shaped relationship between video length and engagement, with an optimal length of 34.69 seconds in that research context, as reported in this video engagement study. The same source summary reports that TikTok videos between 15 and 30 seconds reached a 6.00% engagement rate, while videos between 120 and 180 seconds earned the highest median views, at 11,136. Those results point to a practical trade-off: trim for the outcome you’re pursuing, whether that’s interaction or reach.
- Generate and edit captions. Use auto-captioning for the first draft, then remove filler, correct names and terminology, and rewrite line breaks so the viewer can scan the message. Oakland’s social media accessibility guidance recommends open captions because auto-captions can be inconsistent, and it recommends a transcript in the post or through a link for longer or complex content.
- Check the safe zone. Keep titles, captions, and key text inside the central 80 percent of the vertical frame. Usernames, action buttons, interface labels, and other overlays can cover text placed too close to the edges. Review the rendered export on the actual platform preview, not only in the editing canvas.
A repurposing system should produce variants, not identical reposts. Change the opening line, caption emphasis, or call to action when the platform serves a different job in the funnel. Resources on how to repurpose content for maximum reach are useful for expanding one source asset without treating every channel as interchangeable.
The queue discipline is fixed: a clip exits this stage only when it has a final caption file and an assigned platform. In quso.ai, the repurposing flow brings clipping and caption generation into one pass, which can reduce handoff friction, but the operator still owns the editorial decision. Automation creates candidates. It doesn’t decide which idea deserves distribution.
Stage 3 Approval Without Bottlenecks
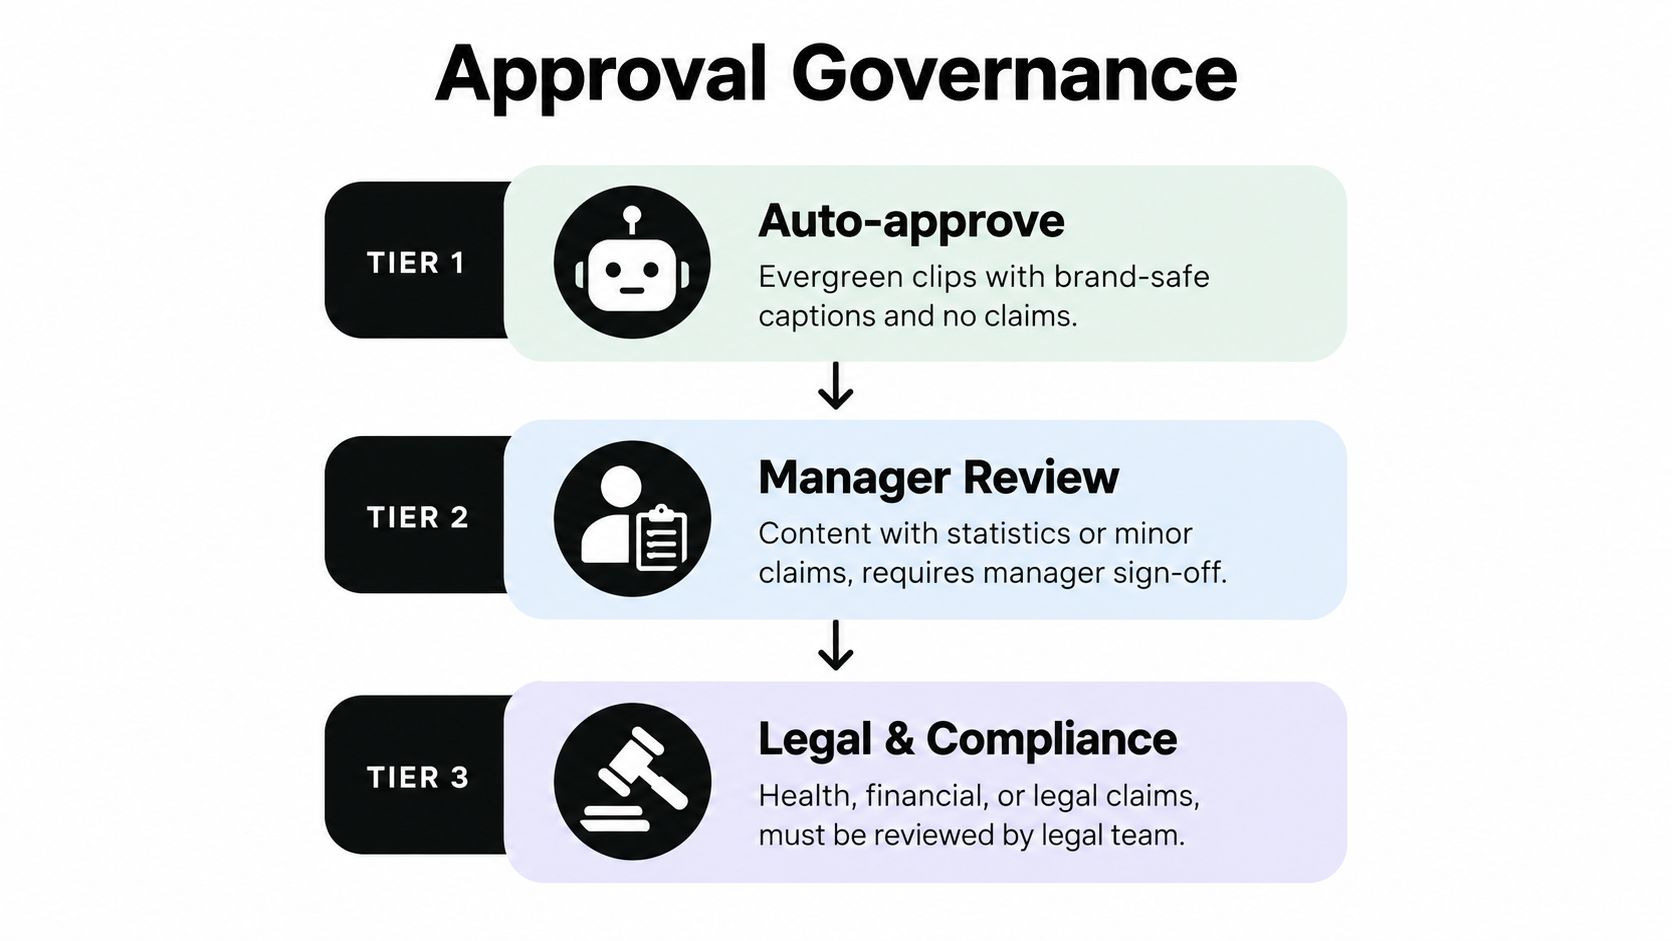
Approval should reflect risk. Sending every evergreen clip to the same committee creates delay without adding proportional protection. A tiered model gives routine content a short path and reserves specialist attention for posts that can create factual, legal, partner, or executive risk.
Use three reviewer tiers:
- Tier 1 auto-approval: Evergreen clips with brand-safe captions and no claims.
- Tier 2 content lead review: Posts containing numbers, quotes, or product claims. Give the reviewer a 24-hour turnaround window.
- Tier 3 named approver: Content involving legal, partner, or executive mentions. Assign a 4-hour SLA and route it to one named approver.
Each post gets one Decision Owner, not a committee. Reviewers can contribute, but one person consolidates feedback and makes the status change. Keep the board to In Review, Changes Requested, and Approved. Anything in Changes Requested for more than 12 hours goes to a backup reviewer.
The governance rule matters because late edits create version conflict. Once a post is Approved, lock the caption, thumbnail, and clip cut. If a material change becomes necessary, reopen the item and send it through the relevant tier again. That record is clearer than editing a scheduled asset after sign-off.
Stage 4 Scheduling and Publishing Across Platforms
A shared calendar can show dates while hiding platform logic. Build separate publishing rules into the queue, because timing is a testable variable rather than a universal answer. A 100-million-post analysis concluded that there is no single global best time to publish, as documented in the analysis of 100 million social posts. Use audience data to test candidate windows by platform, then compare engagement, saves, watch time, and conversions.
| Platform | Best Posting Windows | Caption Limit | Queue Buffer |
|---|---|---|---|
| Tuesday through Thursday, 8 to 10 a.m. | Platform-specific | Five posts | |
| Instagram Reels | Monday, Wednesday, Friday, 11 a.m. to 1 p.m. | Platform-specific | Five posts |
| YouTube Shorts | Saturday, 9 a.m. | Platform-specific | Five posts |
| TikTok | Daily, 6 to 9 p.m. | Platform-specific | Five posts |
These windows are operating hypotheses, not permanent rules. Independent benchmark coverage reports that engagement can differ substantially by platform, with midweek performance often strong and some visual or video channels performing well during weekend evening blocks. The Sup scheduling optimization guide provides additional context for building timing tests rather than copying a generic calendar.
Maintain a rolling queue, but don’t let it become an archive. Tag every clip with a content pillar and a freshness score. When a clip passes its 21-day freshness decay point, return it to triage instead of auto-publishing it. Check whether the angle is still relevant, whether the wording needs an update, and whether the platform still suits the asset.
Send approved clips to the scheduler with platform-specific captions, aspect ratios, and safe-zone adjustments already applied. Publish one platform at a time with 10-minute gaps, so a render or metadata error can be caught before it spreads across the entire release. This content workflow automation guide is useful when you’re deciding which handoffs belong inside the scheduler and which still need a person.
Stage 5 Measure, Iterate, and Avoid Common Failures
After the pipeline has run for a while, the same failures usually surface. They aren’t creative problems. They’re capacity, governance, and feedback-loop problems.
The failure patterns to watch
The queue goes stale. Teams create clips faster than reviewers can process them, so old assets crowd out timely ones. Cap weekly output to review capacity, not to the maximum number of clips the tool can generate.
Captions drift off-brand. Multiple editors gradually change phrasing, rhythm, and formatting. Lock caption style templates, and allow text corrections without permitting structural changes after approval.
Reporting arrives too late. A quarterly review can’t correct a problem in next week’s queue. Use a short Monday review of the previous week’s top and bottom performers, then write the decision in a one-page log.
Track four leading indicators weekly: approval turnaround time, average clip production time, stale-queue count, and per-platform engagement rate versus the rolling 90-day baseline. If any indicator moves more than 20 percent away from baseline, audit the workflow before adding volume. The point isn’t to punish the team. It’s to find whether intake is too loose, review capacity is too low, or platform adaptations are taking too long.
For timing experiments, keep the creative variable controlled where possible. The American Marketing Association’s analysis of scheduling science reported that morning posts increased link clicks by 8.8% versus afternoon posts and 11.1% versus evening posts in its cited analysis. Treat that as historical evidence that timing can matter, not as a universal schedule for your audience.
Review the full pipeline every 6 weeks. Retire weak content pillars, adjust intake criteria, and compare what the team planned with what shipped. Use the social media analytics tracking guide to keep measurement connected to publishing decisions rather than treating reporting as a separate presentation exercise.
FAQ on Building a Social Media Marketing Workflow
How long does it take for a small team to stabilize the workflow?
A basic process can be mapped quickly, but smooth execution takes several publishing cycles. Start with one intake queue, one Decision Owner per post, and a manageable clip volume. Adjust only after you can see where work stalls.
What roles does a two-to-four-person team need?
One person should own intake and scheduling, one should handle repurposing and captions, and one content lead should make approval decisions. A fourth person can cover subject-matter, legal, or executive review when the content requires it. One person may hold multiple roles, but every post still needs a named owner.
How often should the team repurpose long videos?
Set the cadence from review capacity and distribution demand, not from the number of clips the tool can generate. If approved assets accumulate faster than the team publishes, reduce intake or batch fewer clips from each recording.
Which metrics justify continued investment?
Track approval turnaround, production time, stale items, publish rate, and platform-specific engagement. Add business outcomes such as qualified conversations or conversions when the social post has a clear path to them. A workflow deserves continued investment when it makes those decisions visible and helps the team improve the next cycle.
quso.ai turns long videos into short-form clips, generates captions, and schedules approved posts across social platforms. Use it to build the intake-to-publish pipeline described here, then visit quso.ai to see how the workflow fits your team.