Content Creation Workflow That Actually Ships in 2026
Most content teams don’t have an ideation problem. They have a handoff problem. Adobe reports that 71% of creators have used AI video generation or editing tools, while 41% use them weekly, yet workflow maturity still lags: only 43% of teams describe their workflows as standardized, automated, and consistently efficient, and just 32% can update content across channels the same day (Adobe AI content creation statistics; Sozee workflow bottlenecks).
A useful content creation workflow therefore isn’t a longer checklist. It’s a production system that moves one recording from idea to publishable assets without losing time between recording, editing, captions, approvals, and distribution.
Table of Contents
- Why Most Content Creation Workflows Break at the Handoff
- The Five Stages of a Production-Ready Content Creation Workflow
- Repurposing One Long Video Into a Week of Shorts
- Caption-First Publishing and Platform Safe Zones
- Approvals, Scheduling, and the Post-Publish Loop
- Putting the Workflow Together and Knowing When to Automate
Why Most Content Creation Workflows Break at the Handoff
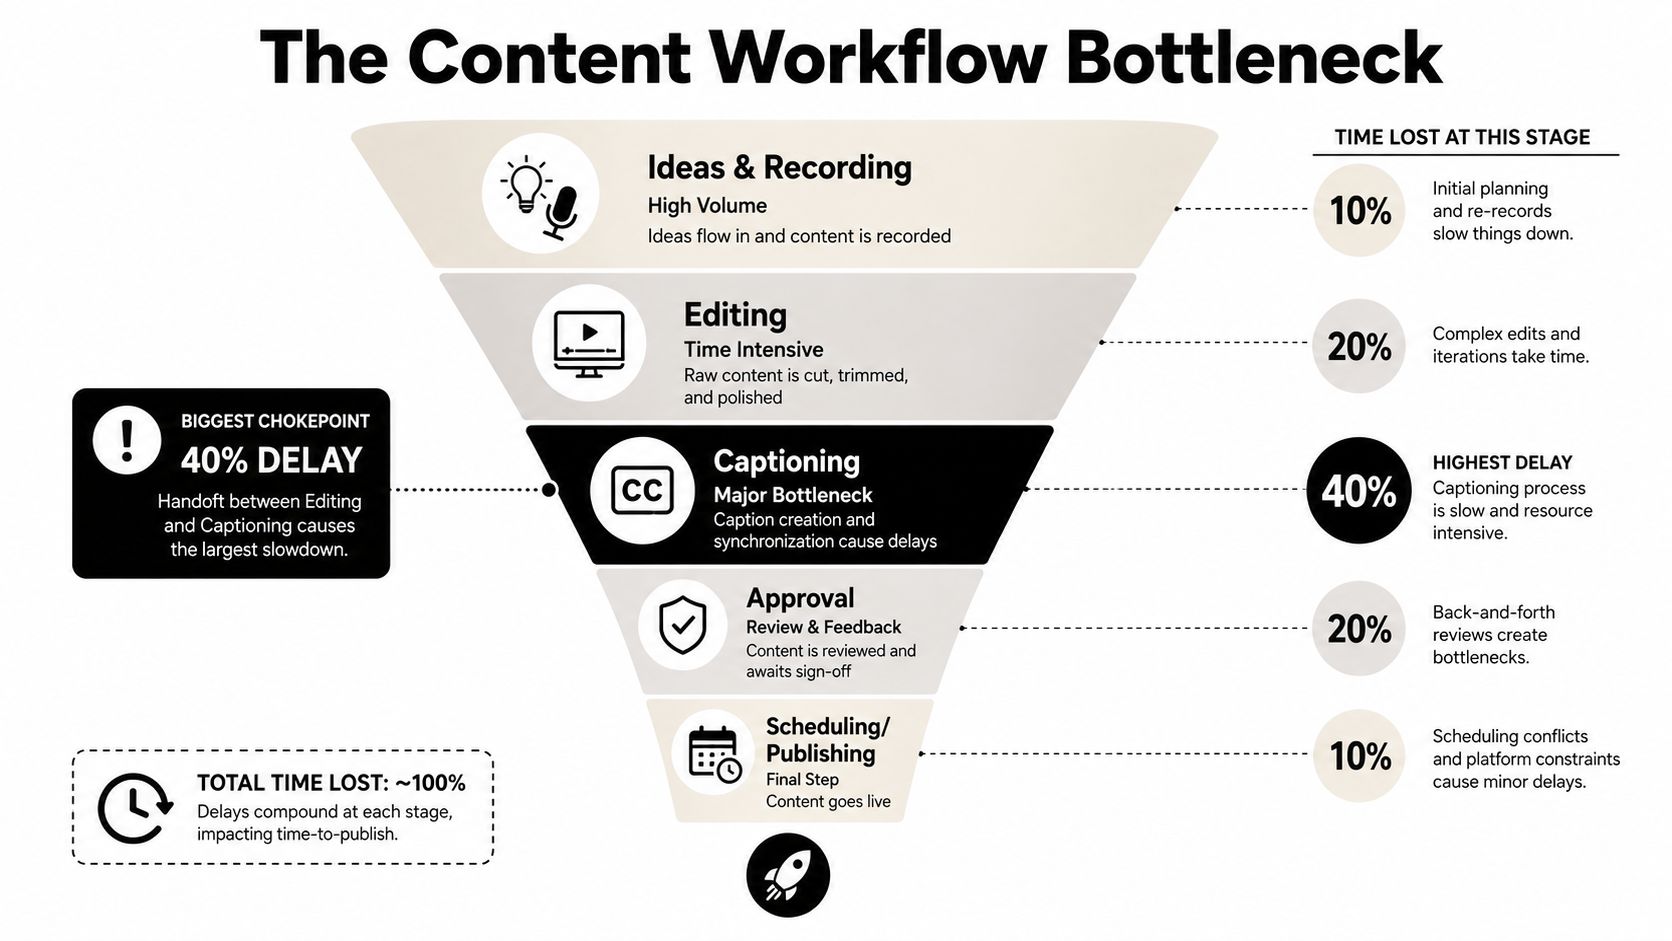
The common advice is familiar: plan, create, edit, publish. That sequence isn’t wrong, but it hides the expensive part. Teams rarely lose momentum while someone is recording. They lose it when the editor finishes a cut, the caption owner opens another tool, a reviewer requests a small change, and the social manager reformats the asset again for each platform.
Those gaps create invisible queues. Files get renamed inconsistently, context disappears between collaborators, and nobody knows whether “final” means edited, captioned, approved, or scheduled. Adding another stage or another app usually makes the queue longer.
Diagnose the queue before buying automation
Track the work for one week. Record how long people spend planning, scripting, recording, editing, captioning, waiting for feedback, exporting, scheduling, and checking performance. A workflow guide from 60 Minute Apps recommends measuring each phase before automating, because a team can’t improve a bottleneck it hasn’t identified.
Look for these warning signs:
- Tool switching: The same asset moves through several disconnected platforms.
- Unclear ownership: Multiple people can approve a post, but nobody owns the next action.
- Late formatting: Captions, dimensions, and platform layouts get handled after creative approval.
- Manual distribution: Someone uploads every post separately, then copies captions and links by hand.
- No post-publish owner: The team publishes but doesn’t assign anyone to review results or feed learnings into the next batch.
Practical rule: Fix the slowest handoff before adding a new creative task.
The operational target isn’t “make more content.” It’s make each handoff boring. Every stage should produce a named artifact, a clear owner, and an obvious status. If the output of editing is an approved clip with captions and platform-ready framing, distribution can move immediately. If it’s merely “a video in a folder,” the next person has to restart the decision-making process.
The Five Stages of a Production-Ready Content Creation Workflow
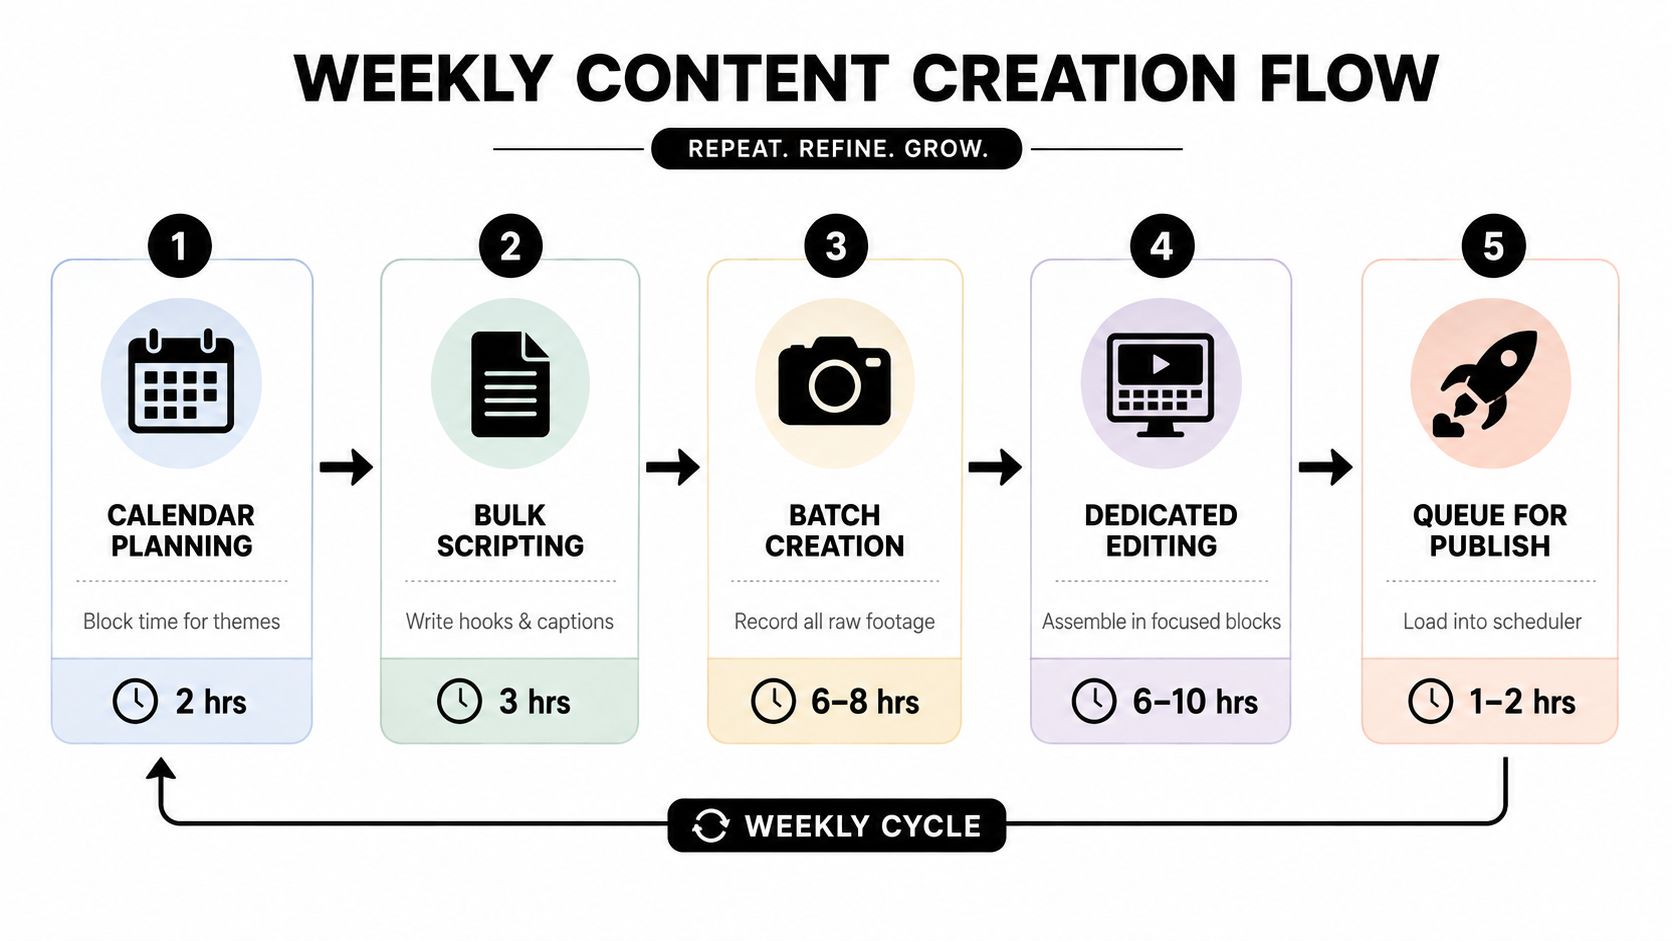
Run production in batches, not as a daily scramble. The reliable sequence is calendar planning, bulk scripting, batch creation, dedicated editing, and queued distribution. Each phase should hand off a specific file or decision, so the next person doesn’t need a meeting to understand what happens next.
Build the weekly production board
1. Plan the calendar. Choose themes, source videos, campaign priorities, and distribution dates in one sitting. The output is a calendar with a defined purpose for every item, not a list of vague ideas.
2. Script hooks and captions in bulk. Write opening lines, supporting points, calls to action, and caption drafts together. Separate the hook from the body so editors can identify the strongest moments quickly.
3. Batch-create raw assets. Record related videos in the same setup. Capture extra introductions, transitions, and alternate calls to action while the camera, lighting, and microphone are already ready.
4. Edit in a dedicated block. Keep editing separate from recording. Work through the queue in one focused session, using the calendar and hook document as the brief.
5. Schedule and distribute. Upload approved assets in one session. Adapt the copy and framing for each channel, then move every item into a visible publishing queue.
A Kanban project management tool can make these handoffs visible without turning the process into a complicated project-management exercise. Use simple columns such as Backlog, Recording, Editing, Review, Approved, Scheduled, and Live. Give each card one owner and attach the source file, caption, deadline, and review notes.
Use two focused production sessions
One session should cover planning, scripting, and recording. The other should cover editing, review, and scheduling. Don’t scatter the same task across every day, because repeated setup and context switching will consume the time you hoped batching would save.
For a baseline, follow each stage for a full week and log actual time. MarketingProfs data cited by Loopdesk shows that 28% of marketers spend one to three hours creating a single content item, while 24% spend four to six hours (Loopdesk content creation research). Those figures describe why a clean queue matters. If every post starts from a blank page and ends in a separate upload session, consistency becomes difficult even when the creative ideas are strong.
Repurposing One Long Video Into a Week of Shorts
Repurposing fails when teams treat every short as a separate production. The better approach is to decide the derivatives before cutting, then move through the source once with a clear map.
Day 1 records the source
Record one substantial asset, such as an interview, webinar, lesson, podcast episode, or product discussion. While recording, mark strong transitions and complete thoughts verbally. A clip that makes sense without the full episode is more valuable than a dramatic sentence that depends on missing context.
Day 2 maps moments before editing
Spend 10 to 20 minutes mapping the source before automated clipping or detailed editing, as recommended in this content repurposing strategy. Note the timecode, central idea, hook, likely audience, and destination platform for each candidate.
Reject clips that need a long introduction. Keep moments that answer a question, challenge a common assumption, explain a process, or contain a complete opinion. This mapping step prevents the editor from polishing weak material because it appears early in the transcript.
Day 3 captions and checks the details
Generate captions, then proofread names, technical terms, product names, and industry jargon. Don’t assume automated transcription understands specialist language. Caption timing should support the speaker’s rhythm, not flash words so quickly that viewers have to choose between reading and watching.
A 30-minute interview can yield a blog post, several clips, and multiple pull quotes, according to the Content Fries repurposing recipe. The point isn’t to promise a fixed output from every recording. The point is to plan the derivatives while the source is still fresh, instead of reopening the original file for every new idea.
Day 4 schedules the batch
Reframe the selected clips for each destination, inspect the first and last frames, and schedule the completed set together. The quso.ai content repurposing guide is useful for teams turning long video into short-form assets, captions, and channel-ready posts.
Keep a derivative checklist attached to the source:
- Short clips: Self-contained moments with a clear opening.
- Text assets: Pull quotes, post copy, and searchable phrases.
- Long-form support: A blog outline or newsletter angle.
- Distribution details: Platform, format, caption, owner, and scheduled status.
This four-day rhythm works because it separates judgment from production. You decide what matters before the tools start cutting, then use automation for the repetitive work.
Caption-First Publishing and Platform Safe Zones
Caption work belongs in the layout brief, because late changes create a handoff bottleneck. A 2025 study of 95,155 social-media image posts from 402 brands across 33 sectors found that longer captions increased consumer interest and engagement (SINC Lab study). Apply that finding as an editorial rule: give each post enough text to explain its value, then cut filler and disconnected keywords.
Design around the interface
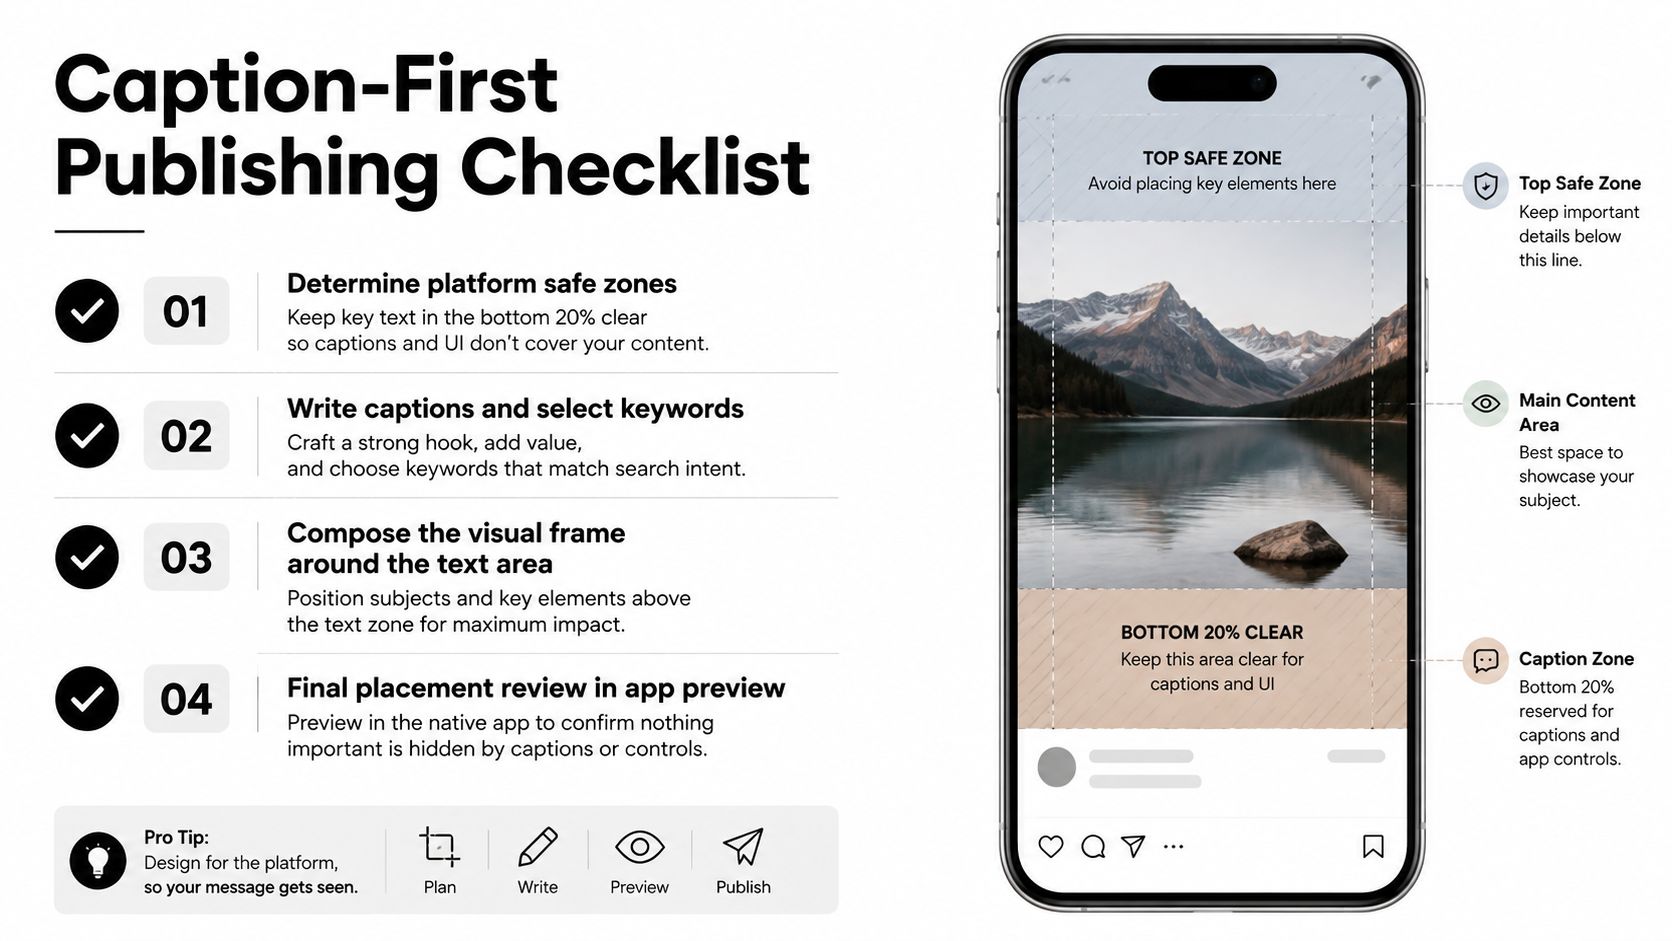
Platform overlays can hide the content your team approved. Usernames, captions, buttons, music labels, comments, and navigation controls may cover the lower or side edges of a short-form video. The overlap changes by placement and app version, so test the actual post instead of trusting one universal pixel measurement.
Run a safe-zone check before export:
- Protect the lower area: Keep subtitles and lower-thirds above the region used by platform captions and controls.
- Protect the sides: Keep names, logos, and key text away from buttons and edge controls.
- Keep the hook visible: Place the opening message in a central area that survives different crops.
- Preview inside the app: Upload privately or use the platform preview, then inspect the overlay.
Assign this review to the person exporting the asset. That removes a late approval loop and catches layout failures before scheduling.
Burn in captions, then proofread
A separate review reported that 85% of videos are viewed without sound, so readable captions and time-coded transcripts should be part of the publishing package. For that statistic, use the captioning research review only if it is a distinct, verified source. Since the available citation duplicates the image-post study, do not attach the number to it. State the operational requirement instead: publish captions that work for muted viewing.
Burned-in captions travel with the video, preserve styling, and remain visible outside the original app. Keep wording concise, use strong contrast, and vary placement when the lower area is crowded. Proofread names, product terms, and timing before export.
Caption length should match the viewer’s decision. Use a short line for a visual punchline and more context for an educational clip. Write the explanation the viewer needs, then remove anything that does not help them understand or act.
Approvals, Scheduling, and the Post-Publish Loop
Publishing is a production stage. A finished clip that sits in an approval folder has created no distribution value, and a scheduled post with the wrong caption can create avoidable cleanup.
Start with one intake form or board. Every item needs a source link, platform, caption, visual preview, owner, due date, and risk level. Then use four statuses: Draft, Ready, Scheduled, and Live.
Give every item one owner
One person owns the next action, even when several people review the content. The reviewer can approve or request changes, but the owner moves the item forward and records the decision. This eliminates the familiar situation where everyone assumes somebody else handled the final upload.
Use risk-based review instead of routing every post through the same approval chain:
- Low risk: Educational clips, routine commentary, and evergreen posts can move through one review.
- Medium risk: Product claims, customer references, and partner content need a subject-matter check.
- High risk: Sensitive topics, regulated claims, legal issues, or crisis responses require explicit approval gates.
Teams that need a more formal structure can use this guide to streamline content approval workflows 2026. The principle is simple: add review where the consequences justify it, not where habit has created paperwork.
Schedule when the asset is ready
Tie scheduling to the Ready status. Don’t schedule a post that still needs caption edits, because last-minute changes turn the calendar into another manual queue. Same-day cross-channel updates remain difficult for many teams, so the practical baseline is to prepare derivatives and distribution details before the original long-form piece goes live, not after the launch window has passed.
The guide to scheduling social media posts can help teams formalize the upload stage. After publishing, record the post link, note the audience response, and capture one useful observation for the next planning session. Performance review doesn’t need to become a separate research project. It needs an owner and a recurring place in the board.
Putting the Workflow Together and Knowing When to Automate
Your operating system should leave behind five artifacts: a content calendar, hooks document, asset folder, edit queue, and publishing schedule. It should also eliminate three recurring tasks: reformatting each post from scratch, scheduling one item at a time, and manually repairing captions after export.
The diagnostic question is blunt: Where does the asset wait longest after someone finishes their part? If the answer is captioning, automate transcription and review. If it’s formatting, define safe zones and platform templates. If it’s approval, reduce reviewers and assign one owner. If it’s distribution, batch the uploads and schedule from a ready queue.
Use content workflow automation only after you can name that bottleneck. For creators and small teams, quso.ai can turn a long recording into short-form clips, add captions, and support scheduled distribution without forcing the asset through separate manual stages.
Frequently asked questions
What is a content creation workflow?
It’s the repeatable system that moves an idea or source recording through planning, production, editing, review, publishing, and post-publish learning. A strong workflow defines owners, outputs, statuses, and handoffs.
How do you create a content workflow for social media?
Start with a calendar, batch related tasks, define platform-specific safe zones, assign one owner per item, and schedule approved assets together. Measure each stage for a week before automating.
How do you repurpose long-form video into short-form content?
Map self-contained moments first, cut only the strongest segments, proofread captions and terminology, reframe for each platform, and schedule the finished clips as a batch.
When should you automate content creation?
Automate after you identify a repeated bottleneck. Captioning, clipping, formatting, and scheduling are strong candidates when they create a queue between recording and distribution, but creative judgment and final quality checks still need clear human ownership.
quso.ai turns long videos into short-form clips, adds auto-captions, and helps you schedule the finished assets across social channels. If your team is losing time between editing and publishing, visit quso.ai and put the next recording through a cleaner repurposing workflow.