Video Production Workflow: A 2026 Guide for Creators
Video production now typically runs through a repeatable four-phase system: Pre-Production, Production, Post-Production, and Distribution & Repurposing. That structure matters because video drives 310% more engagement than static media, and the teams getting results aren’t treating production like a one-off creative event.
If you’re reading this, you’re probably dealing with the bottleneck already. You record a webinar, podcast, demo, or customer interview, publish the full version, then stall out when it’s time to turn that anchor asset into clips people will watch. That isn’t a shooting problem. It’s a workflow problem.
A modern video production workflow has to start with repurposing in mind. The goal isn’t one finished video. It’s one strong anchor asset built to produce multiple short-form outputs without rebuilding the process every time.
Table of Contents
- Your Modern Video Production Workflow Framework
- Phase 1 Pre-Production and Strategic Planning
- Phase 2 Shooting with Repurposing in Mind
- Phase 3 Streamlining Your Post-Production
- Phase 4 QA Distribution and Performance Analysis
- Video Production Workflow FAQ
Your Modern Video Production Workflow Framework
A modern video workflow starts with one question: how will this recording produce more than one asset?
Teams that stay efficient do not treat production as a straight line from idea to finished video. They build one anchor asset, then turn that source material into clips, cutdowns, social posts, and follow-up creative without rebuilding the process every time.
Build around the four phases
This framework works because each phase sets up the next one:
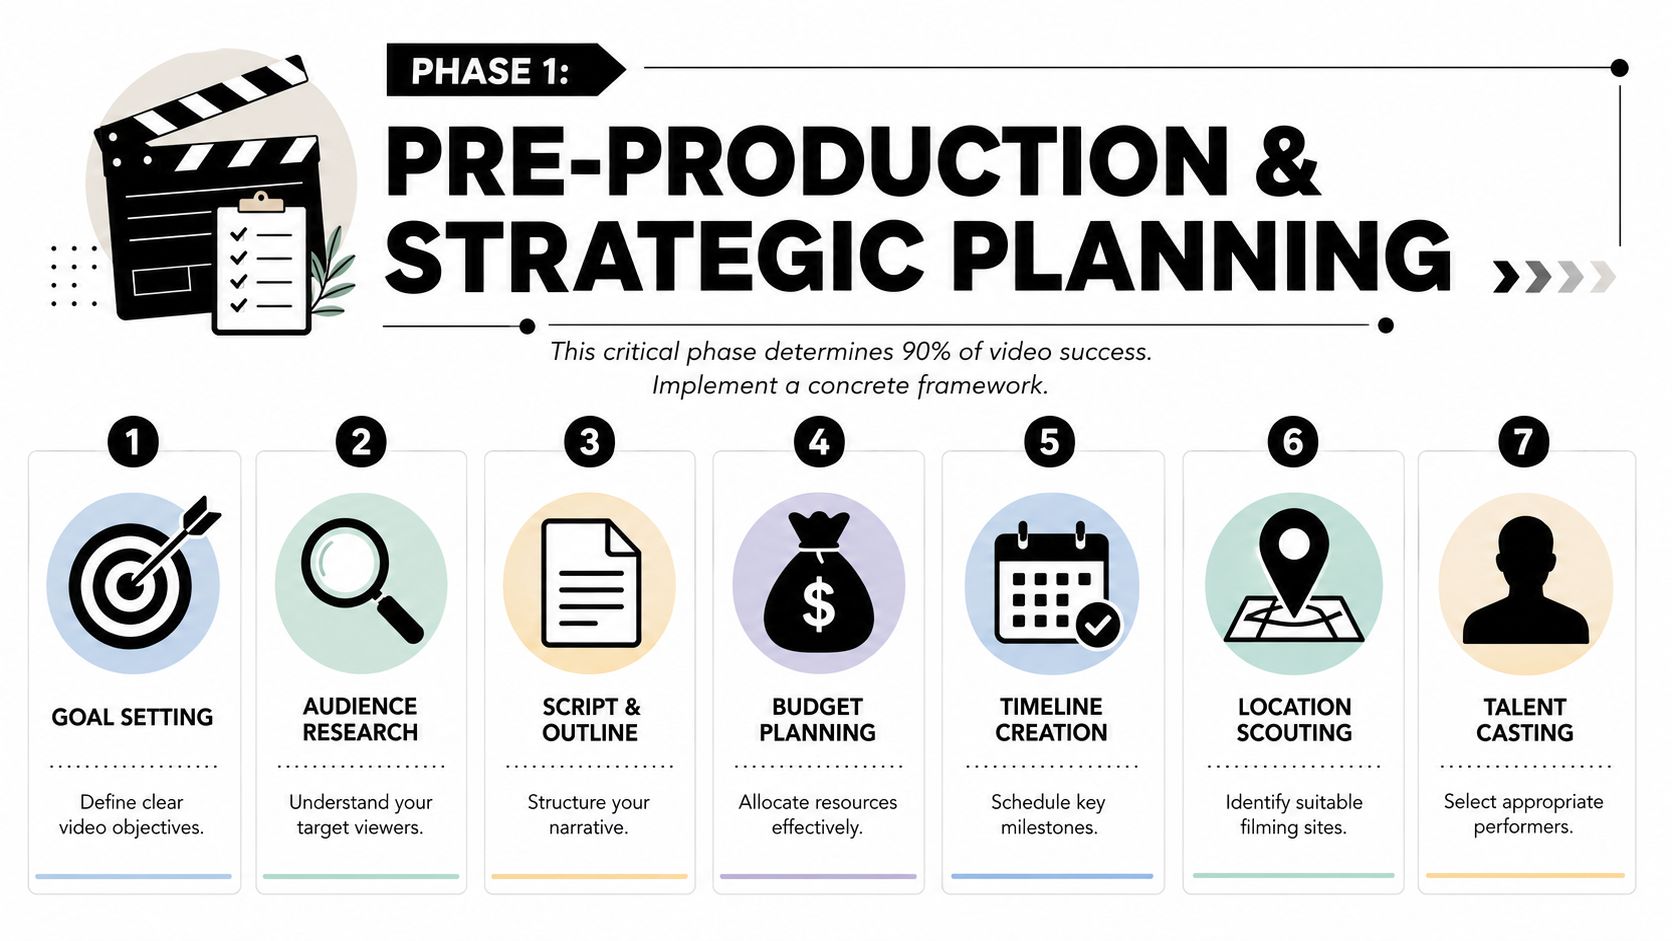
- Pre-Production. Set the objective, audience, message, format, approval path, and shoot plan before production day starts.
- Production. Record the anchor asset, then capture the extra moments, alternate takes, and visual support that make repurposing faster later.
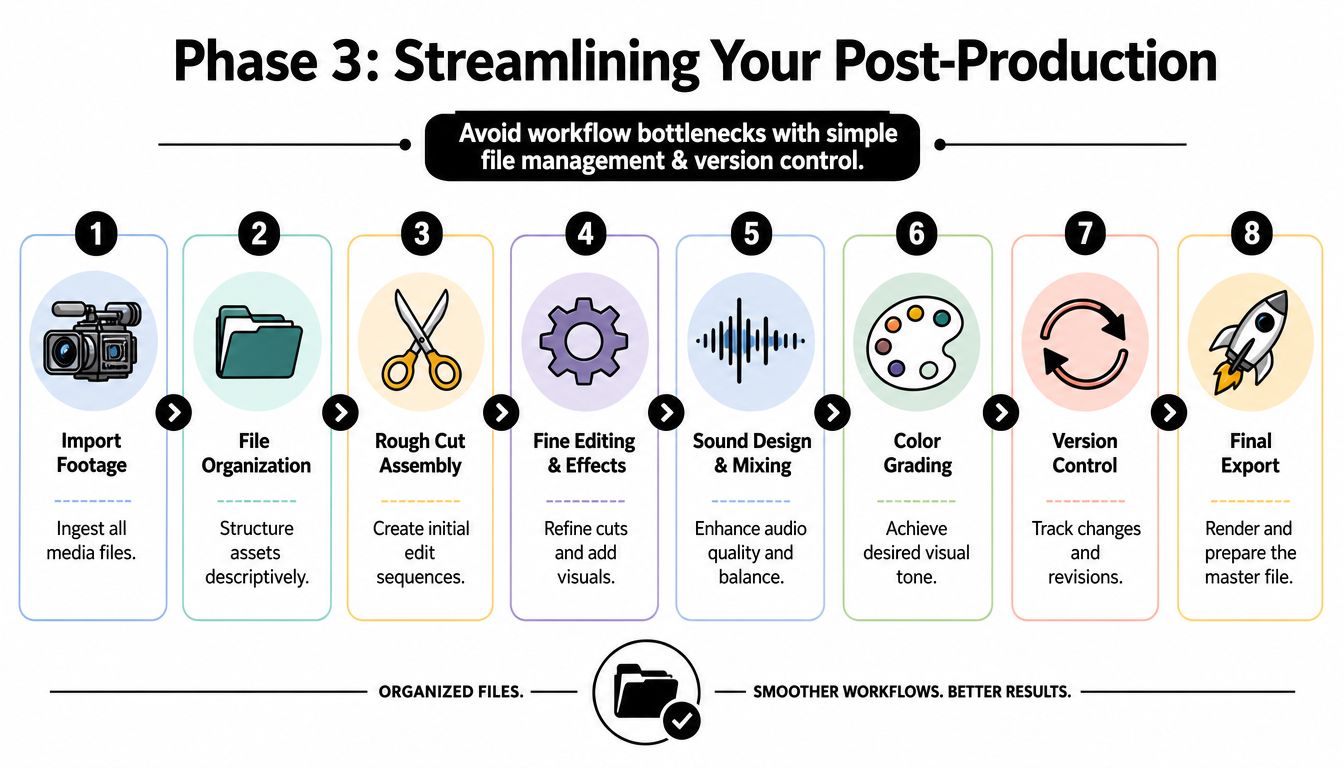
- Post-Production. Sort footage, edit the main version, pull clip candidates, add captions, adjust for platform pacing, and package exports.
- Distribution & Repurposing. Publish channel-specific versions, track response, and feed those findings back into the next recording.
The point is output efficiency. A clear workflow reduces missed shots, revision loops, and last-minute asset requests. It also gives the team a reliable way to turn one session into a repeatable content batch.
Treat workflow like an operating system
The strongest workflows remove routine choices so the team can spend time on judgment calls that affect performance. That usually means standard templates, file naming rules, approval checkpoints, and a clear handoff from long-form edit to short-form distribution.
I have found that repurposing breaks down first in the handoff layer. Footage exists, but no one knows which take is final, which quote is clip-worthy, or which version was approved for each channel. A system fixes that.
If you’re refining the system side of content operations, these strategies for AI workflow design are useful for thinking about where automation helps and where human review still matters.
For teams managing larger content libraries, a proper video content management system becomes part of the workflow itself. It helps keep source footage, versions, approvals, and reusable clips organized so the next round of content starts from assets you already have, not from scratch.
A repeatable workflow keeps creativity focused on decisions that improve the video, instead of fixing preventable process mistakes.
Phase 1 Pre-Production and Strategic Planning
A recording day goes sideways in familiar ways. The guest shows up with broad talking points. The team captures one solid long-form conversation. Then post starts and everyone realizes there are only two usable clip moments, no clean transitions, and no clear angle for distribution.
Pre-production prevents that. It also holds the key to whether one shoot becomes one asset or a full batch.
Plan the anchor asset first
The working unit is not a single video. It is an anchor session built to produce a long-form piece, plus a library of short clips, cutdowns, stills, quotes, and follow-up assets.
That changes the brief.
Instead of asking for a polished video topic, define a session format that can carry multiple angles without feeling forced. Interviews, product demos, tutorials, webinars, founder commentary, and customer conversations tend to work because they naturally create distinct statements, examples, objections, and reactions. Those become clip candidates later.
Teams that want faster turnarounds from long-form footage usually benefit from a workflow built around AI tools for turning long videos into short clips, but the footage still has to be planned for extraction. Editing tools can speed up selection. They cannot fix a weak source session.
Script in modules
A script for repurposing needs clean boundaries.
The easiest way to do that is to break the session into segments that can stand on their own without two minutes of context. Each segment needs one job. State the problem. Make the point. Show proof. End with a line that still makes sense as a 20 to 45 second clip.
I usually cut anything that depends on heavy setup unless the long-form version absolutely needs it. Dense transitions, inside jokes, and rambling scene-setting often survive the full edit and die in short-form.
Use a simple structure for each segment:
- Start with the tension. Name the problem, mistake, cost, or question fast.
- Make one clear point. Each section should communicate a single takeaway.
- Support it with evidence. Use a story, demo, comparison, walkthrough, or example.
- End cleanly. Finish on a sentence that can be lifted without extra explanation.
Planning rule: If a line only works after a long setup, it is weak raw material for repurposing.
Build the shot list around edit options
A standard shot list covers coverage. A repurposing shot list covers options.
The long-form editor needs a reliable master angle. The short-form editor needs visual resets, clean punch-in opportunities, moments of movement, and enough variety to hide trims without making the clip feel stitched together. If those options are missing, the team ends up forcing static footage into formats it was never built for.
Include these before shoot day:
- Master framing for the primary long-form cut
- Secondary framing for punch-ins, resets, or alternate crops
- Hands-on moments such as demos, screen actions, product use, or whiteboard work
- Natural reactions like pauses, emphasis, listening shots, and gestures
- Clean starts and stops so editors can isolate statements without awkward trims
- Platform-safe framing so faces, captions, and graphics stay clear of UI overlays
This is a trade-off call. More coverage takes longer on set. Less coverage saves time in production but creates friction in post. For teams publishing across multiple channels, the extra planning time usually pays for itself.
Lock the clip plan before the camera turns on
Short-form extraction should not start after the shoot. It starts in the brief.
List the clip themes you want in advance. That might include objections, myths, how-to steps, mistakes, definitions, hot takes, product moments, or customer pain points. Once those themes are named, the host can prompt for them, the producer can watch for them, and the editor has a map instead of a pile of footage.
That also improves approvals. Stakeholders tend to argue less when the intended outputs were defined early.
Use the same pre-production checklist every time
A repeatable checklist keeps the system tight and reduces expensive misses.
| Item | What to lock before shoot day |
|---|---|
| Goal | One clear business or content objective |
| Audience | Who this is for and what they already know |
| Anchor format | Webinar, demo, interview, tutorial, podcast, or explainer |
| Clip plan | The short-form themes you want to extract |
| Script | Talking points broken into reusable segments |
| Shot list | Master angle, alternates, and supporting visuals |
| Approval path | Who can approve script, recording, and final cuts |
Teams skip this work because it feels slower. In practice, it cuts reshoots, reduces revision loops, and gives post-production footage that can be multiplied without guesswork.
Phase 2 Shooting with Repurposing in Mind
Most long-form footage fails in short-form because it was never captured for short-form in the first place.
Stop filming only for the long version
The common assumption is that you can record one polished long video and trim clips later. In practice, that usually produces flat excerpts. The rhythm is wrong, the framing is static, and the strongest moments aren’t visually distinct enough to stop a scroll.
That gap shows up in the data. Based on analysis of 170K+ posts across 1,100+ creators, short-form clips derived from cinematic long videos using POV, tracking shots, or layering see 34% higher engagement than static clips.
That doesn’t mean every shoot needs to look cinematic. It means you should capture visual variation that gives your clips usable texture.
What to capture during the shoot
Prioritize moments that can stand on their own when removed from the full edit.
- POV angles for tutorials, product use, or behind-the-scenes footage
- Tracking movement when a speaker is walking through a process or space
- Layered framing with foreground elements to avoid a flat look
- Clean starts and stops so the clip can open without awkward lead-in
- Intentional pauses that make caption timing and jump cuts cleaner
A practical way to think about the shoot is this: every segment should work as part of the anchor asset and as a possible standalone clip.
For teams comparing methods, this guide to long-to-short video AI tools is a useful reference point when you’re deciding how much of the clipping process you want to automate.
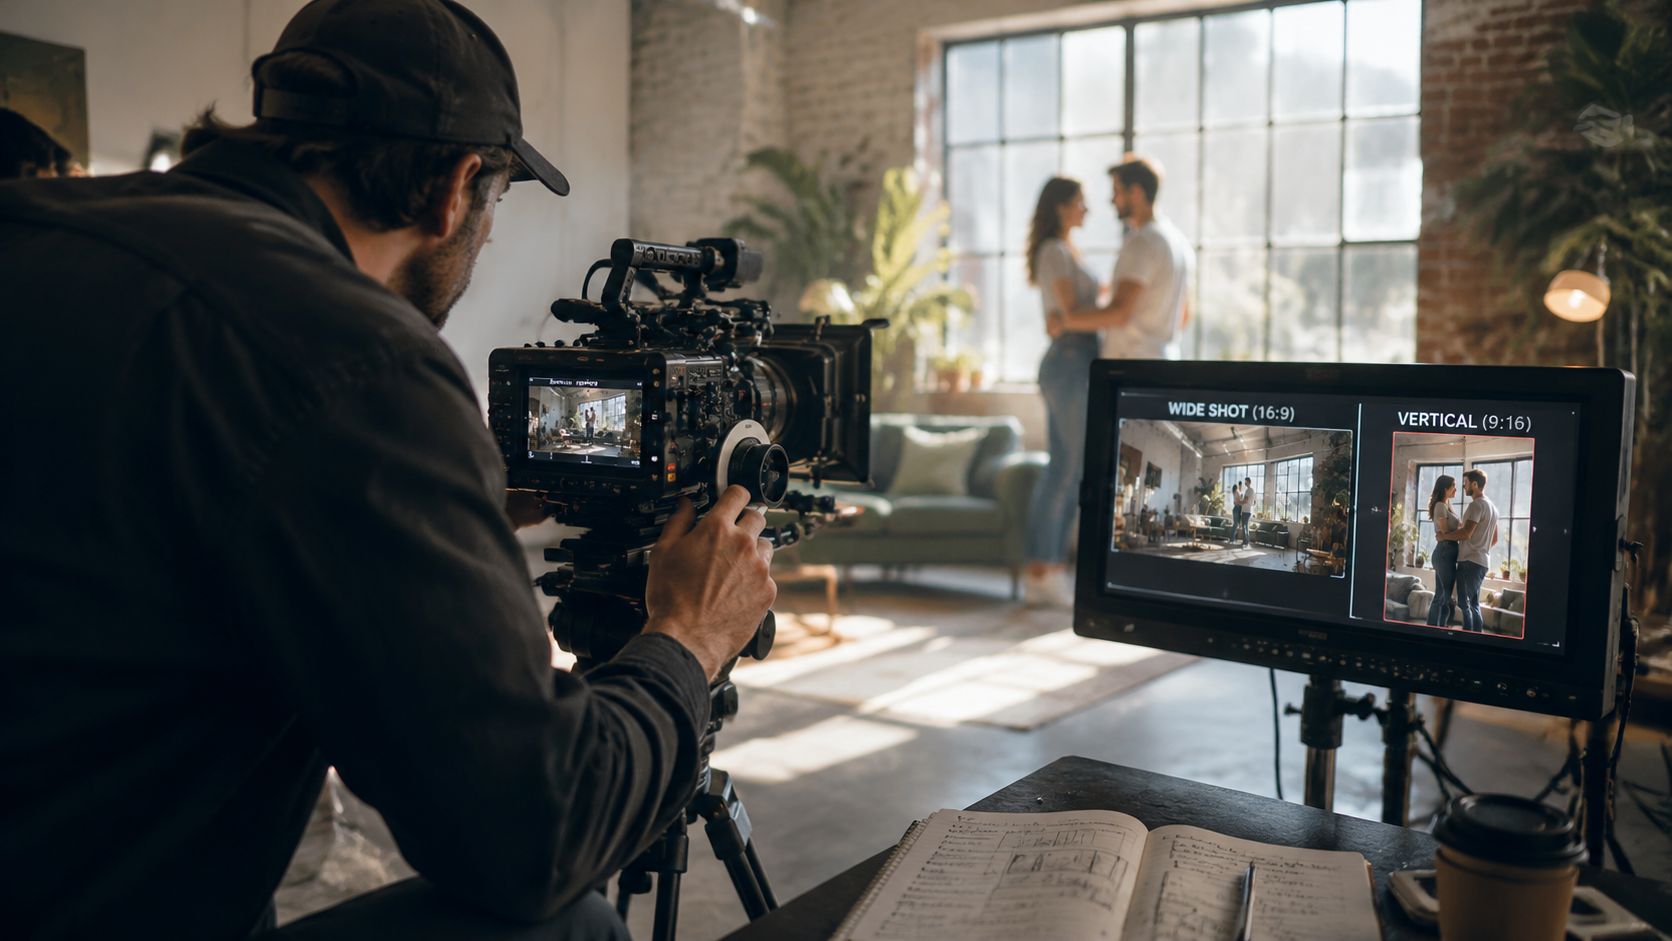
A quick visual refresher on set discipline helps too:
Don’t chase pretty footage that only works in a montage. Capture moments with a beginning, a point, and a natural end.
Phase 3 Streamlining Your Post-Production
A weak post-production system shows up fast. Editors waste time hunting files, reviewers comment on the wrong version, and the anchor video never turns into the volume of clips the team planned.
Use a naming system that survives revisions
If your files are named final.mp4, final-final.mp4, and use-this-one.mov, you do not have a post-production system. You have guesswork.
The fix is boring, and that is why it works. Every file should tell the team what it is, where it belongs, and whether anyone can publish it.
Keep naming plain and consistent:
- Project identifier for the campaign, series, or client
- Asset type such as anchor, clip, caption file, thumbnail, or transcript
- Scene or segment label so anyone can find the source
- Version number that moves forward cleanly
- Status marker like draft, review, approved, or scheduled
A simple example would be: demo-q3_anchor_segment03_v02_review.
That structure matters even more when one recording session turns into an anchor asset, platform cuts, caption files, thumbnails, and transcript-based derivatives. The goal in post is not just to finish one edit. It is to create an asset library the team can reuse without reopening old confusion.
Cut the anchor first, then build the clip stack
Teams lose time when they edit every deliverable as a separate job. Cut the main asset first. Then mark the strongest moments for short-form extraction while the context is still fresh.
That changes how editors work. They are not polishing one timeline in isolation. They are identifying hooks, objections, proof points, demos, reactions, and quotable lines that can survive outside the full video.
A practical edit pass usually looks like this:
- Finish the anchor cut with the core narrative intact
- Mark clip candidates by topic, hook, and audience intent
- Create short versions with platform-specific pacing and framing
- Add captions and graphics only after the trim is locked
- Export in batches by aspect ratio, platform, and publish date
That order keeps the work efficient and reduces duplicate effort.
Edit for platform pace, not personal preference
A webinar clip, a product demo, and a TikTok talking-head do not need the same rhythm. Good editors adjust pacing to viewer context.
Short-form usually needs faster resets, tighter dead-space removal, and earlier visual payoff. Long-form can hold a shot longer if the speaker is adding real value. Clips pulled from educational content often need the most intervention because the original pacing was built for people already committed to watching.
Use this as a working reference:
| Platform context | Better pacing choice |
|---|---|
| TikTok and Reels | Faster visual resets, tighter dead-space removal |
| YouTube long-form | Longer holds when the speaker is adding value |
| Shorts from webinars or demos | Aggressive trimming plus visual support like captions or cutaways |
Monetization can shape these decisions too. Teams producing short-form at volume for creator-led channels should understand how payout mechanics affect format priorities. Shopstar’s TikTok payment guide is a useful reference for that side of the decision.
Automate repetitive work, but keep review control
The repetitive parts of post are easy to identify. Finding usable moments, turning them into shorts, generating captions, resizing exports, and loading assets into a publishing queue all eat hours.
quso.ai helps with that operational layer. A long-form video can be turned into short clips, captioned, and prepared for publishing with less manual handling. That matters when the bottleneck is not editing one anchor asset. It is multiplying that asset into enough quality outputs to maintain distribution.
If you want the publishing side connected to the edit process, a content distribution platform for scheduling and multi-channel publishing fits well here.
The fastest post-production setup removes repeatable labor and keeps approvals clear. Speed only helps if the team still knows which version is correct.
Phase 4 QA Distribution and Performance Analysis
Editing isn’t the end of the workflow. Delivery is.
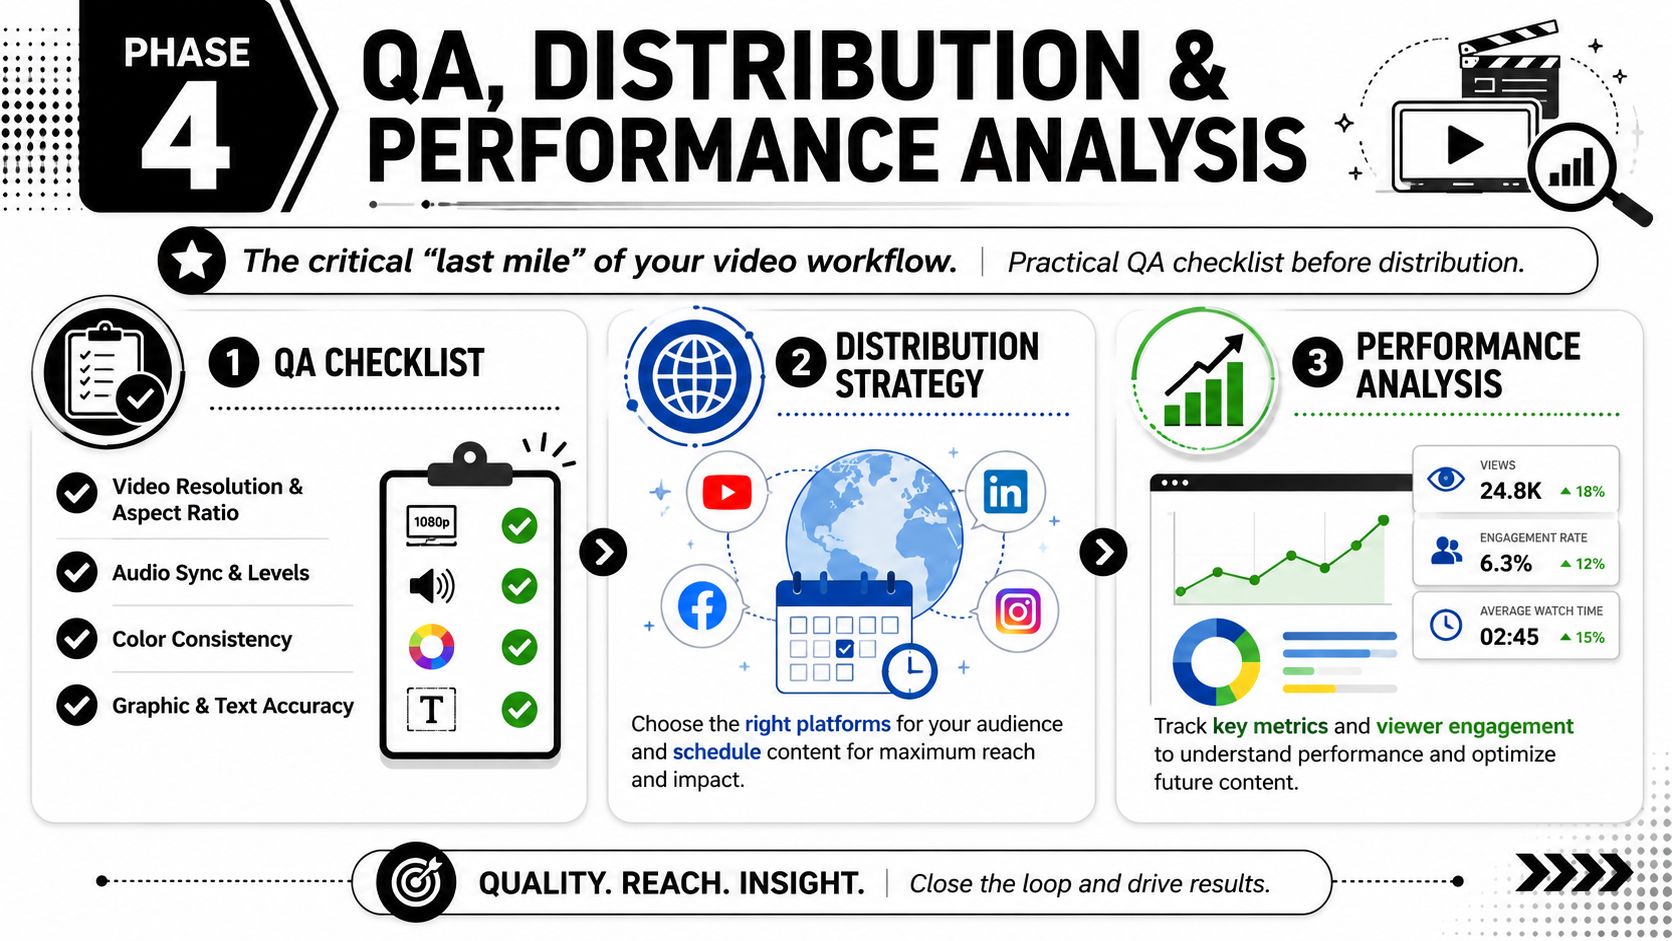
Run QA before anything goes live
A clean QA pass catches the mistakes viewers notice immediately.
QuickFrame recommends building accessibility into the workflow from the start, including closed captions and platform-specific sizing. That also means checking safe zones before publishing. On TikTok, Reels, and Shorts, interface elements can cover captions, lower-thirds, CTAs, and even parts of the speaker’s face if the composition is too low or too close to the edge.
Use a short final checklist:
- Frame fit. Confirm the aspect ratio matches the platform and key content stays inside safe zones.
- Caption placement. Make sure subtitles don’t collide with platform UI.
- Audio quality. Check sync, volume consistency, and obvious clipping.
- Text accuracy. Review names, claims, on-screen copy, and branded graphics.
- Accessibility. Include captions and supporting text elements from the start, not as cleanup.
Distribution is part of production
Publishing ad hoc creates uneven output. A content calendar fixes that by giving every anchor asset a release path: full version, teaser clips, quote clips, cutdowns, and repost windows.
If monetization is part of your channel strategy, practical platform-specific references help. For example, creators looking into earnings logistics can review Shopstar’s TikTok payment guide while building their publishing workflow.
For teams that need a more repeatable release process, a dedicated content distribution platform helps centralize scheduling and publishing decisions.
Publish, review what held attention, and feed those patterns back into the next shoot plan. That’s how the workflow gets better instead of just busier.
Video Production Workflow FAQ
A workable video workflow is built to produce one strong anchor asset and a batch of usable derivatives from the same shoot. If the process ends at a single export, the team is doing more work than the content can justify.
What are the main stages of a video production workflow?
The four stages are pre-production, production, post-production, and distribution with repurposing. That order matters, but true gain comes from treating them as one system. Planning shapes what gets filmed, filming shapes what can be clipped, and performance data should shape the next brief.
How long does a video production workflow usually take?
The timeline depends on approval layers, shoot complexity, edit volume, and how many deliverables come out of the same source footage. A simple internal video can move fast. A campaign with multiple stakeholders, versioning, and short-form cutdowns takes longer than the shoot itself.
In practice, the slowest part is rarely filming. It is revision churn, unclear briefs, and last-minute requests for formats nobody planned for.
How many short clips should one long video create?
There is no fixed number worth chasing. A better target is to get enough strong clips to fill your publishing calendar without forcing weak edits into the lineup.
For one anchor video, I would rather publish six clips with clean hooks and clear takeaways than push out fifteen that feel trimmed for volume. Good repurposing starts in scripting and shot design, not in the edit bay.
What is the biggest mistake in video production workflow?
Teams often approve the long-form video and treat the job as done. That breaks the economics of the whole process.
The better approach is to define the clip package before filming starts. Decide what moments need clean standalone intros, what lines need captions, what visual variations will help retention, and which platforms the cuts are meant for. That keeps the shoot aligned with the distribution plan.
Why do so many short clips from long videos underperform?
Because the source footage was only built to support the full-length piece. Long answers, flat framing, weak first sentences, and no visual resets give editors very little to work with.
Short-form performance usually improves when the speaker delivers tighter beats, the camera setup leaves room for reframing, and each segment can stand on its own without extra context.
If you’re turning webinars, podcasts, demos, or interviews into a weekly clip pipeline, quso.ai can help with clipping, captions, and scheduling as part of that system.