Best Sound Extractor from YouTube: 4 Safe Methods 2026
You've got a YouTube video open right now, and you only need the audio. Maybe it's a webinar clip for a social post, a podcast guest appearance you want to reference, or a lesson you want to turn into a clean sound bite. The easy move is to search for a quick converter, paste the URL, and hope for the best.
That's also how people end up with muddy MP3s, sketchy browser prompts, missing metadata, and a process they can't trust the next time they need it.
A good sound extractor from YouTube isn't just a downloader. It's a workflow choice. The right method depends on whether you need speed, fidelity, repeatability, or minimal risk. If you repurpose content often, your primary goal isn't getting one file. It's building a process you can use again without sacrificing quality or exposing your machine, browser, or brand to avoidable problems.
Table of Contents
- Why Your Audio Extraction Workflow Matters
- Why people use them anyway
- What usually goes wrong
- When they're acceptable
- Think in content packages, not files
- The legal line creators shouldn't ignore
- A practical repurposing path
Why Your Audio Extraction Workflow Matters
Users typically don't start with workflow. They start with urgency. There's a quote buried in a long interview, a clean 20-second lesson in a training video, or a strong podcast moment that needs to become a short clip today.
That urgency is why so many creators treat YouTube audio extraction like a throwaway task. Paste a URL into whatever shows up first, grab an MP3, move on. The problem is that the shortcut often creates new work later. You may get lower quality than the original stream, lose useful metadata, or end up depending on a tool that disappears the next time you need it.
Independent discussion around this topic keeps circling the same issue. Most guides reduce extraction to a simple process, but the questions that matter are really about safety, quality, and repeatability. Common methods carry very different risks. Online converters often re-encode audio, browser extensions can introduce permission and maintenance issues, and even strong tools can hurt quality when used the wrong way, as noted in this workflow-focused breakdown of YouTube audio extraction risks.
Practical rule: If you expect to reuse clips for podcasts, audiograms, transcripts, or social edits, treat extraction like the first production step, not a side task.
A durable workflow also connects audio to the rest of your content system. Once you've extracted clean sound, the next step is usually transcript, summary, clip selection, or captioning. If you need that part too, this guide on how to transcribe a video to text fits naturally into the same process.
The strongest sound extractor from YouTube is the one that gives you a file you can trust, in a format that fits what happens next.
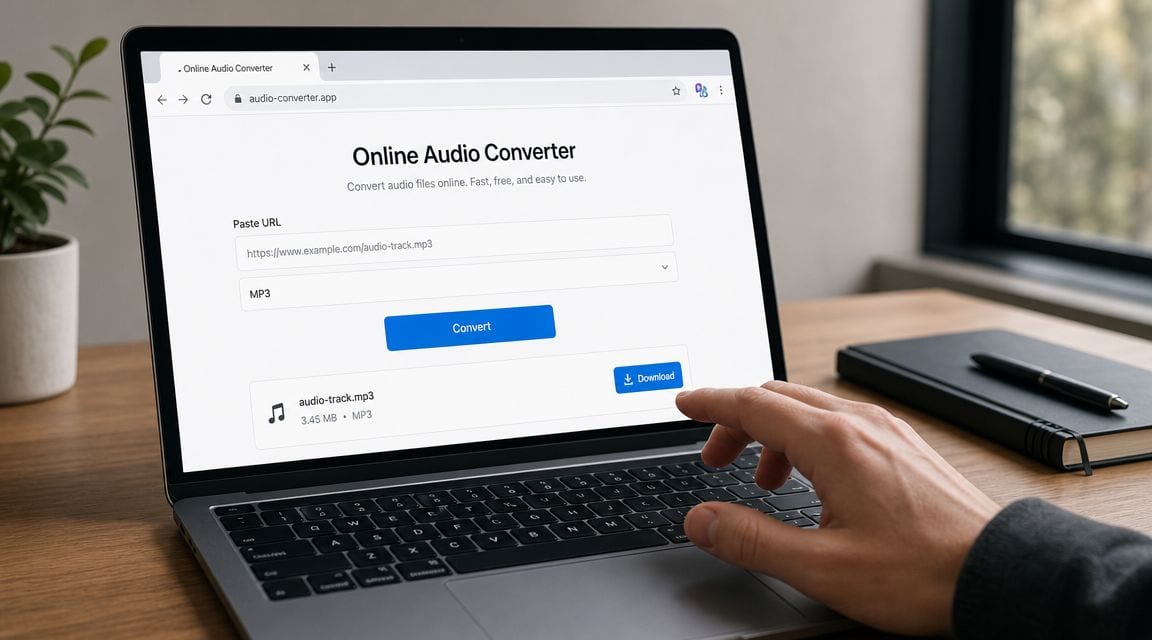
Quick Methods Online Converters and Extensions
For one-off jobs, online converters and browser extensions win on speed. You paste a link or click an icon, and a file appears a moment later. That convenience is real. It's also why these tools stay popular.
Why people use them anyway
They remove friction. No install, no terminal, no setup. If someone only needs a rough audio reference or a temporary file for internal review, that can be enough.
Extensions feel even easier because they live inside the browser. For people who already spend most of the day in Chrome or Firefox, that feels efficient. If your use case is casual, these tools can look like the obvious answer.
A related convenience path is downloading the video first and handling audio later. If that's your route, this walkthrough on how to download YouTube video helps with the file capture side before you separate the sound.
What usually goes wrong
The biggest issue is hidden processing. Many web tools don't pass through the original stream cleanly. They convert it to a new file, often an MP3, which means another lossy step. You get something playable, but not necessarily the cleanest version available from the source.
The second issue is trust. A random converter site may be filled with deceptive buttons, aggressive ads, pop-ups, or download prompts that have nothing to do with your file. Extensions create a different risk. They can ask for broad browser permissions and may stop working when platform changes break them.
Here's a quick side-by-side view:
| Method | Convenience | Quality control | Security risk | Best use |
|---|---|---|---|---|
| Online converter | Very high | Low | Higher | One-off, non-critical tasks |
| Browser extension | High | Medium to low | Medium | Frequent casual use |
| Installed desktop or CLI tool | Lower at first | High | Lower if trusted source | Repeatable professional workflow |
If a converter forces MP3 with no visibility into the source stream, assume convenience is the feature, not fidelity.
When they're acceptable
These methods aren't useless. They're just easy to misuse.
Use them when:
- The clip isn't mission-critical: Internal review, rough notes, temp edits, or quick monitoring.
- You don't need metadata or transcripts: You only care about basic playback.
- You can tolerate some quality loss: The audio won't go through heavy post-production.
- You've verified the tool carefully: Clear interface, no deceptive prompts, sensible permissions, and no pressure to install unrelated software.
Skip them when:
- You're editing for publication: Compression artifacts become obvious after EQ, noise reduction, or level balancing.
- You need consistency: A tool that works today may vanish or change tomorrow.
- You're building a repeatable team process: Random converter sites don't belong in documented production workflows.
For casual use, convenience can win. For anything client-facing, quality-sensitive, or repeatable, it usually doesn't.
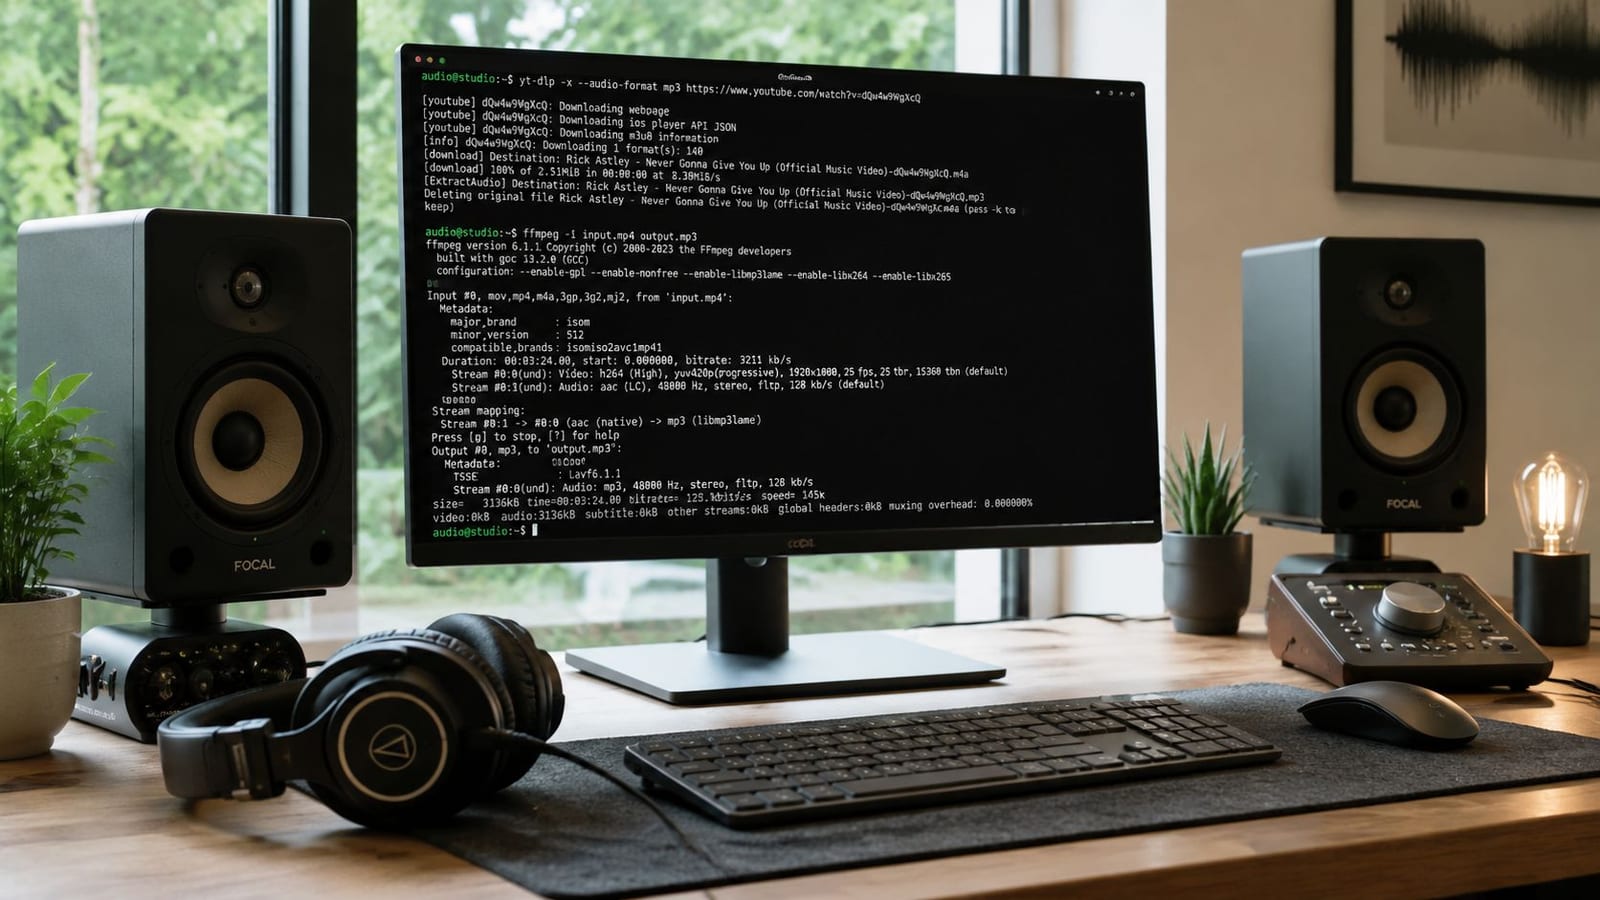
The Professional Toolkit Using FFmpeg and yt-dlp
If audio quality matters, this is the method that professionals keep coming back to. yt-dlp with FFmpeg gives you control over what you download and how you save it. It can grab the best available audio stream and remux it without re-encoding when that's possible, which is why it's widely treated as the practical best practice for high-quality extraction in this guide to extracting audio with yt-dlp and FFmpeg.
Why this method holds up
The difference is simple. Instead of sending your link to a mystery web service, you're pulling the available stream directly and processing it locally. That gives you more predictable results and fewer surprises.
There's also an important format detail that many people miss. If you choose MP3, you're creating a new lossy encode. If you save to WAV, you're using a lossless container for the extracted audio, which is usually the better choice when the file is headed into editing, restoration, or further processing.
For a creator, marketer, or podcaster, this matters because the extraction step affects everything afterward. Noise cleanup, EQ, clipping, and transcription all work better when you start from the cleanest practical source.
Commands worth keeping
If yt-dlp and FFmpeg are installed, these are the commands worth saving.
Extract the best available audio and convert to WAV for editing:
yt-dlp -x --audio-format wav "YOUTUBE_URL"Extract audio as MP3 for easy sharing or lightweight distribution:
yt-dlp -x --audio-format mp3 "YOUTUBE_URL"Download the best available audio stream without forcing a new lossy encode when a direct copy is possible:
yt-dlp -f ba "YOUTUBE_URL"Those commands are enough for most creators. The first is the safe default for post-production. The second is fine for quick publishing or handoff. The third is useful when you want the source stream as-is and plan to decide on format later.
Save a clean master first. Make delivery copies after. That one habit prevents a lot of avoidable quality loss.
How to inspect the available stream first
Before extracting, it helps to see what YouTube is serving.
Use:
yt-dlp -F "YOUTUBE_URL"That lists the available formats. When you inspect first, you stop guessing. You can see whether the audio stream is in M4A, WebM audio, or another format, then choose your next step with more confidence.
A short walkthrough can help if the command line is new to you:
A few practical habits make this setup far smoother:
- Verify the URL first: Broken or region-limited links waste time fast.
- Keep FFmpeg updated: If your conversion behaves oddly, outdated dependencies are often the reason.
- Name outputs intentionally: If you create multiple versions, use filenames that show whether the file is source audio, edit master, or delivery copy.
- Avoid repeated conversions: Don't make an MP3, then convert that MP3 again for another use.
This is the strongest sound extractor from YouTube for anyone who cares about control. It takes a few extra minutes to set up once. After that, it's often faster than wrestling with web tools that hide what they're doing.
The Browser-Only Method Using Developer Tools
Sometimes you need a cleaner method than a random converter, but you can't install software. That happens on locked-down work devices, temporary machines, or shared environments. In those cases, browser Developer Tools can act like a lightweight sound extractor from YouTube.
Why this method is useful
This approach gives you direct visibility into what the browser is loading. Instead of trusting a third-party converter, you're looking for the actual media requests made while the video plays.
That matters because you can often identify the audio stream itself, open it directly, and save it. It's more manual than yt-dlp, but it avoids many of the ad, malware, and permission problems tied to web converters and extensions.
It also teaches you something useful about the platform. You start seeing that the browser is already fetching separate media resources, and your job is to identify the right one.
How to capture the audio stream
The exact labels vary a bit between browsers, but the workflow is usually similar.
- Open the YouTube video and let it load.
- Open Developer Tools in your browser.
- Go to the Network tab.
- Filter for media requests. In some browsers, searching terms like
audio,m4a, orwebahelps. - Reload the page or resume playback so fresh requests appear.
- Look for a likely audio stream. Files often show up as media resources rather than obvious downloadable files.
- Open the request in a new tab if the browser allows it.
- Save the file from that direct media URL.
If the request list is noisy, pause the video, clear the network log, then play a few seconds again. That cuts down the clutter.
The cleanest browser-only result usually comes from saving the media stream itself, not recording system audio.
What to expect from the file
Most of the time, you won't get a polished MP3. You're more likely to save an M4A or WebM audio file. That's fine. In many workflows, that's better because you're closer to the original delivered stream.
A few practical notes help here:
- Don't expect perfect file names: Browser-loaded media often arrives with generic or cryptic names.
- Some streams expire: If the direct media URL stops working later, repeat the process from the page.
- Keep the original file before converting: If you need MP3 later, make that as a secondary copy.
- Check playback immediately: Some files need a player that handles the container correctly.
This method is a good middle ground. It's more hands-on than a converter site, but safer and usually cleaner. If you only need occasional extraction and want to avoid installing tools, it's a useful skill to have.
Understanding Audio Quality Formats and Bitrates
Most audio extraction mistakes happen after the download button, not before it. People see a format menu, choose the biggest number, and assume they've improved quality. That isn't how audio works.
The source sets the ceiling. For YouTube and YouTube Music, the upper bound for high-quality playback is 256 kbps AAC, as discussed in this codec bottleneck discussion. If you convert that into a 320 kbps MP3, you don't recover missing detail. You just create a larger file based on an already compressed source.
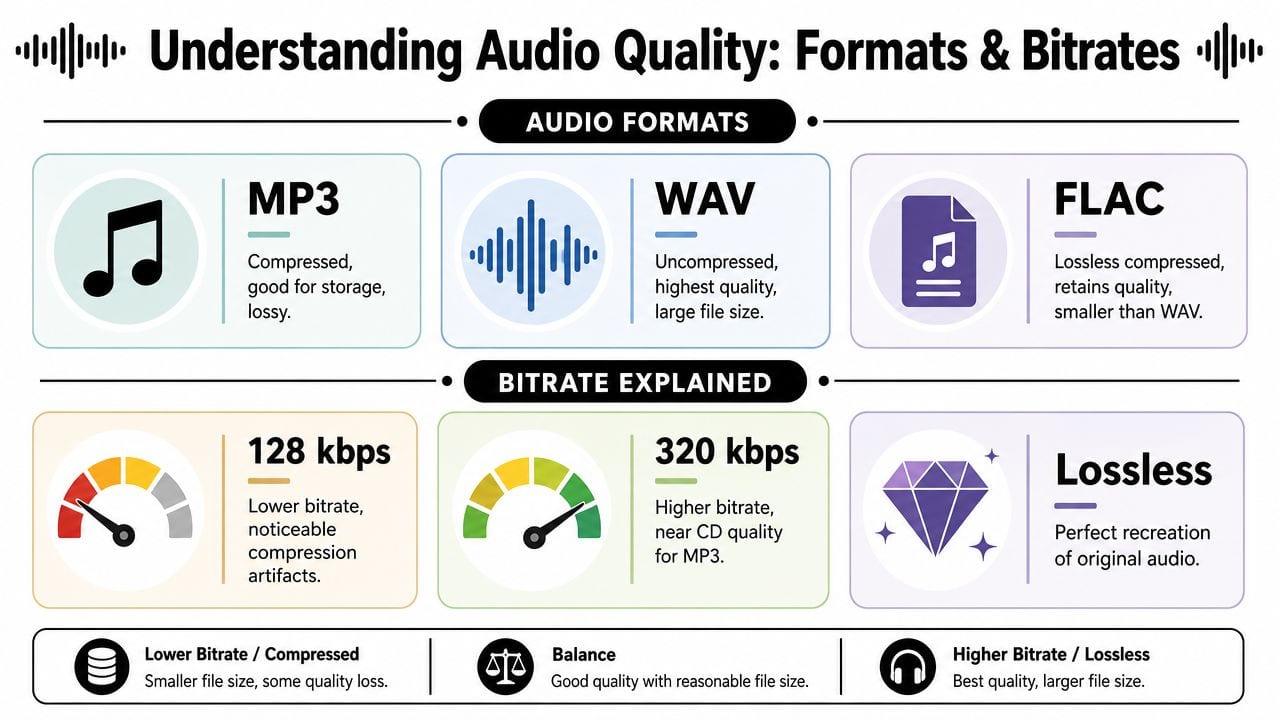
The ceiling comes from the source
The process is like exporting a screenshot of a screenshot. You can enlarge it, save it in a different format, or store it in a bigger file, but you can't restore detail that wasn't there.
That's why codec awareness matters. Every unnecessary conversion adds another chance for artifacts. Speech loses edge. High frequencies soften. Musical transients smear. If you plan to edit heavily, stem-separate, clean dialogue, or repurpose clips into polished content, preserving the original delivered stream matters more than chasing a higher output bitrate.
Which format to use and when
Each format has a practical role.
- AAC or M4A: Good when you want a compact file that stays close to what the platform likely delivered.
- MP3: Useful for compatibility and quick sharing, but it's a new lossy encode if you convert into it.
- WAV: Best for editing, restoration, and any workflow where you want a stable, lossless working container.
- FLAC: Useful in general audio workflows, though not always necessary for YouTube-sourced material.
Bigger files aren't automatically better files. Better handling beats bigger bitrate.
A simple decision table
| Goal | Format to keep | Why |
|---|---|---|
| Archive the extracted stream | Original delivered audio format | Keeps the source version intact |
| Edit in DAW or video editor | WAV | Avoids extra generation loss during work |
| Share quickly across devices | MP3 | Broad compatibility |
| Build a content library | Original plus WAV working copy | Clean source and clean edit path |
A practical workflow is simple. Keep the original extracted stream. Make a WAV if you're editing. Export MP3 only when distribution or compatibility calls for it.
That mindset changes how you choose a sound extractor from YouTube. You stop asking, “How do I get an MP3 fast?” and start asking, “What file should I preserve so the next step doesn't suffer?”
From Extraction to Content The Ethical Repurposing Workflow
A lot of creators think in single outputs. Download the audio, clip a moment, post it, move on. That works for a while, but it leaves value on the table and creates avoidable legal risk.
Modern extraction workflows can go beyond audio alone. Some tools now pull transcripts in 156 languages along with metadata such as titles, tags, views, likes, and engagement details, which turns one source video into a much broader content package, as described in this overview of YouTube downloader extraction outputs.
Think in content packages, not files
One YouTube URL can support several assets if you handle it well:
- Raw audio for editing: Pull your clean working file first.
- Transcript for written content: Turn spoken material into show notes, summaries, or quote posts.
- Metadata for context: Useful when organizing content libraries and comparing topics.
- Short clips for distribution: The clip itself is rarely the end of the workflow.
If your next step is social distribution, it helps to study real strategies for social media video so the extracted audio becomes part of a broader repurposing system rather than a random download habit.
The legal line creators shouldn't ignore
The safest rule is simple. Extract from your own content or from content you have clear permission to use.
That matters more than any technical trick. Copyright, platform rules, and fair use questions don't disappear just because a tool made downloading easy. If you're a business, agency, educator, or brand, “I found it on YouTube” isn't a rights strategy.
A sustainable workflow protects quality and protects your operation. It keeps your team away from shady tools, unclear permissions, and content reuse that could create platform or legal problems later.
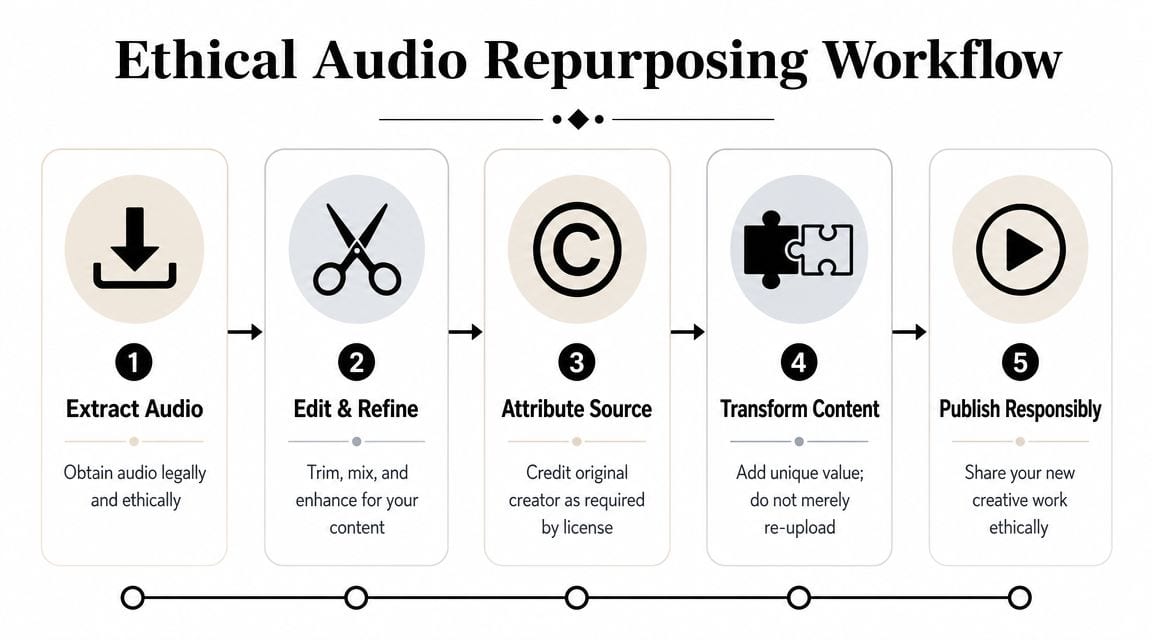
A practical repurposing path
The cleanest version of this workflow looks like this:
- Extract the audio with the least destructive method available.
- Create a working edit file if the clip needs cleanup, trimming, or mixing.
- Pull transcript and notes so the spoken content can power text assets too.
- Transform the material into clips, captions, or educational snippets with new context.
- Publish only when the rights are clear.
If your goal is turning YouTube-derived source material into short vertical content, this guide to tools that convert YouTube videos to Instagram Reels is a useful next step.
quso.ai fits into this stage as a repurposing option rather than an extraction utility. It can help turn long videos into short clips, add subtitles, and support scheduling once you already have content you're allowed to use.
If you already have long videos, webinars, interviews, or lessons that deserve more than a single upload, quso.ai can help you turn them into clips, captions, and publish-ready social content from one workflow.