Subtitles for Premiere Pro: A Complete Workflow Guide
Part of the AI Social Captions guide →
You've finished the cut. The pacing works, the audio is cleaned up, and the export is almost ready. Then the last annoying job shows up. Subtitles.
The process of managing subtitles often slows down Premiere Pro workflows. Not because subtitles are hard, but because the wrong method turns a simple delivery step into manual cleanup, timing fixes, and exports that break the moment you post to a different platform. For some projects, Premiere's native tools are exactly what you want. For others, they're only good enough to get a draft on the timeline.
Accessibility is part of the job, but so is speed. If you need a broader foundation for captioning standards and accessibility decisions, this full guide for accessible videos is a useful companion to the editing workflow covered here.
Table of Contents
- Why Your Subtitle Workflow Matters
- Manual work is still the cleanest option for sensitive edits
- Premiere's built-in transcription is the default for most editors
- External AI tools are for volume and social-first production
- Start with the transcript, not the caption track
- Build the caption track with readable defaults
- Fix the transcript before you style anything
- What works well inside Premiere
- Use style choices that survive real playback
- Save a text style before you touch the next project
- Know when manual overrides are worth it
- Choose sidecar or burned-in on purpose
- Platform-safe placement matters more than most editors expect
- A practical export checklist
- Small Premiere habits that save time every week
- When staying in Premiere stops being efficient
- Where external AI tools fit
Why Your Subtitle Workflow Matters
Subtitles are one of those tasks that look small until they interrupt delivery. If you pick the wrong workflow, you end up doing the same work twice. First in Premiere, then again after upload when the captions are too low, too long, or just wrong for the platform.
There are really three ways most editors handle subtitles for Premiere Pro. You can type them manually for maximum control. You can use Premiere Pro's built-in transcription and turn that into captions. Or you can use an external AI workflow when the primary task isn't just captioning, but turning one video into a batch of social-ready clips.
Each path solves a different problem.
Manual captioning makes sense when wording has to be exact, timing has to be deliberate, or a client already approved the text. Premiere's built-in tools are the practical middle ground. They're fast enough for most interviews, tutorials, podcasts, and talking-head edits. External AI tools make more sense when speed, clipping, formatting, and social distribution matter more than frame-level editorial control.
Practical rule: Don't choose your subtitle method based on what Premiere can do. Choose it based on what the final deliverable needs.
That's the difference between a clean workflow and a frustrating one. Good subtitles aren't just accurate. They fit the edit, survive export, and stay readable where people watch.
Choosing Your Premiere Pro Subtitle Method
Before opening the Text panel, decide what kind of project you're finishing. A short corporate interview, a YouTube tutorial, a podcast cutdown, and a vertical Reel don't need the same subtitle process. Editors lose time when they treat them like they do.
Some jobs need control. Some need speed. Some need both, but not inside the same tool.
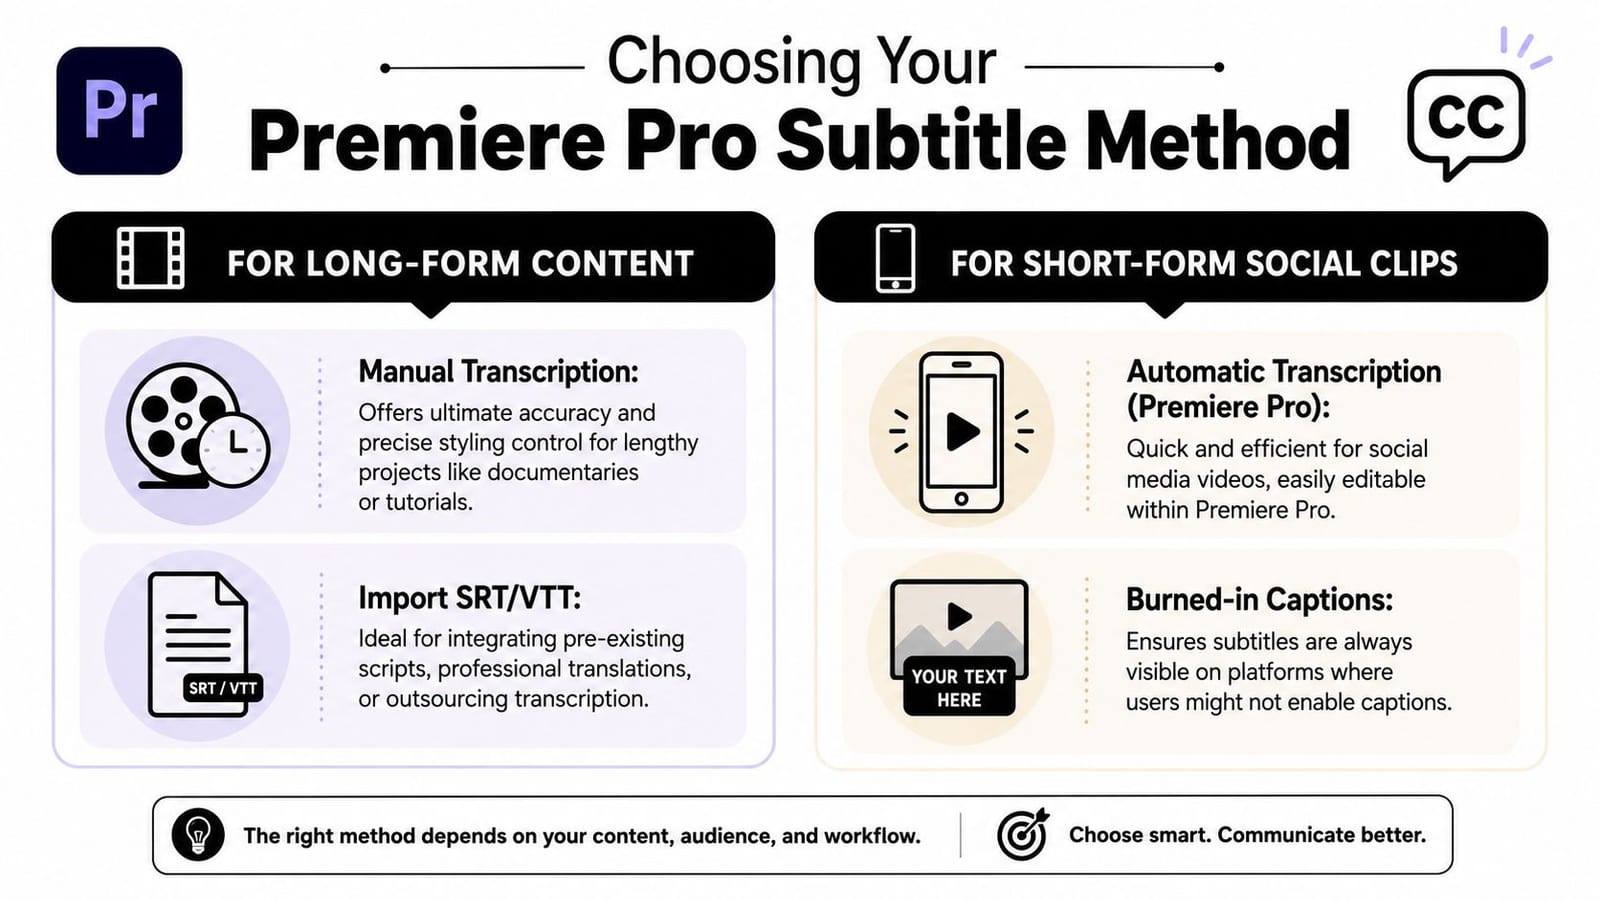
Manual work is still the cleanest option for sensitive edits
If you're cutting legal, medical, educational, or client-reviewed material, manual entry or importing an approved subtitle file is still the safest route. It's slower, but there's no guessing about terminology, names, or phrasing. You also avoid the common problem where auto-transcription gets close enough to look right until someone important notices a mistake.
This method is also useful when a producer sends approved wording in advance. In that case, generating fresh text inside Premiere usually creates extra cleanup instead of saving time.
Premiere's built-in transcription is the default for most editors
Premiere Pro works well when you need a reliable middle path. Adobe builds the workflow around the Captions and Graphics workspace and the Create captions from transcript tool, so you can generate text, convert it to captions, and adjust how long each caption stays on screen inside the same edit environment, as documented in Adobe's caption workflow for Premiere Pro.
That matters because timing is usually where rushed subtitle work falls apart. Auto-generation is only half the job. Readability comes from how those captions break, how long they stay up, and how much cleanup you do afterward.
External AI tools are for volume and social-first production
If your actual workload is cutting clips for TikTok, Reels, Shorts, and YouTube from one long source, Premiere starts to feel like the slower option. It can do the job. It just isn't built around fast social iteration the way dedicated AI repurposing tools are.
Here's the quick decision view.
| Method | Best For | Speed | Accuracy | Cost |
|---|---|---|---|---|
| Manual captioning | Approved scripts, sensitive topics, exact wording | Slow | High with careful review | Labor-heavy |
| Premiere Pro automatic transcription | Interviews, tutorials, podcasts, standard edits | Medium to fast | Good after editor cleanup | Included in existing Premiere workflow |
| External AI subtitle tools | Social clips, repurposing, fast turnaround | Fast | Varies, still needs review | Additional tool cost |
If you're already in Premiere and only need one polished deliverable, stay there. If you need many social outputs from one source video, speed usually matters more than staying native.
Using Premiere Pro's Automatic Transcription
Premiere's automatic transcription is the fastest native workflow when the audio is usable and you want captions that stay editable. For most editors, this is the practical starting point. It's quicker than typing everything by hand and gives you more control than burning in text from an outside app without review.
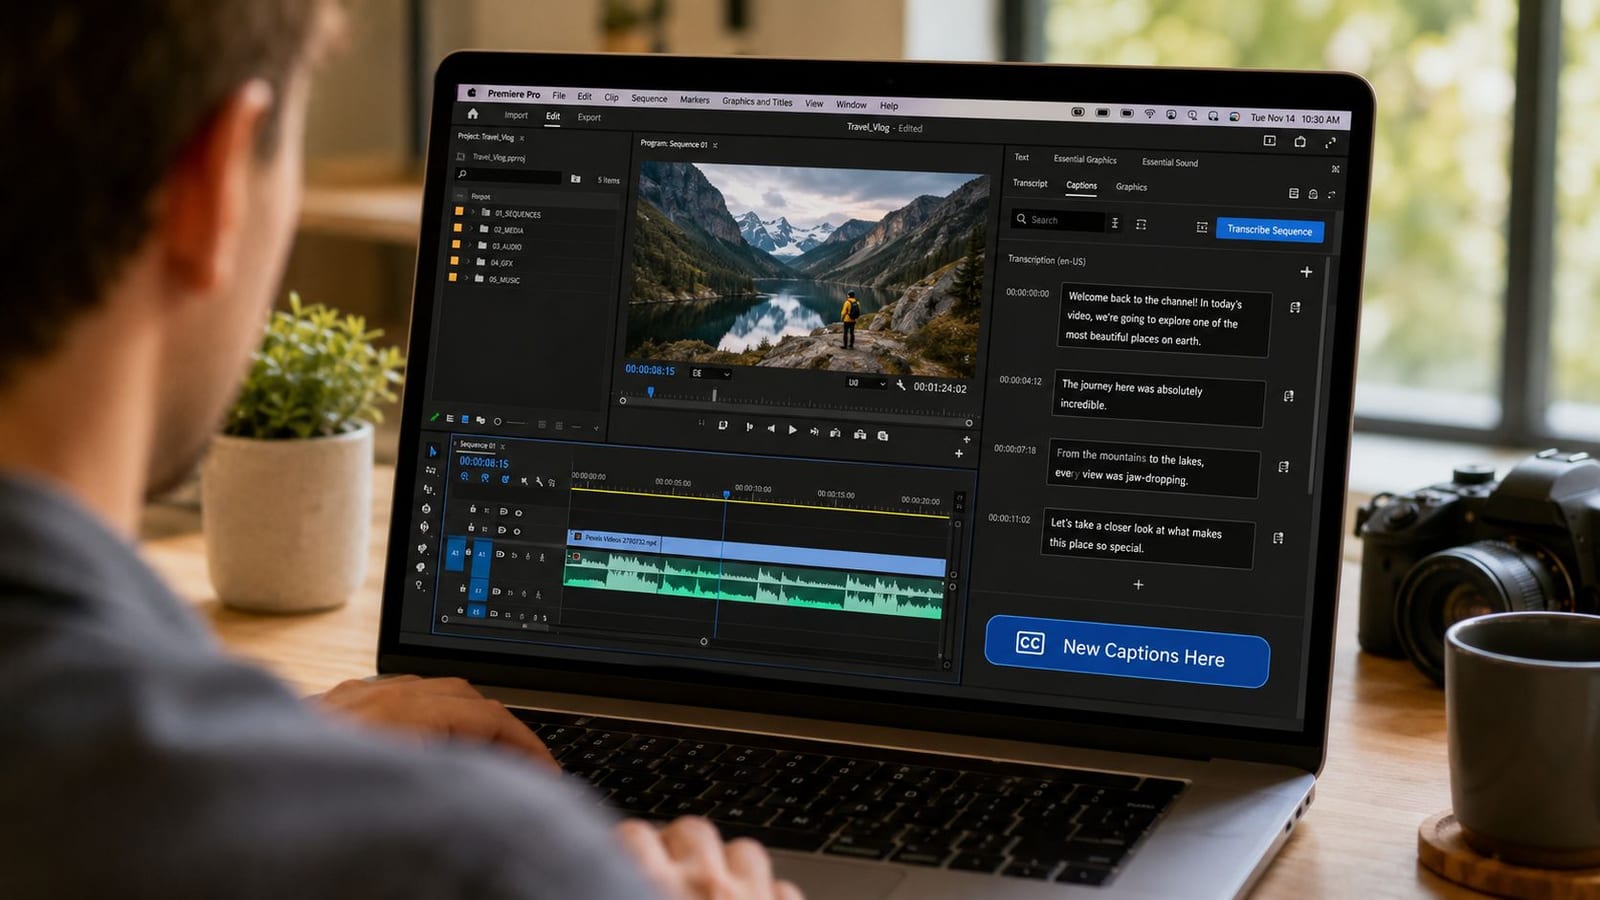
Start with the transcript, not the caption track
Adobe explicitly recommends using Automatic Transcription during import so the transcript is ready immediately in the Captions and Graphics workspace. That's the right habit. If the transcript exists as soon as your footage lands in the project, you avoid waiting until the end of the edit to discover language issues, speaker confusion, or bad line breaks.
The clean workflow looks like this:
Import your footage with transcription in mind
If you have the option during import, let Premiere generate the transcript early.Open the Text panel
This is the control center for transcript review and caption generation.Review the transcript before creating captions
Fix obvious proper nouns, product names, and repeated errors first.Use Create captions from transcript
This converts the transcript into a caption track on the timeline.Refine timing, not just words
Adobe lets you adjust length, duration, and gaps between captions, which is why the workflow is useful. It isn't just auto-captioning. It's editable caption timing built into the edit process.
A lot of editors rush from transcript to timeline. That's where the avoidable mess starts.
Build the caption track with readable defaults
When you create captions from the transcript, Premiere asks you to make decisions that affect readability far more than font choice does. Line length, duration, and spacing between captions all shape whether subtitles feel natural or feel machine-made.
Use shorter chunks than you think you need. Long lines often look acceptable in the Program Monitor and then feel cramped on a phone. Keep breaks around natural speech units. If someone delivers a long sentence, it usually reads better as two caption events than one dense block.
Don't optimize captions for your desktop preview. Optimize them for the smallest screen that will matter.
If you want a transcript-first workflow outside Premiere for roughing in dialogue before the edit, tools like video transcription workflows can be useful upstream. The key is still the same. Review the text before you commit to styling or export.
Fix the transcript before you style anything
Once the caption track exists, stay in correction mode for a bit. Don't start changing fonts and colors yet. That's where people waste time polishing text that still has errors.
Look for these first:
- Names and brand terms that auto-transcription tends to mishear
- Speaker switches that need cleaner breaks
- Filler-heavy lines that may read poorly even if they're technically accurate
- Captions that land late because the transcript grouped too much speech together
For interview edits, I usually trim captions slightly tighter than the first draft generates, especially when speakers pause mid-thought. For educational videos, I keep wording cleaner and more stable so the subtitle reads like a polished sentence instead of a verbatim transcript.
A quick visual walkthrough helps if you haven't used the panel recently.
What works well inside Premiere
Premiere's native system is strong when you need these things at the same time:
- Timeline context so you can adjust captions while watching the actual cut
- Editable timing rather than one-click caption generation with no finesse
- Simple export paths when the subtitle work stays tied to the edit
- One-project consistency across a full video or episode
What doesn't work as well is high-volume social production where every clip needs a slightly different format, framing, and caption treatment. Premiere can still do it, but you'll feel the friction fast.
Styling and Customizing Captions for Impact
Once the text is correct, styling decides whether viewers can use it. The default look in Premiere is serviceable, but “serviceable” isn't the same as readable over mixed footage, lower thirds, jump cuts, and bright backgrounds.
Captions should look deliberate. Not decorative.
Use style choices that survive real playback
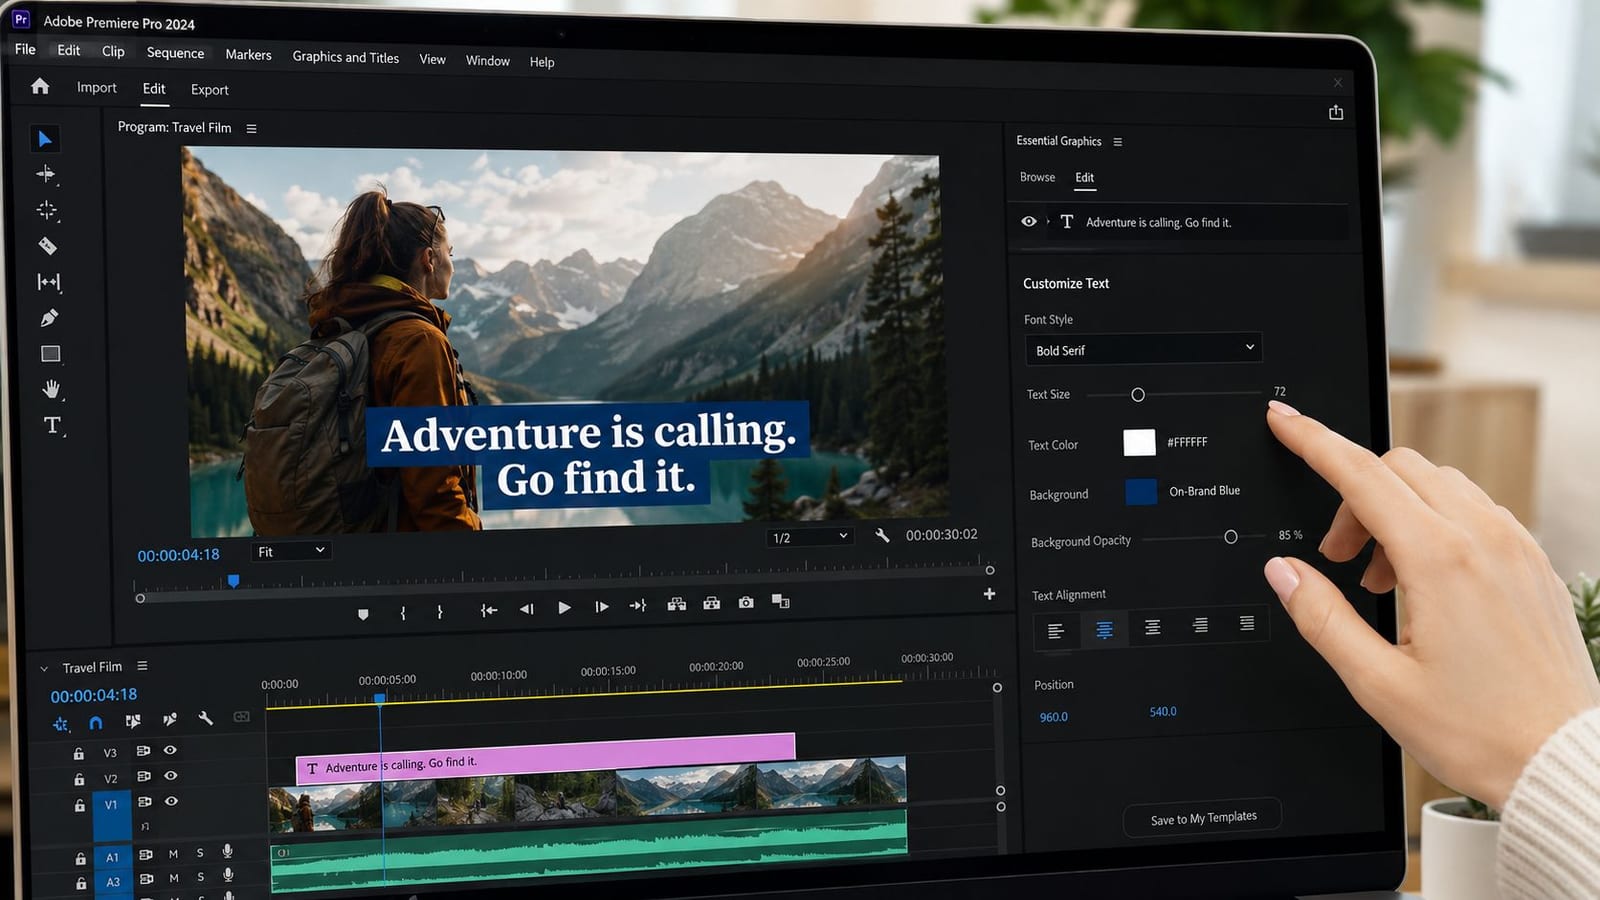
Inside Premiere, the Essential Graphics controls are where you make your subtitles usable. Start with readability before brand styling.
A few settings usually matter most:
Font choice
Use a clean sans-serif. If the font looks stylish but gets muddy over footage, it's the wrong font for subtitles.Contrast
White text alone often disappears on bright shots. A background box, shadow, or stroke usually holds up better.Size
If it feels slightly large on desktop, it often feels correct on mobile.Position
Bottom-center is standard, but not if your video already has lower thirds, speaker names, or product callouts there.
You can also adjust subtitle appearance with tools discussed in this guide to adding text to video, especially if you're comparing native editing controls with more template-driven workflows.
Plain captions that stay readable beat stylish captions that disappear into the shot.
Save a text style before you touch the next project
This is one of the easiest time savers in Premiere, and a lot of editors skip it. If you land on a subtitle look you like, save it as a reusable Text Style. That way you're not rebuilding the same font, color, background, and positioning decisions on every project.
This matters even more if you handle recurring content like podcasts, webinars, courses, or client series. One saved style keeps subtitles consistent across episodes and speeds up revisions when a client wants a global change.
A good saved style usually includes:
| Element | Good default |
|---|---|
| Font | Clean sans-serif |
| Fill | High-contrast color |
| Background or stroke | Added for mixed footage |
| Position | Raised enough to avoid lower graphics |
| Alignment | Consistent across every caption |
Know when manual overrides are worth it
Global styling should do most of the work. Manual changes should be rare.
Use overrides when one caption needs a different position because a lower third is already in place, or when you need one emphasized word for a social clip. Don't use overrides just because you can. Random styling changes make subtitles feel inconsistent and amateur.
A strong subtitle system is boring in the right way. It stays clear, predictable, and easy to follow while the edit does the interesting work.
Exporting for YouTube, Instagram, and TikTok
Subtitles that look fine in Premiere can still fail at delivery. That usually happens at export, not creation. The file type is wrong, the captions are too low for mobile UI, or the project was built for one frame shape and then pushed into another.
That's why export decisions should be tied to the platform, not just your editing habit.
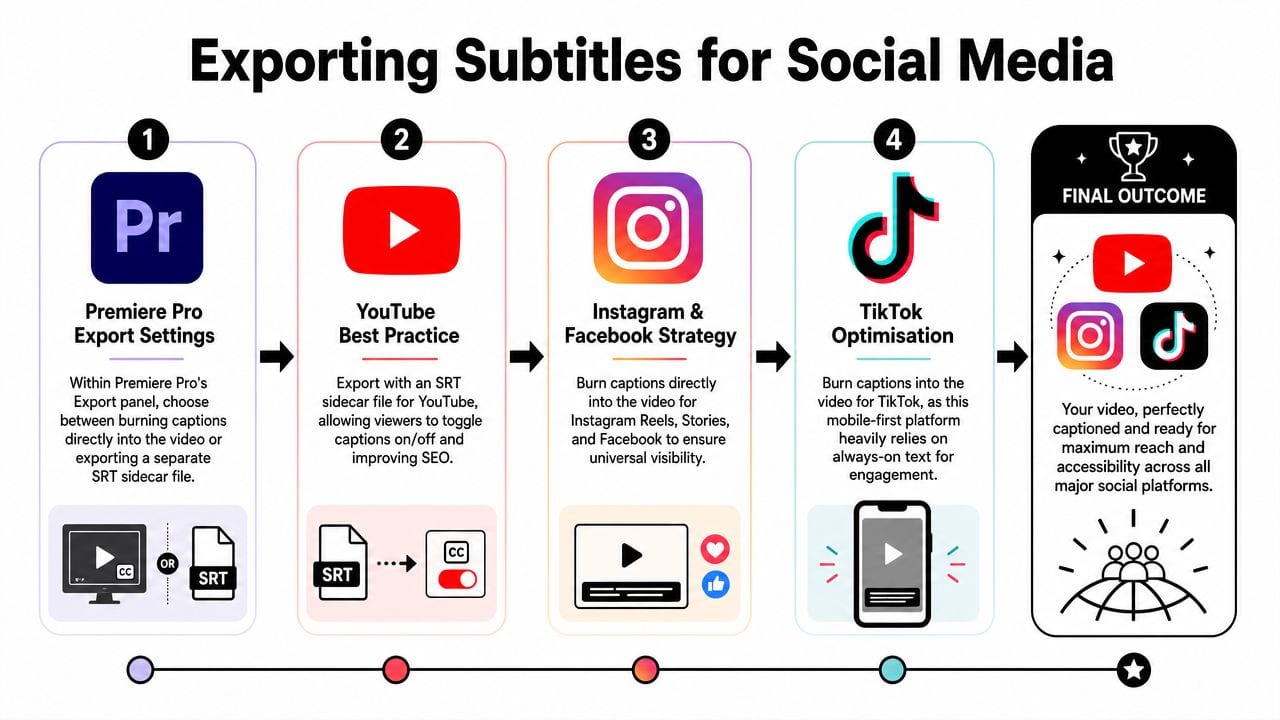
Choose sidecar or burned-in on purpose
Premiere Pro subtitles are commonly exported as SRT files. In practice, editors transcribe in Premiere, convert the transcript into captions, and then export the subtitle track for use on other platforms. The captions track appears as a separate orange subtitle lane and can be exported directly as an SRT for upload elsewhere, as shown in this Premiere Pro subtitle export walkthrough.
That gives you two practical delivery paths.
Use SRT sidecar files when:
- YouTube or another platform supports uploaded captions
- You want captions viewers can toggle on and off
- You may need to revise text later without re-exporting the video
Use burned-in captions when:
- The platform is social-first and mobile-first
- You need predictable visibility in the feed
- You don't want to rely on platform caption behavior
For long-form YouTube, SRT is usually cleaner. For short-form social, burned-in is usually safer.
Platform-safe placement matters more than most editors expect
A frequently missed problem with subtitles for Premiere Pro is platform-safe placement. Adobe's consumer-facing subtitle guidance notes that U.S. adults spend more than 60% of their digital video viewing time on mobile devices in its subtitle overview for video creators. That changes how you should place and break captions.
On mobile, subtitles compete with platform UI, captions, usernames, call-to-action overlays, and progress bars. The usual bottom-center position can become unreadable fast, especially in vertical formats.
Good subtitle placement is part of distribution, not just editing.
If you're posting the same content across YouTube, Shorts, Reels, and TikTok, build for the most restrictive viewing environment first. That usually means shorter lines, more vertical breathing room, and captions positioned higher than a traditional broadcast-style layout.
A practical export checklist
Before final export, check these five things:
Read a full minute without audio
If the subtitles feel rushed, the timing needs work.Preview on a phone
Desktop playback hides a lot of spacing problems.Check vertical crops separately
A 16:9 subtitle position often won't survive a 9:16 version.Decide whether the viewer needs control
If yes, export an SRT workflow. If no, burn the captions in.Spot-check the platform upload
Don't assume what looked correct in Premiere will display the same way after posting.
A subtitle workflow only counts as finished when the text survives real playback.
Workflow Optimization Shortcuts and AI Tools
Editors don't usually need a more complicated subtitle workflow. They need fewer repeated actions.
The first gains come from simple habits inside Premiere. Keep the Text panel open while reviewing dialogue. Fix repeated transcript errors in batches instead of one by one. Save text styles. Duplicate sequences for platform versions instead of restyling the original repeatedly. Those aren't flashy tricks, but they remove a lot of friction.
Small Premiere habits that save time every week
The most useful shortcut is procedural, not keyboard-based. Keep subtitle work in this order:
- Correct transcript
- Create captions
- Fix timing
- Apply global style
- Handle exceptions
- Export
Editors who reverse that order usually restyle captions they later split, trim, or rewrite.
Another useful habit is deciding early whether the project needs a sidecar file. If it does, keep your wording cleaner and avoid visual choices that only matter for burned-in text. Since Premiere commonly exports subtitles as SRT for use on other platforms, it helps to treat the caption lane as a delivery asset, not just a visual overlay.
When staying in Premiere stops being efficient
Premiere is strong when one editor is finishing one polished piece. It gets less efficient when the primary assignment is content repurposing.
If you're cutting a webinar into multiple Shorts, or a podcast into a week of social clips, the bottleneck isn't just subtitle generation. It's clipping, reframing, subtitle styling for vertical formats, export variation, and scheduling pressure. That's where native editing can turn into a lot of repetitive labor.
For teams thinking through how viewers react to on-screen text in promotional content, examples like Armele 2025 on Testimonial are useful as a reminder that subtitle presentation affects perceived polish, even when the underlying video is simple.
Where external AI tools fit
An external workflow becomes the sensible approach. If your job is social distribution, not just timeline finishing, tools built for AI clipping and subtitle generation are often the smarter move. One example is quso.ai's AI subtitle generator, which is designed around creating and styling subtitles for social-ready outputs rather than only editing them inside a traditional NLE.
That doesn't replace Premiere for detailed finishing. It changes where you do the repetitive part.
Use Premiere when you need editorial precision, controlled revisions, and direct timeline access. Bypass it when you need fast turnarounds across multiple short clips and the subtitle task is tied to broader social production.
If your subtitle workflow keeps turning into cleanup, reformatting, and extra exports, quso.ai is worth considering for the social side of the job. It fits best when you're repurposing long videos into short clips, need captions generated quickly, and want a faster path from source footage to publish-ready content.