Uploading a video to YouTube can seem daunting, but it's a straightforward process once you know the steps. This guide will walk you through the process of how to upload a video to YouTube, whether you're using a computer, phone, or tablet. We’ll also cover some tips to make sure your video gets noticed and stops the scroll!
How to Upload a Video to YouTube?
Step 1: Select Your Video
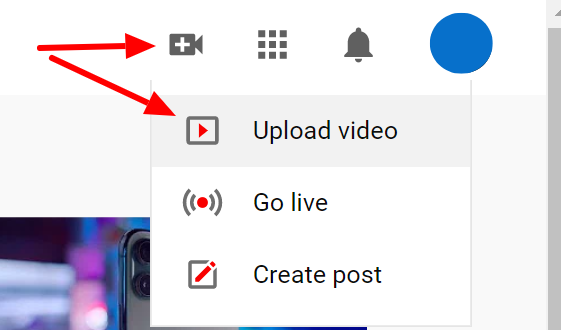
To upload video to YouTube, first, go to YouTube or studio.youtube.com and log in to your account. Click the “Create” button (a camera icon with a plus sign) at the top right corner and select “Upload a video.” Choose your video file from your library or drag and drop it from your desktop.
Tips for Selecting Files
- File Format: Ensure your video is in a supported format.
- File Size: Keep your video file size manageable to avoid long upload times.
- Resolution: Higher resolutions like 1080p or 4K offer better viewing experiences.
Step 2: Add Video Details
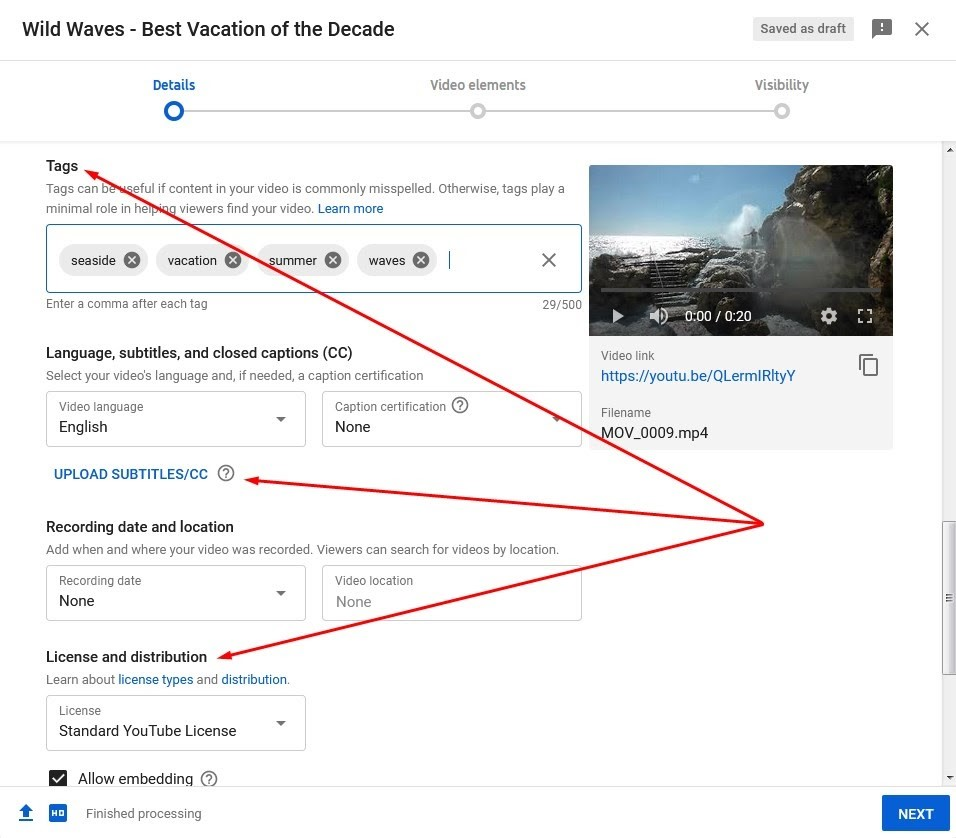
Fill in the video title, description, and tags. This information helps viewers find your video through search.
Optimizing Video Details
- Title: Create a compelling and accurate title.
- Description: Write a detailed description including key points from your video.
- Tags: Use relevant keywords to improve searchability.
Step 3: Choose a Thumbnail
Select or upload a custom thumbnail that represents your video well. Thumbnails are the first thing viewers see and can greatly impact your video’s click-through rate.
Customize Thumbnails
- High Quality: Use clear, high-resolution images.
- Text Overlay: Add concise, readable text to enhance the thumbnail.
Step 4: Set Video Preferences
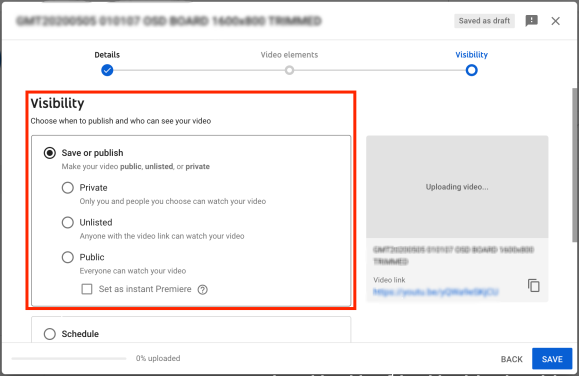
Choose your video's visibility settings. You can set it to public, private, or unlisted depending on your preference. You can also schedule your video to go live at a specific time.
Step 5: Add End Screens and Cards
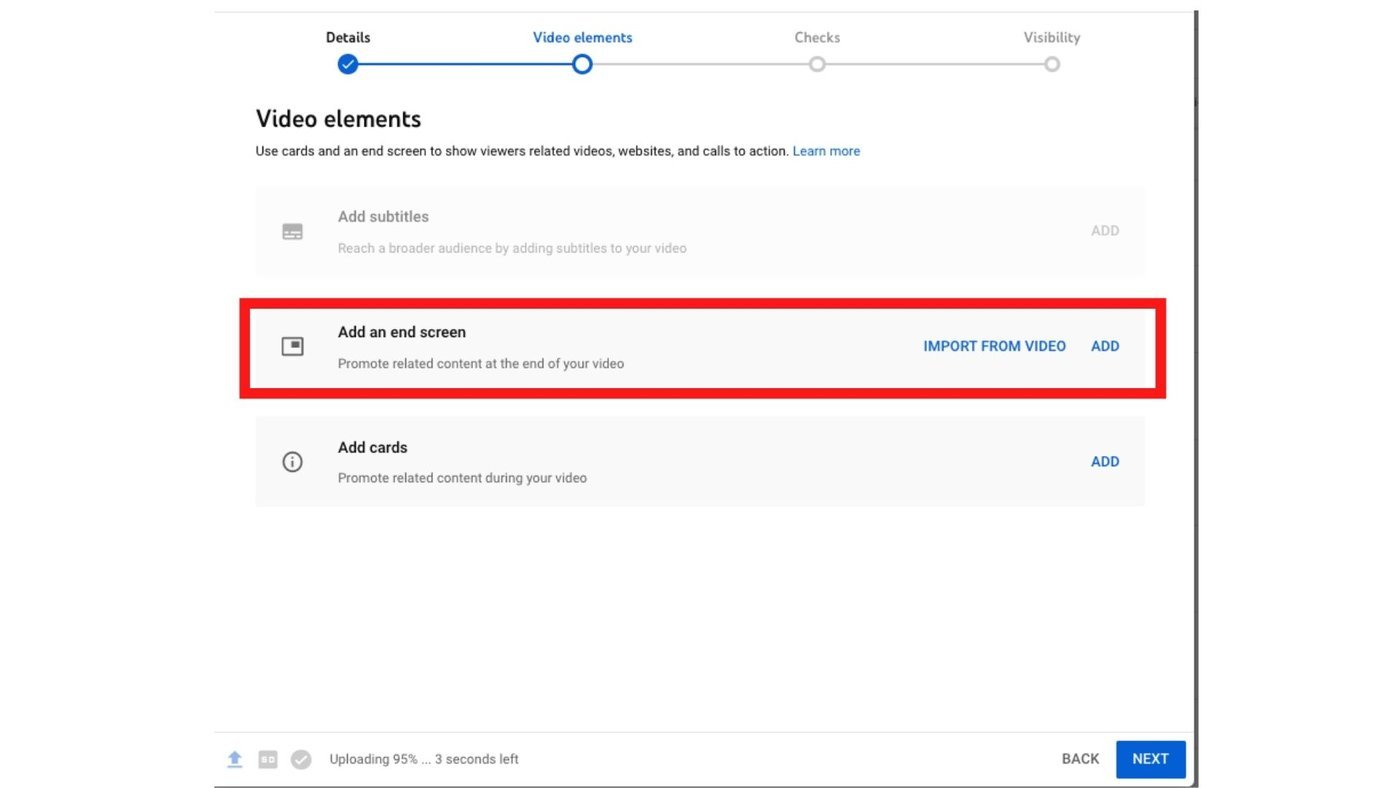
End screens and cards are interactive elements that can promote other content, encourage subscriptions, or direct viewers to external websites.
Using End Screens and Cards
- Promote Content: Suggest other videos or playlists.
- Encourage Subscriptions: Add a subscribe button.
- External Links: Direct viewers to your website or social media.
Step 6: Publish Your Video
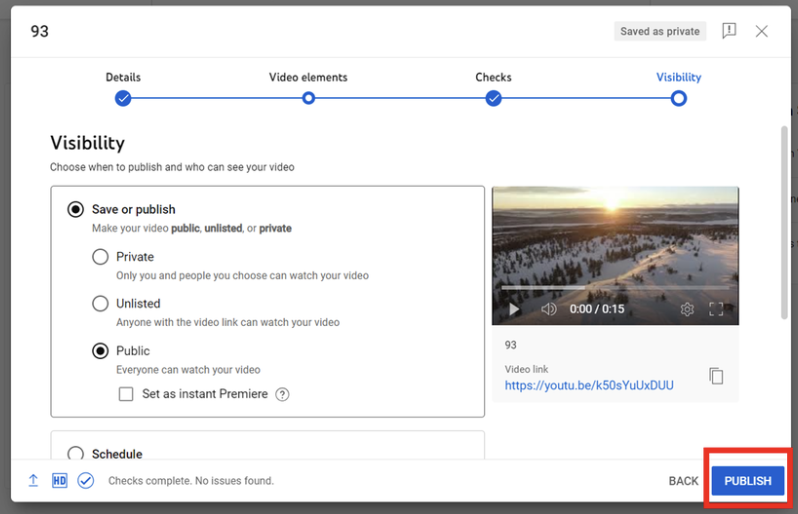
Once all details are filled in, click "Publish" to make your video live. If you schedule it, it will go live at the set time.
💡Related read: How 2024 YouTube Algorithm Works & 25 Tips for Optimization
How to Upload a Video to YouTube With quso.ai?
Uploading and editing videos on quso.ai is a streamlined process that allows you to generate micro-content efficiently. Here’s a comprehensive guide to help you navigate the process:
Step 1: Choose Your Video
To begin, decide which video you want to upload. You have two options:
- YouTube Video: If your video is already on YouTube, you can import it directly.
- Local File: If your video is stored on your computer, you can upload it from there. some text
- Supported files: mp4, m4v, mov, webm
- Size limit: 5 GB (free plan), 15 GB (paid plan)
Step 2: Select Video Formats
quso.ai allows you to auto-resize your video based on where you plan to post it. Choose from the following formats:
- Portrait: Ideal for TikTok, Instagram Stories, or Reels.
- Square: Suitable for Facebook, Instagram, or LinkedIn posts.
- Landscape: Best for posting longer video chapters.
In our example, we will select both Portrait and Square formats. quso.ai allows you to instantly resize your video or crop a video using AI, reducing time and effort by 2x!
Step 3: Choose Your Templates
Templates in quso.ai define the look and feel of your video. You need to select at least three YouTube templates for each format you’ve chosen. This helps ensure that you get a variety of outputs that match your desired style. Templates can be adjusted later if needed.
Step 4: Add Social Media Handles
You can schedule your YouTube video in one click by adding your social media handle. This feature allows you to include call-outs for your other social channels like Instagram, LinkedIn, and TikTok profiles too directly in your video. Enter your handles in the provided fields and click "Done."
Step 5: Upload and Process
Once you’ve completed the above steps, your video is ready for upload. Click the upload button, and your video will begin processing. Processing time usually ranges between 20-30% of the video’s length as quso.ai applies its editing magic.
Additional Tips
- Save Preferences: To save time on future uploads, you can save your settings so that you don’t have to re-enter them each time.
- Review and Edit: After processing, return to the dashboard to review your video. You can make further adjustments or create custom clips if needed.
💡Related read: Create Shorts with quso.ai's Youtube Clip Maker Now
Importing YouTube Videos
If you prefer to import a video from YouTube:
- Start a New Project: On the homepage or dashboard, click “New Project.”
- Import Link: Copy the YouTube link of your video and click “Import.”
- Select Language: quso.ai automatically selects English captions, but you can change this if your video is in a different language like Spanish, French or German.
- Generate Clips: Click “Generate Clips” to start processing.
- Answer Onboarding Questions: Answer a few onboarding questions like content type (podcast, webinar, livestream or speech), video details (Zoom recordings, screen sharing, single cam or multi cam), number of speakers (1, 2, 3, 4, 5 or more than 5) and keyword indexation to help quso.ai understand your preferences and needs.
Once processing is complete, your video will appear in the project list. Click on it to review and finalize your clips. With these steps, you can easily upload, edit, and schedule your YouTube videos using quso.ai.
💡Related read: quso.ai Helps Founder Gain 180K YouTube Subscribers in 90 Days
How to Upload a Video to YouTube from Your Phone?
Using the YouTube App
Step 1: Open the YouTube App
Log in to your account through the YouTube app.
Step 2: Select Your Video Type
Tap the “+” button at the bottom center of the screen. Choose “Upload video” and select your video from your library. If you want to know how to upload a video to YouTube as a short, tap “Create a short” instead.
Step 3: Add Descriptions
Fill in your video’s title, YouTube descriptions, and other details. Select your privacy settings and tap “Upload” to share your video.
💡Related read: The Best Time to Post on YouTube in USA Revealed [+ Guide]
How to Upload a Video to YouTube from a Computer?
Step-by-Step Instructions
- Log in to YouTube Studio: Access YouTube Studio and log in to your account.
- Upload Your Video: Click “Create” and then “Upload videos.” Select your video file.
- Add Details: Enter your video’s title, description, YouTube tags, and select a thumbnail.
- Adjust Settings: Choose your privacy settings and schedule, then click “Save.”
💡Related read: 10 Best Peer-Tested and Reviewed YouTube Video Editors in 2024
How to Upload a Video to YouTube from Different Devices?
From iPhone
Open the YouTube app, click the “+” icon, and select “Upload video.” Choose your video, add details, and tap “Upload.”
From iPad
Similar to the process on a phone, open the YouTube app, select your video, add necessary details, and upload.
From Android Phone
Follow the same steps as uploading from an iPhone.
💡Related read: How to Build a Community on YouTube in 10 Easy Steps
5 Tips for Uploading a Video to YouTube
1. Check Video Specifications
Ensure your video meets YouTube’s requirements: a maximum file size of 256GB, MP4 format, and a 16:9 aspect ratio. Using quso.ai, you can convert and optimize your videos to fit these specifications automatically.
2. Use Keywords
Incorporate relevant keywords into your video title and description to enhance discoverability. Tools like quso.ai's AI caption generator can help identify high-impact keywords and integrate them seamlessly into your content.
3. Add Titles and Descriptions
Craft a detailed and engaging title and description for your video. This not only aids in searchability but also boosts viewer engagement. quso.ai's AI content assistant, Viddy, and AI YouTube description generator can assist in refining your titles and descriptions respectively for maximum impact.
4. Use the Right Frame Rate
Choose a frame rate between 24 and 60 FPS, depending on your content type. According to BLARE Media,
- Cinematic and Artistic Content: If your video aims to create a cinematic or artistic effect, stick with 24 FPS. This frame rate gives your content a classic film look, enhancing its visual appeal and emotional impact.
- Educational and Tutorial Videos: For instructional videos, tutorials, or general informational content, 30 FPS provides a balance between smooth motion and file size, ensuring viewers can follow along comfortably without distractions.
- Sports, Gaming, and High-Speed Action: To capture fast movements and provide a more immersive experience, opt for 60 FPS. This frame rate minimizes motion blur and offers a fluid visual experience, making it perfect for high-energy and action-oriented content.
5. Follow Community Guidelines
Make sure your content complies with YouTube’s community guidelines to avoid removal. quso.ai's editing tools can help you review and adjust your video content to meet these standards.
💡Related read: YouTube Channel Ideas That Can Make you Millions in 2024
5 Best Practices for Posting a Video on YouTube
1. Write an Engaging Title
Create a title that captures attention and clearly describes the video’s content. Use Viddy to test different title variations and see which one performs best.
2. Add Relevant Tags
YouTube tags help categorize your video and suggest it to the right audience. Use quso.ai's AI YouTube video tags generator to auto-generate tag suggestions based on your video’s content.
3. Add Subtitles for Accessibility
Adding subtitles not only improves accessibility but also boosts SEO. With quso.ai, you can add accurate subtitles to your videos effortlessly.
4. Use an End Screen and Cards
Enhance viewer engagement by adding end screens and cards to promote other videos and encourage subscriptions. quso.ai's AI video editor can help you incorporate a stock or custom outro effortlessly!
5. Categorize Your Video Appropriately
Choose a category that best matches your video’s theme to help YouTube recommend it to the right viewers.
💡Related read: How to Build a Community on Youtube in 10 Easy Steps
Takeaway
But you don’t have to take our word for it. Hear from people who are already using quso.ai.
- “Uploading videos to YouTube has never been easier with quso.ai's tools. Streamline your content creation process and get your videos online faster than ever.” – Roderick Jefferson, CEO at Roderick Jefferson & Associates
- “quso.ai makes video editing and uploading a seamless experience, helping creators focus more on their content and less on the technicalities.” – Jo Blackwell, Founder, The Midlife Movement Ltd
By following these steps and leveraging the right tools, you can upload and optimize your YouTube videos with ease. Try quso.ai today to enhance your video quality, improve your reach, and achieve better results on YouTube. Happy uploading!


.png)

